8.2. 
howdy_email_gui
This is documentation for the Howdy one-off and newslettering email announcement GUI, howdy_email_gui. The help output, when running howdy_email_notif -h, produces the following output,
usage: howdy_email_gui [-h] [--info] [--local] [--large] [--noverify]
                       [--extraemails EXTRAEMAILS] [--extranames EXTRANAMES]
                       {n,o} ...

positional arguments:
  {n,o}                 Choose one of two options: (o) do only the email. (n)
                        do the newslettering functionality.
    n                   Do the newsletter one.
    o                   Only do a straightforward email.

optional arguments:
  -h, --help            show this help message and exit
  --info                Run info mode if chosen.
  --local               Check for locally running plex server.
  --large               If chosen, make the GUI (widgets and fonts) LARGER to
                        help with readability.
  --noverify            Do not verify SSL transactions if chosen.
The (n) choice means do a newsletter, while the (o) choice means do only the email. Here are the common arguments.
--infoprints outINFOlevelloggingoutput.--localspecifies that we look for a local (https://localhost:3400) running Plex server.--largespecifies that one should make the GUI (widgets and fonts) LARGER to aid in readibility.--noverifyis a standard option in many of the Howdy CLI and GUIs to ignore verification of SSL transactions. It is optional and will default toFalse.
8.2.1. Only Email Mode
When running with the (o) choice, this GUI only sends a non-newsletter email to either yourself or to all the friends of your Plex server. This GUI is launched when running howdy_email_gui --noverify --local o.
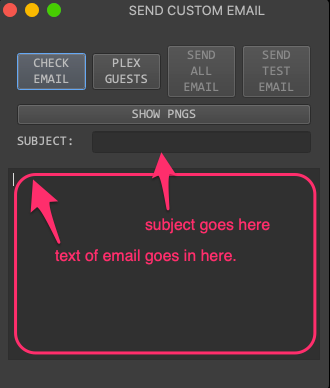
Fig. 8.2 The main window launched when running howdy_email_gui o. Annotations show where one puts in the email body and email text.
The main window has the following buttons and text fields. The subject and body fields go into their respective text areas.
The
CHECK EMAILbutton displays the rich HTML output of the email body, if there are no errors.The
SHOW PNGSbutton displays the PNG images located in your Imgur library. See, e.g., Section 2.3.2.1 to demonstrate its functionality.There is a subject and body that you can specify. The email body is written in reStructuredText and then converted into HTML.
PLEX GUESTSdisplays the list of friends of your Plex server. See Fig. 8.1 for an example of what the friends of your Plex server looks like.SEND TEST EMAILonly sends an email to yourself.SEND ALL EMAILsends an email to you and all the friends of your Plex server.
Here we construct and send a rudimentary email that demonstrates an interesting amount of functionality available with reStructuredText. The work flow is ordered as follows,
8.2.1.1. Write and Test Email
Here, we write an email that consists of some stylized text, some LaTeX math, and an inset image with caption using our Imgur library. The subject of the email is test. The body is reStructuredText, and is given by,
I am showing some example code. Here is some *bold* code.

This is an inline equation, :math:`2x - 5y e^{-x} = 4`.

This is the `Black-Scholes equation`_.

.. math::

   \frac{\partial V}{\partial t} + \frac{1}{2}\sigma^2 S^2\frac{\partial^2 V}{\partial S^2} + r S \frac{\partial V}{\partial S} - rV = 0

Finally, one can insert an image into here. Here is what I will do.

.. figure:: https://i.imgur.com/raP42Rz.png
   :width: 100%
   :align: left

   Look at me! I have a caption!

.. _`Black-Scholes equation`: https://en.wikipedia.org/wiki/Black–Scholes_equation
One can find some good tutorials on how to write valid reStructuredText online or on the Sphinx website. The biggest, undocumented subtlety here comes from adding images from our Imgur library – how do we know that the URL of the image is https://i.imgur.com/raP42Rz.png? We are looking for the HOWDY! EMAIL GUI icon, which has a cowboy hat inside it.
First click on
SHOW PNGSto pop up a table that shows the available PNG images in our Imgur library.
Fig. 8.3 There are nine images in the main album of our Imgur library. Here, we wish to select
howdy_email_gui_SQUARE.png.Second, right-click on the row that has
howdy_email_gui_SQUARE.png, which will pop up a context menu. Select theInformationcontext menu event to verify that we have the right image.
Fig. 8.4 Select the
Informationcontext menu event onhowdy_email_gui_SQUARE.png. This will pop up another window that shows the URL and verifies this is the correct image.Third, we see that
howdy_email_gui_SQUARE.pngis the correct image, and we get its URL.
Fig. 8.5 This is the correct image for the icon. It has a neon green cowboy hat in the middle, and the name
HOWDY! EMAIL GUI. We also see that its URL ishttps://i.imgur.com/raP42Rz.png.Finally, copy that email using the
Copy Image URLcontext menu event.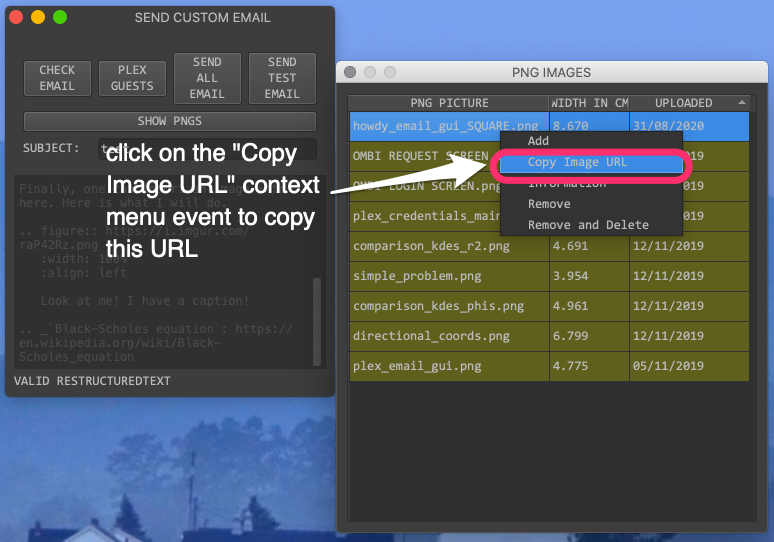
Fig. 8.6 We don’t need to transcribe the URL as shown in Fig. 8.5, by right-clicking on the
howdy_email_gui_SQUARE.pngrow and choosing theCopy Image URLcontext menu event. This will copy its URL to the clipboard.
The movie below demonstrates the step-by-step workflow in writing and testing email.
After we have our URL copied and pasted, we click on CHECK EMAIL to pop up the rich HTML representation of the email body.
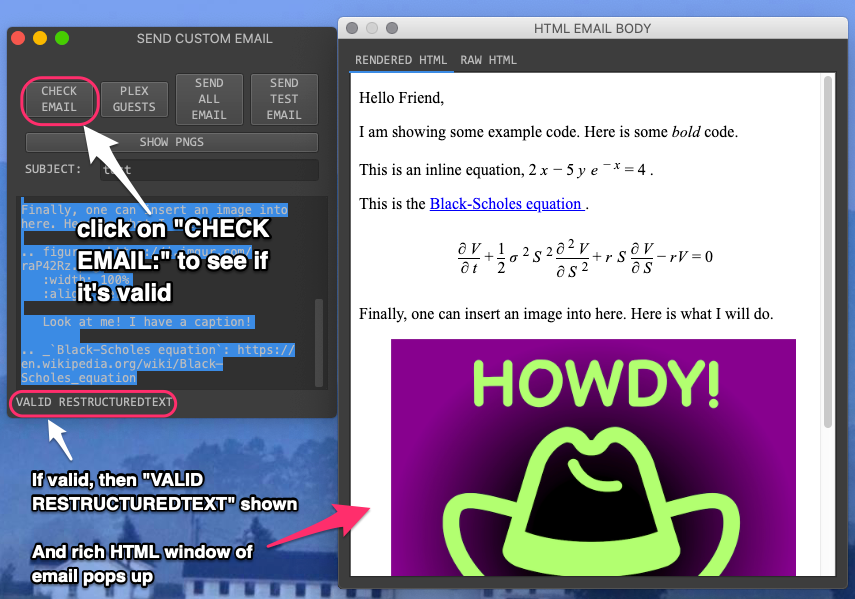
Fig. 8.7 Finally, click on CHECK EMAIL. If the email body text is valid, then VALID RESTRUCTUREDTEXT will appear and a rich HTML rendering of the email body will pop up.
Furthermore, if the email body text is valid, then the buttons SEND ALL EMAIL and SEND TEST EMAIL will be active. If the email body text is invalid, then those two buttons will be inactive.
This other movie shows the full rendered HTML.
8.2.1.2. Verify Plex Friends
Once you verify that your email is valid, you should check that your list of friends on your Plex server is valid. Just click on PLEX GUESTS to get the list of friends, one per row and ordered by name. First column is the full name, and the second column is the email address for their Plex account.
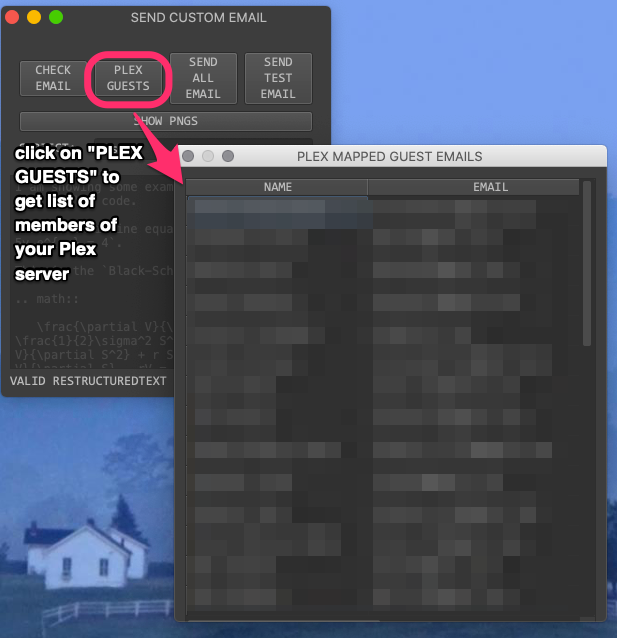
Fig. 8.8 Click on PLEX GUESTS to show the list of people who have access to your Plex server, and who will receive your email. For privacy reasons, I blank out these friends just as in Fig. 8.1.
8.2.1.3. Send Email
Once your email body text is valid, and you are satisfied that you may want to send this email out to people who have access to your Plex server, then you can click on either SEND TEST EMAIL (sends the email only to you) or SEND ALL EMAIL (sends the email to all your Plex friends).
I always verify that the email is valid, by clicking SEND TEST EMAIL first, before sending the email to everyone.
8.2.2. Newsletter Mode
When running with the (n) choice, this GUI only sends a non-newsletter email to either yourself or to all the friends of your Plex server. The Plex newsletter email has this format,
Hello <name>,

<PREAMBLE PART>

<SUMMARY OF MEDIA ON PLEX SERVER>

<POSTAMBLE PART>
Here, <name> is the person receiving the email, <PREAMBLE PART> is an optional introductory section, <SUMMARY OF MEDIA ON PLEX SERVER> summarizes the current media on the Plex server, and <POSTAMBLE PART> is an optional final section.
This GUI is launched when running howdy_email_gui --noverify --local n.
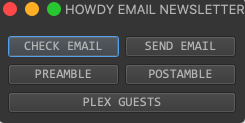
Fig. 8.9 The main window launched when running howdy_email_gui n. This beginning window has only five buttons, and no text fields such as the only email functionality described in Fig. 8.2.
The main window has the following buttons.
The
CHECK EMAILbutton displays the full rich HTML output of the email body, if there are no errors.The
PREAMBLEandPOSTAMBLEbuttons set up the<PREAMBLE PART>and<POSTAMBLE PART>, respectively. It is described in more detail in Setting up the PREAMBLE and POSTAMBLE parts.PLEX GUESTSdisplays the list of friends of your Plex server. It has the same functionality described in Section 8.2.1.2.EMAIL DIALOGlaunches the email dialog window, where you select whether to send a test email or an email to all your Plex friends.
Just as in Section 8.2.1, here we describe the work flow to send a newsletter email.
8.2.2.1. Setting up the PREAMBLE and POSTAMBLE parts
Click on the PREAMBLE button to write up an introductory section in the newsletter, and the POSTAMBLE button to write up a concluding section. The PREAMBLE and POSTAMBLE dialog windows are nearly identical, and differ only in where the text is placed in the newsletter. Fig. 8.10 shows both together, but subsequent instructions focus only on describing the PREAMBLE.
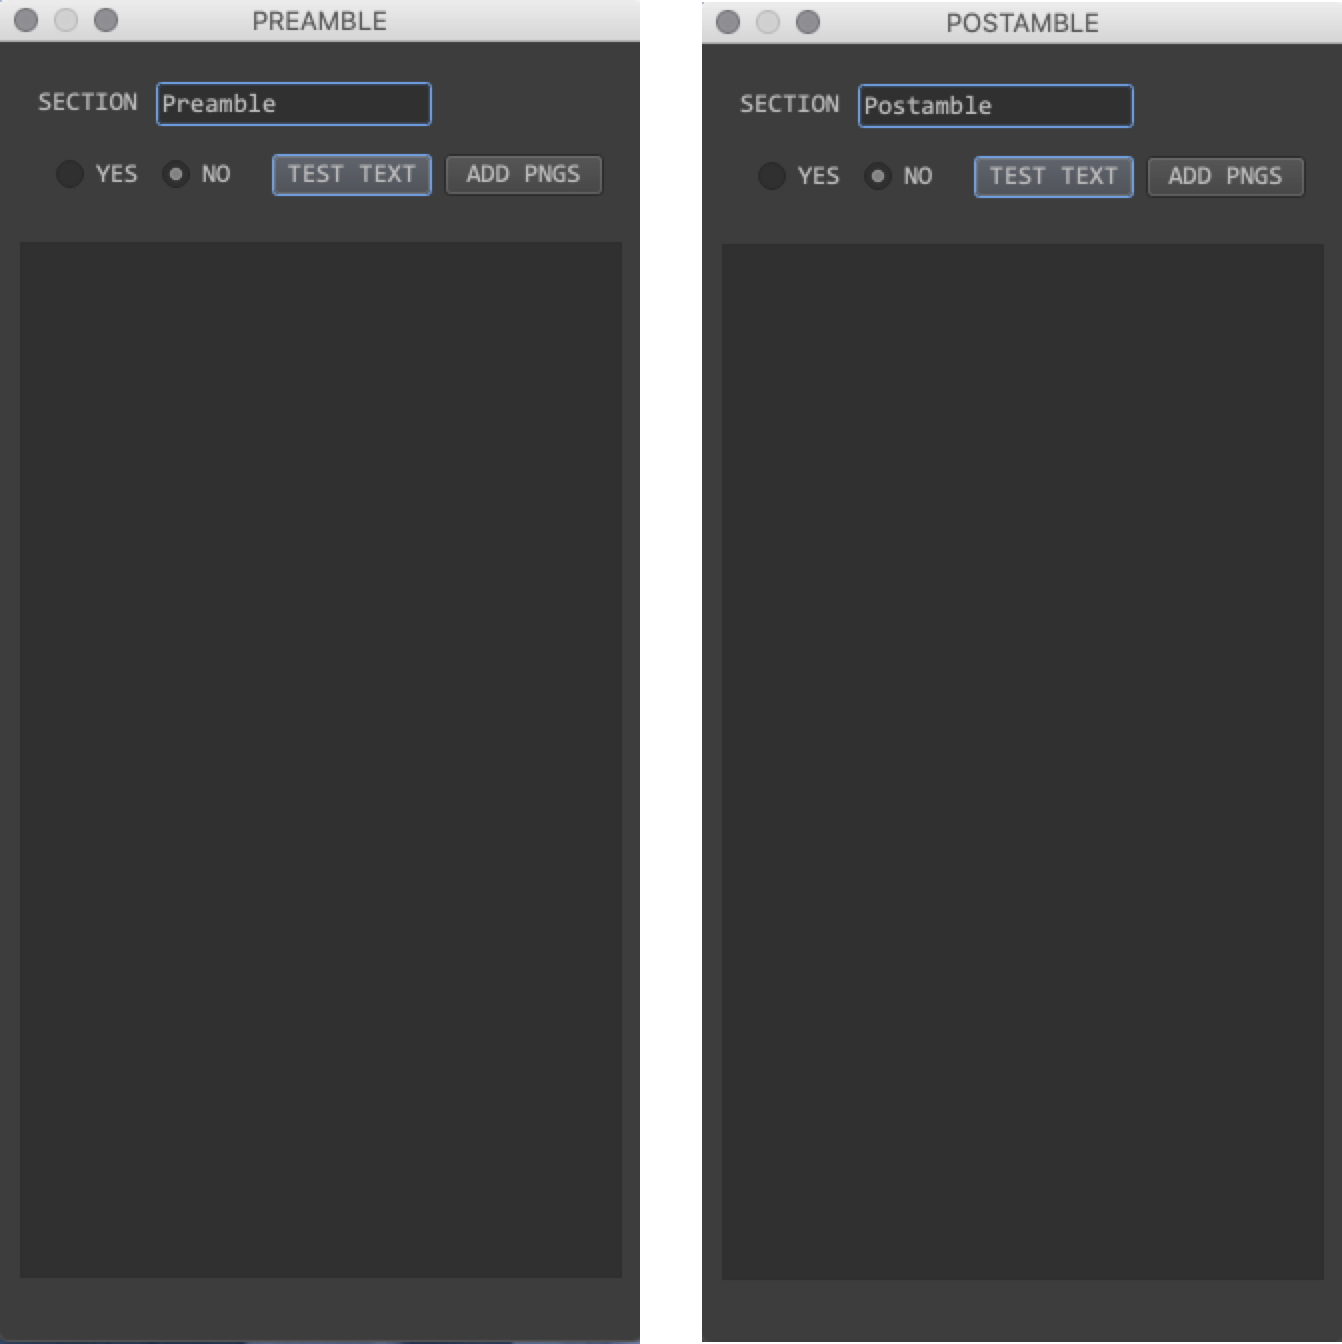
Fig. 8.10 The PREAMBLE and POSTAMBLE windows launched when clicking on either the PREAMBLE or POSTAMBLE main window buttons in Fig. 8.9.
The PREAMBLE window has a similar functionality as the main email window when running in Only Email Mode.
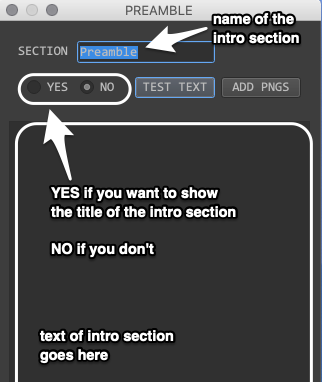
Fig. 8.11 A cropped and annotated screenshot of the PREAMBLE dialog showing functionality similar to Fig. 8.2.
Here, the reStructuredText of the introduction goes into the text box. The title of the introduction goes into the text label after SECTION. Toggle between the YES and NO radio buttons. If you want the introduction title in the newsletter email, choose YES; otherwise, choose NO.
To add PNG images from your Imgur library, just click on ADD PNGS and follow instructions just like in adding PNG to text. in Section 8.2.1.1.
Finally, test your introductory text by clicking on the TEST TEXT button. Its functionality is the same as described in checking email to see text in Section 8.2.1.1.
Fig. 8.12 and Fig. 8.13 show the rich HTML for the introductory and final sections, respectively. If the text is valid, then VALID RESTRUCTUREDTEXT appears on the bottom left corner of the PREAMBLE and POSTAMBLE dialog windows.
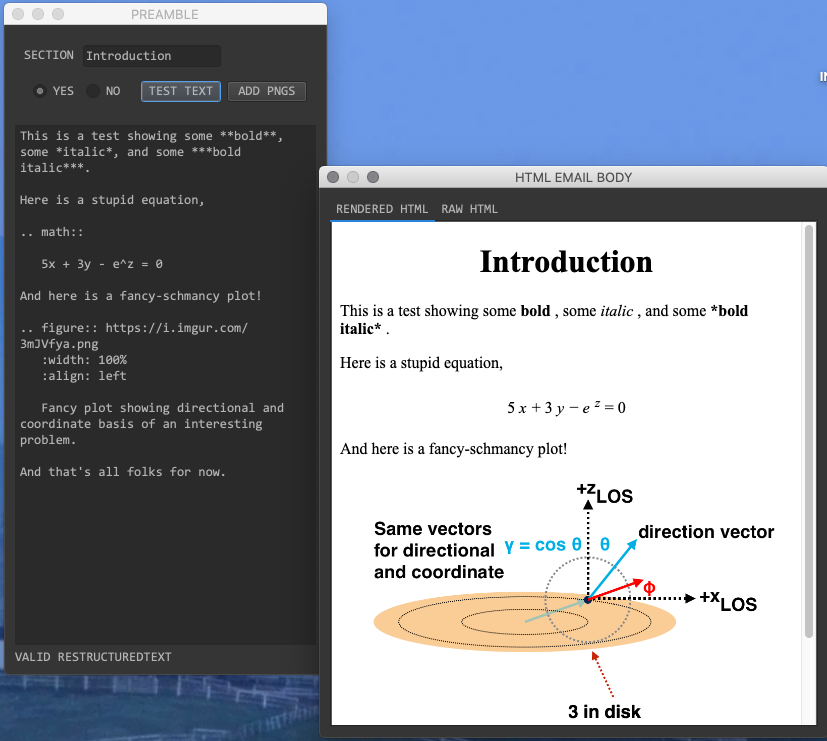
Fig. 8.12 The fancy-looking introductory text that will go into the Plex newsletter. Here we chosen YES to show the introductory section title, which is Introduction.
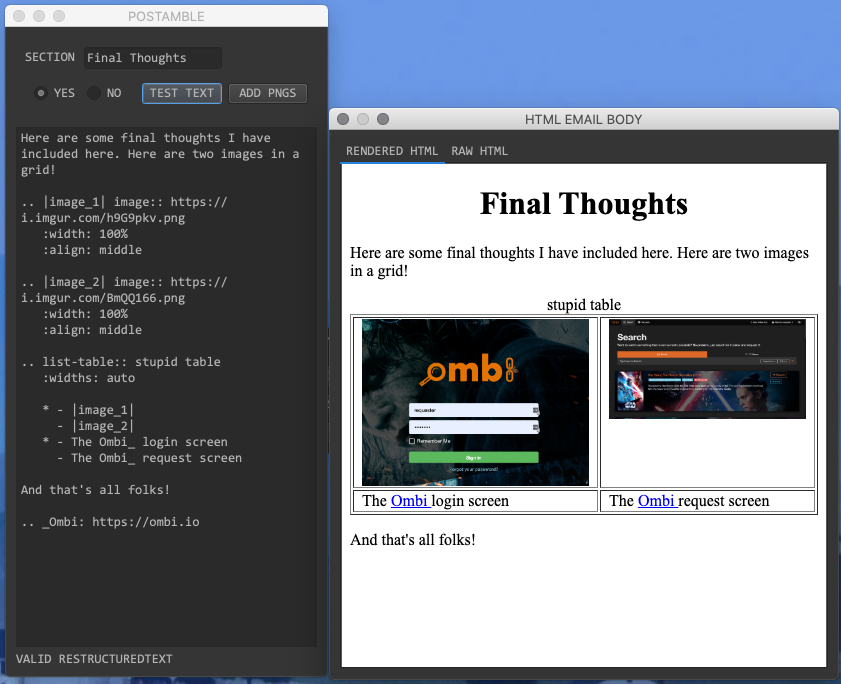
Fig. 8.13 An even-more fancy-looking final text that will go into the Plex newsletter. Here we chosen YES to show the final section title, which is Final Thoughts.
8.2.2.2. Checking Newsletter Email
After choosing the form of the introductory (Fig. 8.12) and final (Fig. 8.13) sections, click on CHECK EMAIL to (wait a long time and) show the rich HTML email of the Plex newsletter.
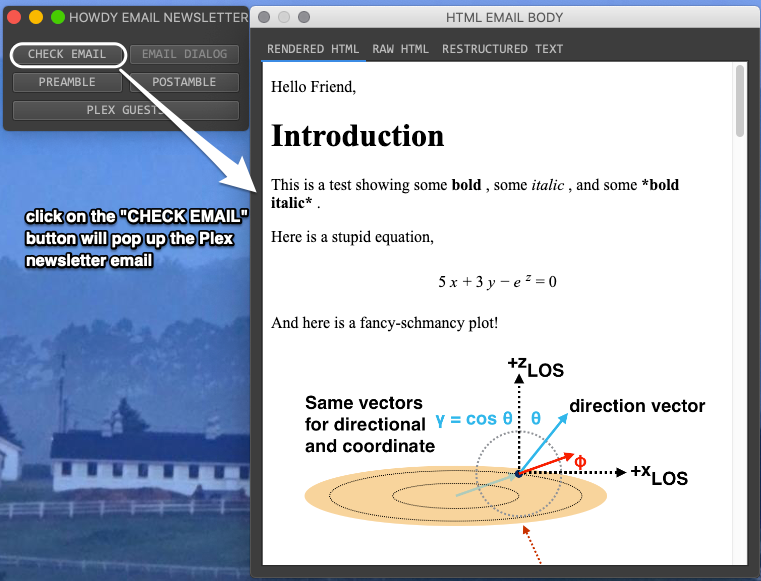
Fig. 8.14 The full HTML Plex newsletter email that will go out, as shown in the HTML EMAIL BODY window.
Although the email is too long to fit into the HTML EMAIL BODY window and the RENDERED HTML tab, we first identify the Introduction section name for the PREAMBLE and the Final Thoughts section name for the POSTAMBLE. The Plex server summary part, in the middle is structured as follows.
SUMMARYis its title.There are subsections on the Plex server’s music, movies, and television libraries collectively. For example, information on multiple music libraries are joined together.
Each section shows the current status of media on that type of library, in total and those media added after the date of the previous newsletter.
Furthermore, to aid in debugging, you can click on the RESTRUCTURED TEXT tab in the HTML EMAIL BODY window to show the reStructuredText used to create this email. I have also included this example restructuredText newsletter to inspect, and independently verify, that it creates proper HTML.
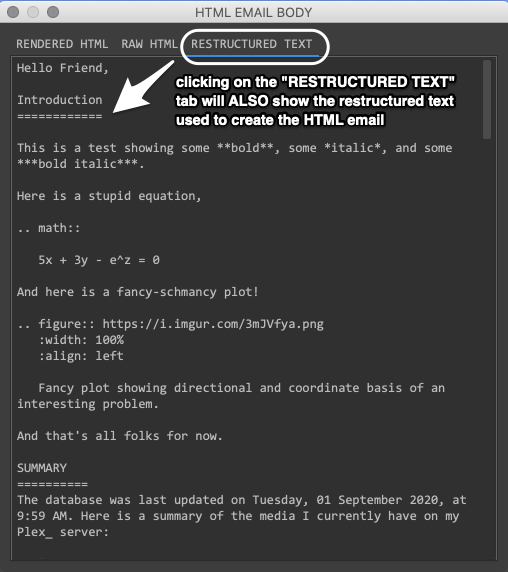
Fig. 8.15 To those who know it, the reStructuredText can be very helpful in figuring out why the HTML does not look as intended.
The movie below demonstrates the usually long process in in checking that the newsletter email looks good.
8.2.2.3. Send Newsletter Email
Once your email body is valid (it generated HTML), and you are satisfied, that you may want to send this email out to people who have access to your Plex server, then you click on the EMAIL DIALOG button to launch an email dialog. This dialog allows you to send the email only to yourself, to specific Plex friends, or to all your Plex friends and yourself.
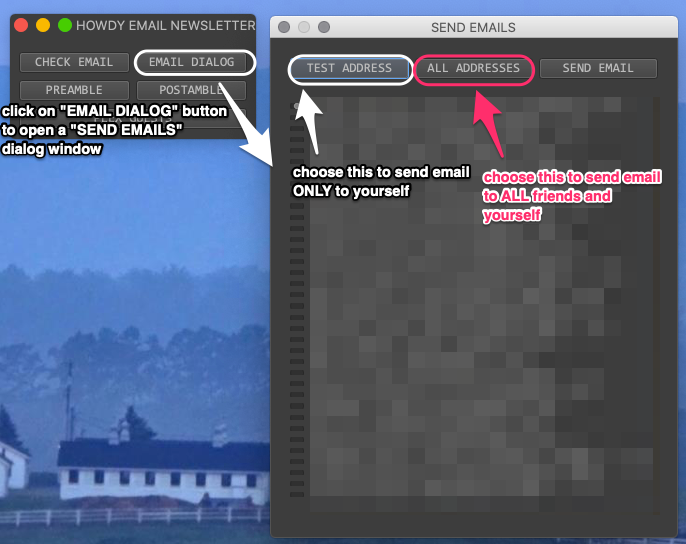
Fig. 8.16 Clicking on EMAIL DIALOG launches the sending email dialog window. You can click on specific friends to toggle whether to send them a newsletter email. Clicking on the TEST EMAIL button selects only yourself (top row). Clicking on the ALL ADDRESSES button selects all your friends and yourself.
The email dialog window starts with yourself on the top row. Subsequent rows are your Plex friends.
Once you have made your selection, click on SEND EMAIL to send the Plex newsletter emails to your group of selected friends and/or yourself. Just as in Section 8.2.1.3, I alway verify that the email is valid, by first clicking TEST EMAIL and then clicking SEND EMAIL, before sending the newsletter email to everyone.