8.3. 
howdy_email_demo_gui
This is a test-bed platform for creating and sending HTML emails using reStructuredText. Its functionality and behavior intersects significantly with howdy_email_gui. The help output, when running howdy_email_demo_gui -h, produces the following output,
usage: howdy_email_demo_gui [-h] [--info] [--noverify]

optional arguments:
  -h, --help  show this help message and exit
  --info      Run info mode if chosen.
  --noverify  Do not verify SSL transactions if chosen.
Here are the command line arguments,
--infoprints outINFOlevelloggingoutput.--noverifyis a standard option in many of the Howdy CLI and GUIs to ignore verification of SSL transactions. It is optional and will default toFalse.
Here is the main window that pops up when running howdy_email_demo_gui --noverify.
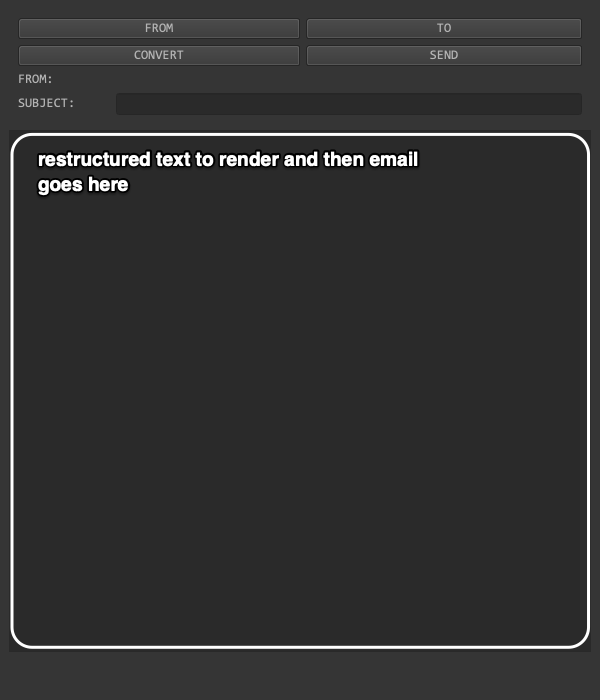
Fig. 8.17 howdy_email_demo_gui starts off with the following initial interface. I have denoted the box into which you write your reStructuredText to render as HTML, and then email, to your recipients.
The first sections detail the standard work flow of sending an email into five steps, in order.
However, you can do steps 1-4 in any order before sending the email. In addition, I describe the following optional functionalities.
I send from myself (Tanim Shahriar Islam) and send only to myself, but to different email addresses I control, in this demonstration.
8.3.1. Specifying a sender
First, we specify a sender by clicking on the FROM button.
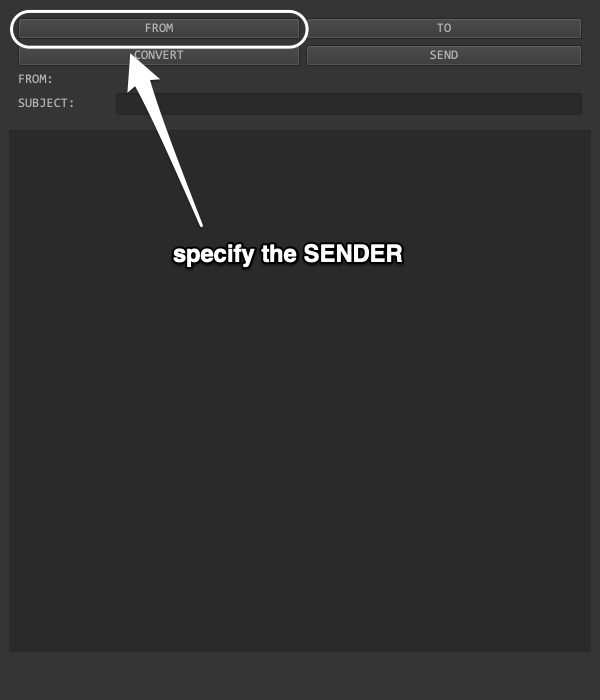
Fig. 8.18 Click on this button to open up a dialog window where one specifies the email address, and optionally the name, of the sender.
Second, once this dialog window opens, specify at least the email. Completion functionality exists when setting both the email address and the recipient.
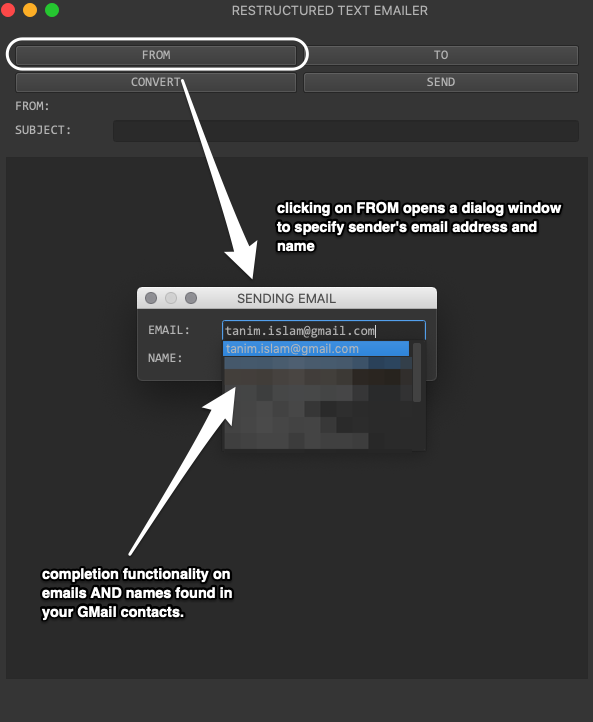
Fig. 8.19 Choose the email and the name of the sender. Completion exists among email addresses and names found in the Google Contacts in your address book. Here, I choose
If you choose an email address that is already known, the sender’s name is automatically filled out. Even though names can be completed, the email address won’t be specified even if you choose a known contact name. This happens because a contact can have multiple email addresses.
Third, once you have chosen a sender email, and optionally a sender name, then you can close this dialog window by clicking the upper left close box, or typing Ctrl+W1 on Windows and Linux or Cmd+W on Mac OS X.
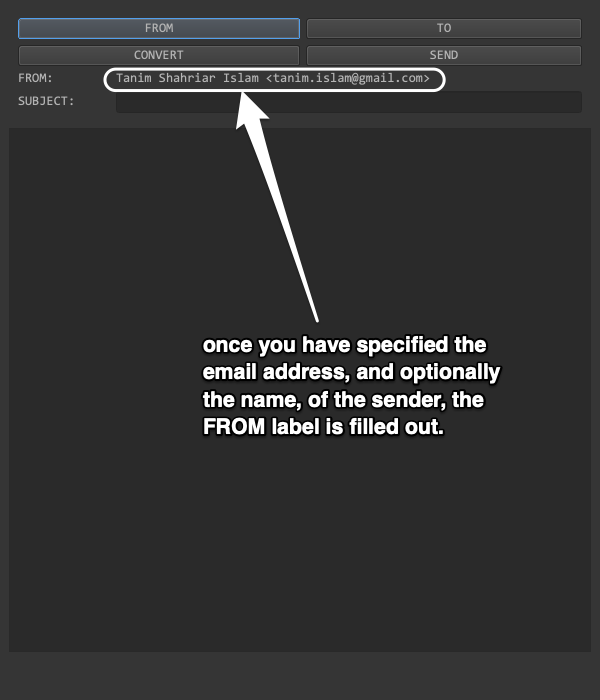
Fig. 8.20 The FROM label is filled out once you have specified an email address and optionally a name. If you also specify a name, the RFC 2047 formatted email info (looking like “NAME” <EMAIL ADDRESS>) shows up in the FROM label.
8.3.2. Selecting recipients
You can then select recipients by clicking on the TO button. Here we start from Fig. 8.20. This will open up a dialog window that allows you to add and optionally remove email addresses.
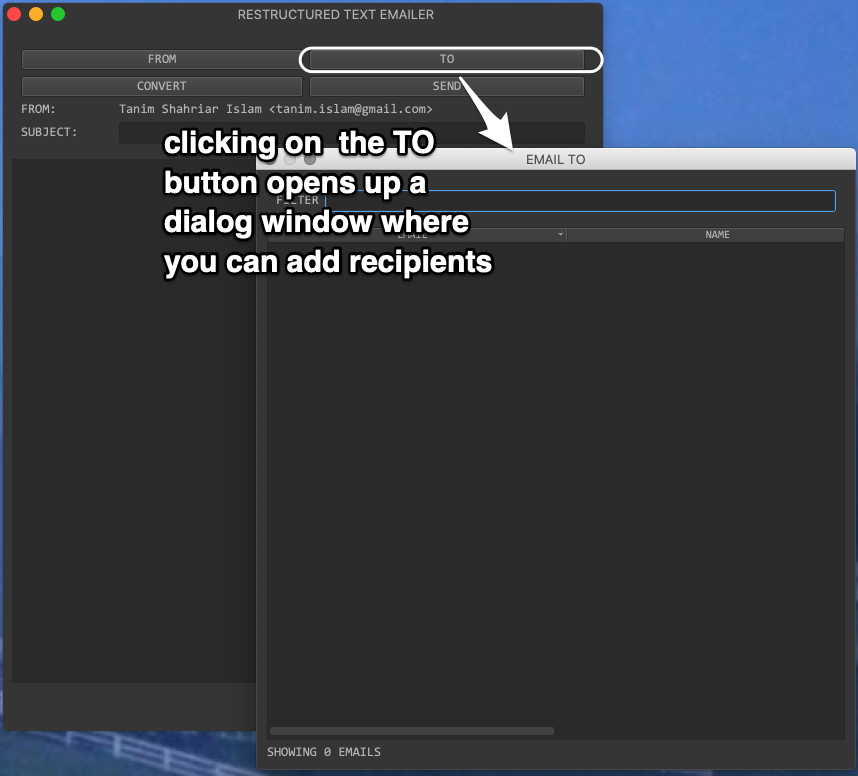
Fig. 8.21 You can add in the email addresses through this TO recipients dialog window.
Next, you can add recipients individually. In the dialog window launched in Fig. 8.21, either launch a context menu (right-click your mouse) or press Ctrl/Cmd+A.
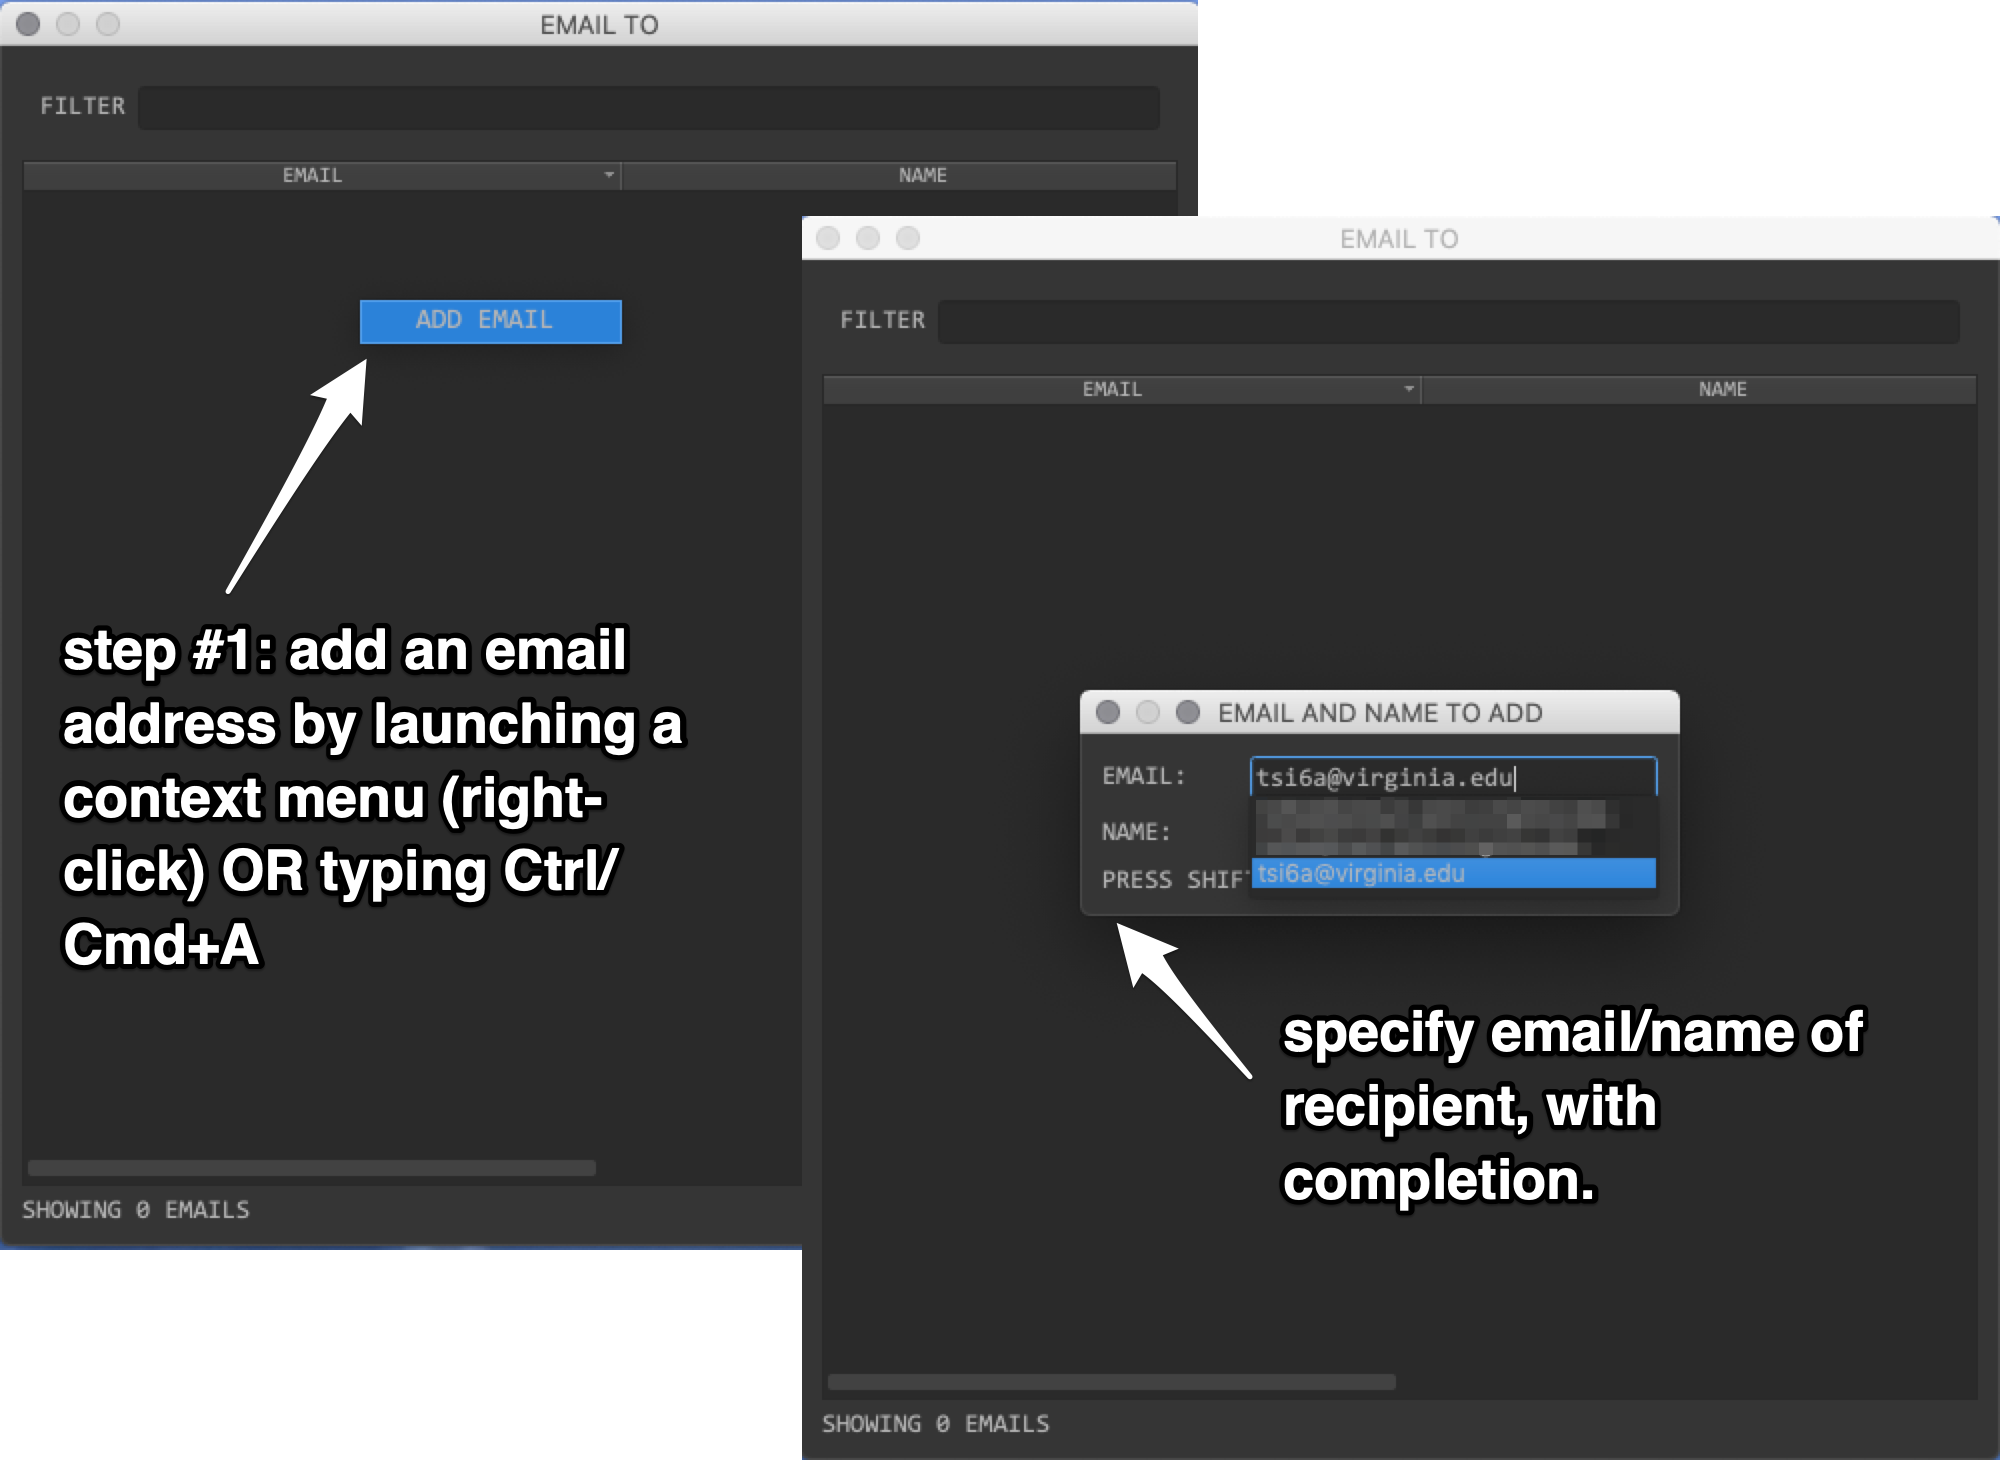
Fig. 8.22 You can launch the add email dialog window by pressing right-click and selecting ADD EMAIL in the context menu, or by typing Ctrl/Cmd+A. Here, the recipient specification has the same completion functionality as shown in Fig. 8.19.
Finally, once you have specified the first recipient’s email and (optionally) name, press Shift+Ctrl/Cmd+A to add that recipient.

Fig. 8.23 Press Shift+Ctrl/Cmd+A to add this recipient to the list of people to whom you will send this email.
Subsequent recipients can be added by going through new contacts as shown in Fig. 8.22 and then Fig. 8.23. However if you specify a name or the email address matches all or in part to an address that already exists in that recipient table, then that email address won’t be added – this machinery thinks you have already added this recipient, so why add them again?
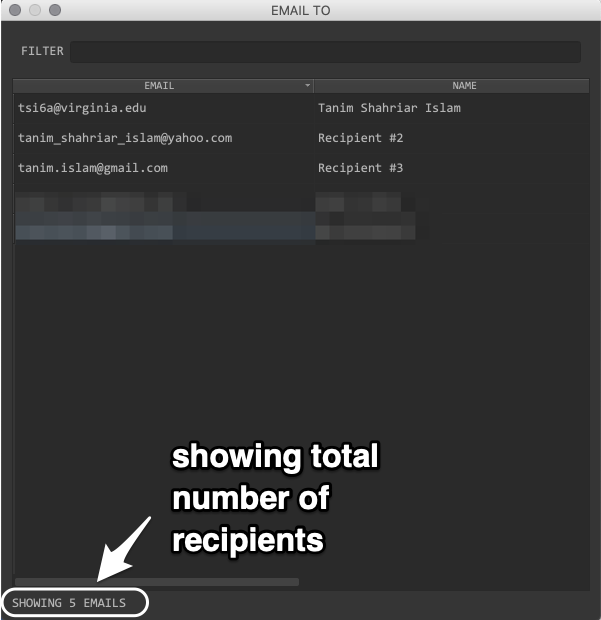
Fig. 8.24 Here I have added five recipients. I own these two email addresses, tanim_shahriar_islam@yahoo.com and tanim.islam@gmail.com, and my Google Contacts identify both as Tanim Islam. In this case, I specified the name as Recipient #2 and Recipient #3. I have blurred out the email addresses and names of two other contacts. One may notice that tanim.islam@gmail.com is the sender as shown in Fig. 8.20.
Fig. 8.25 shows how to remove a specific email from the list of recipients.
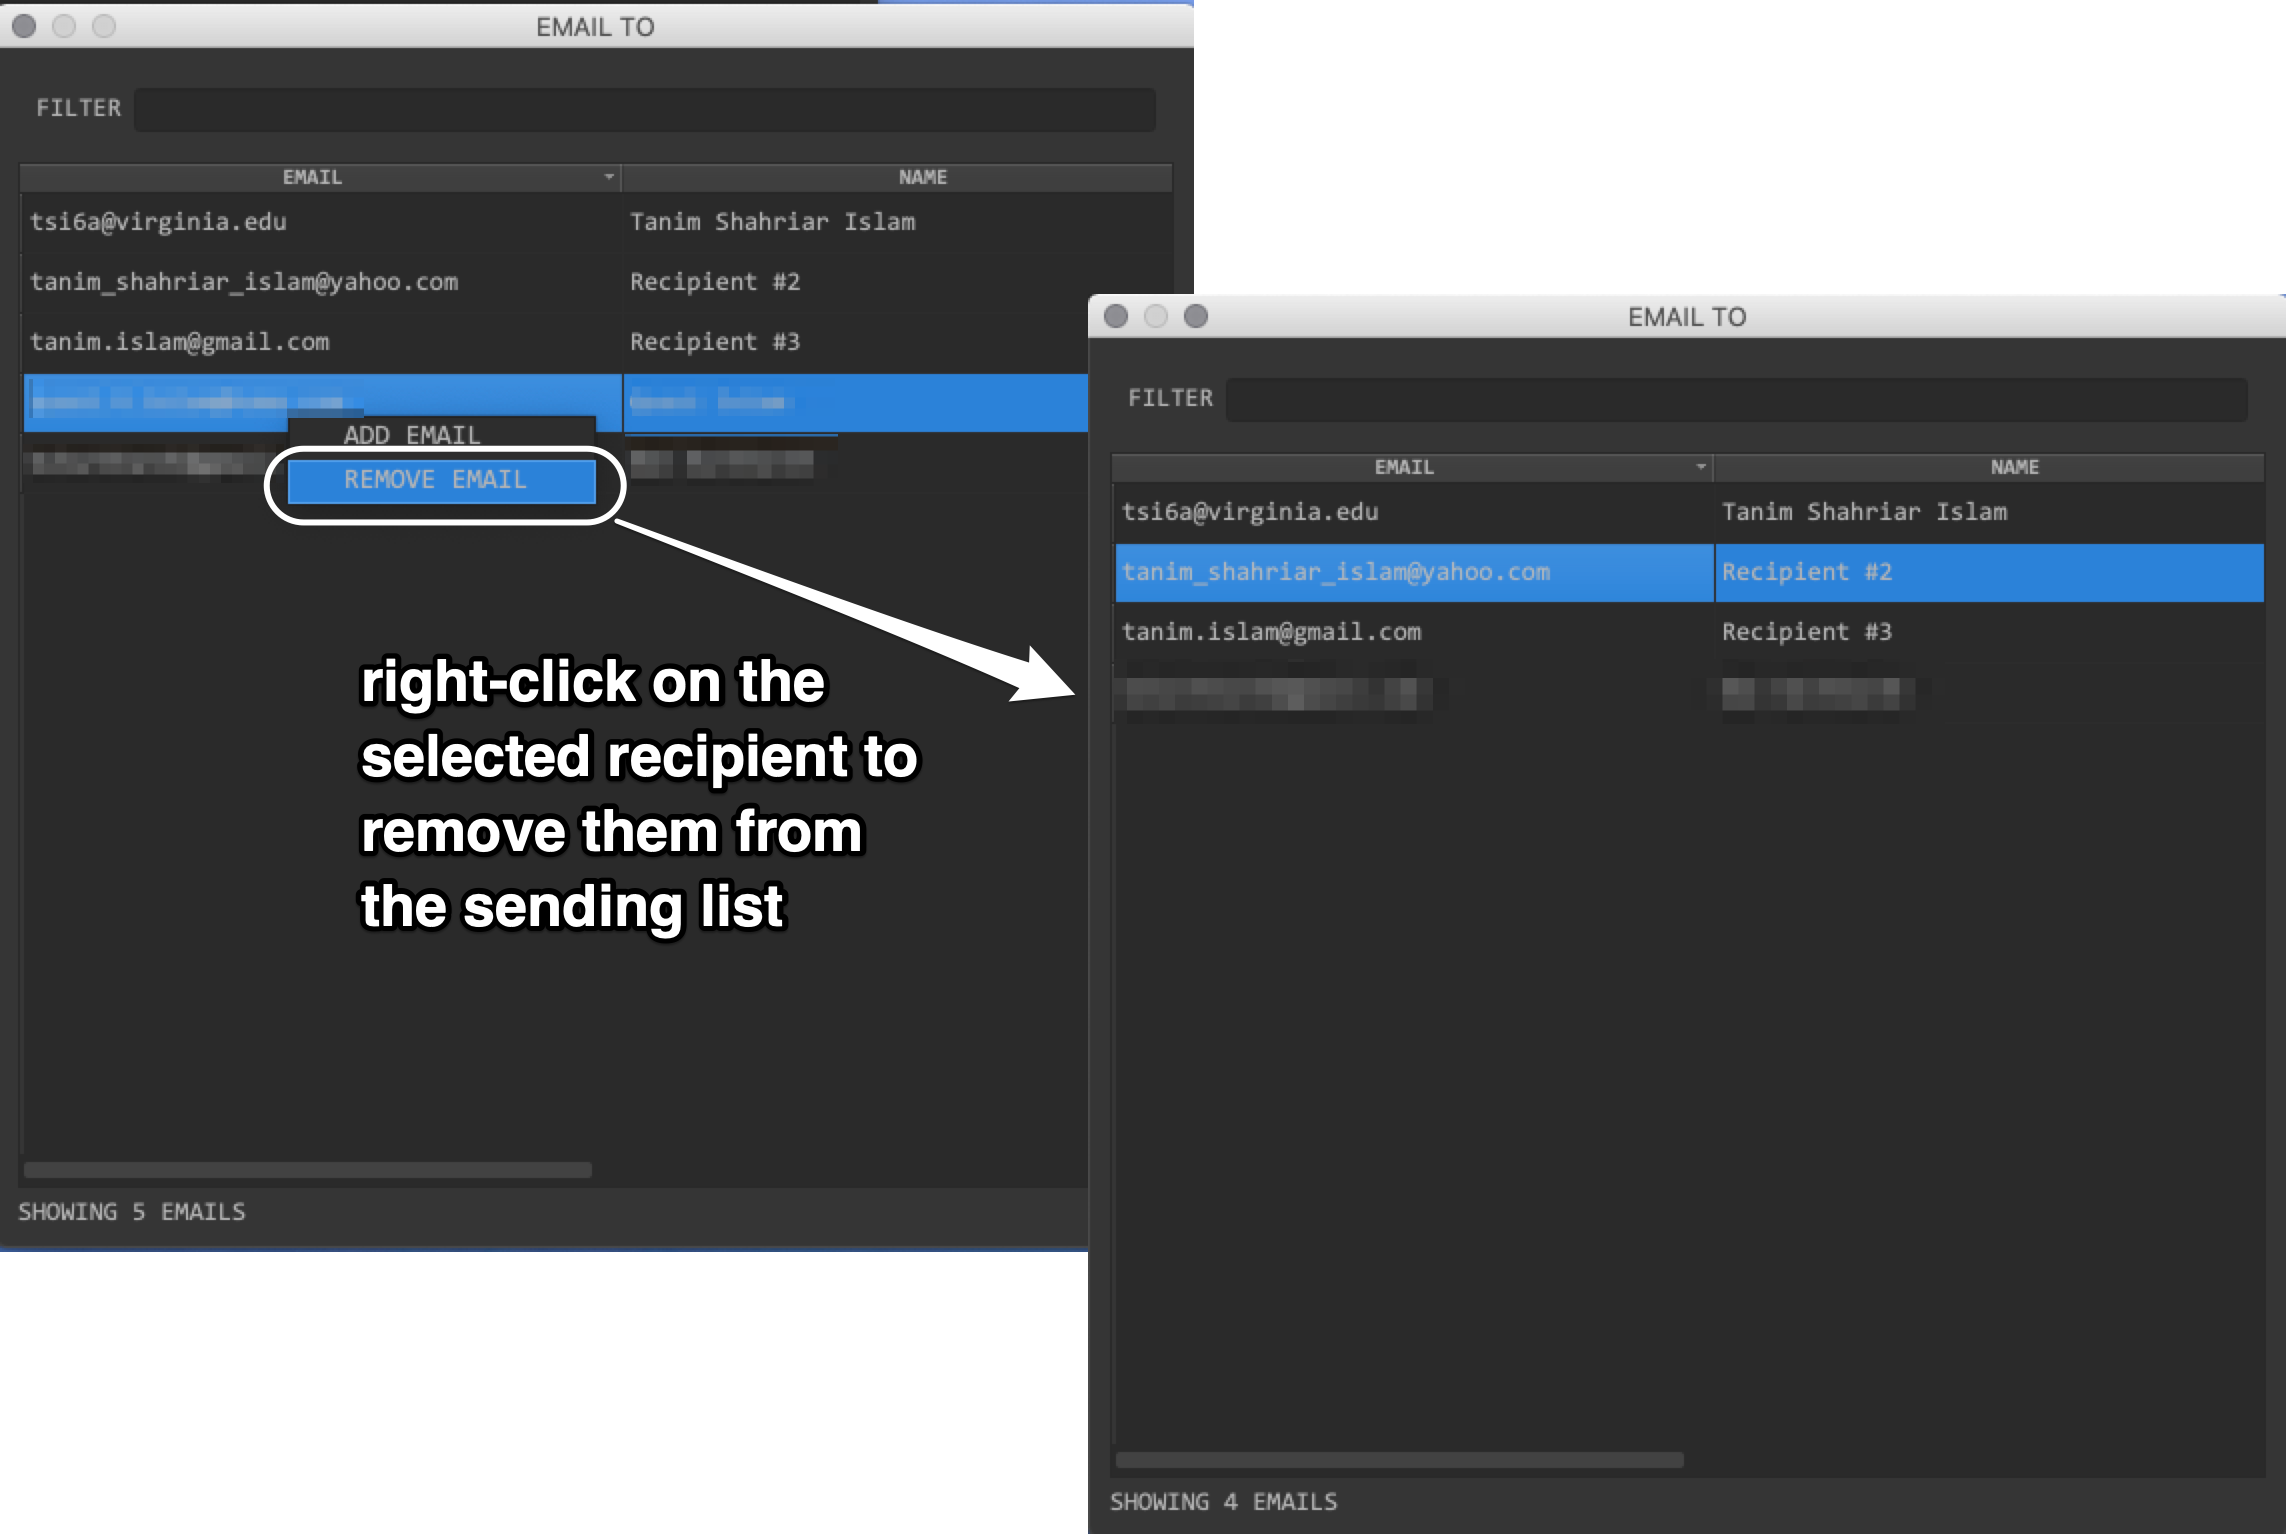
Fig. 8.25 Select (hover over) one of the recipients, and launch a context menu by right-clicking. Select, in this case, REMOVE EMAIL to remove that recipient. Here, I removed one email from five recipients to get four recipients.
One can also go to an existing recipient in the table, and change their email address or name.
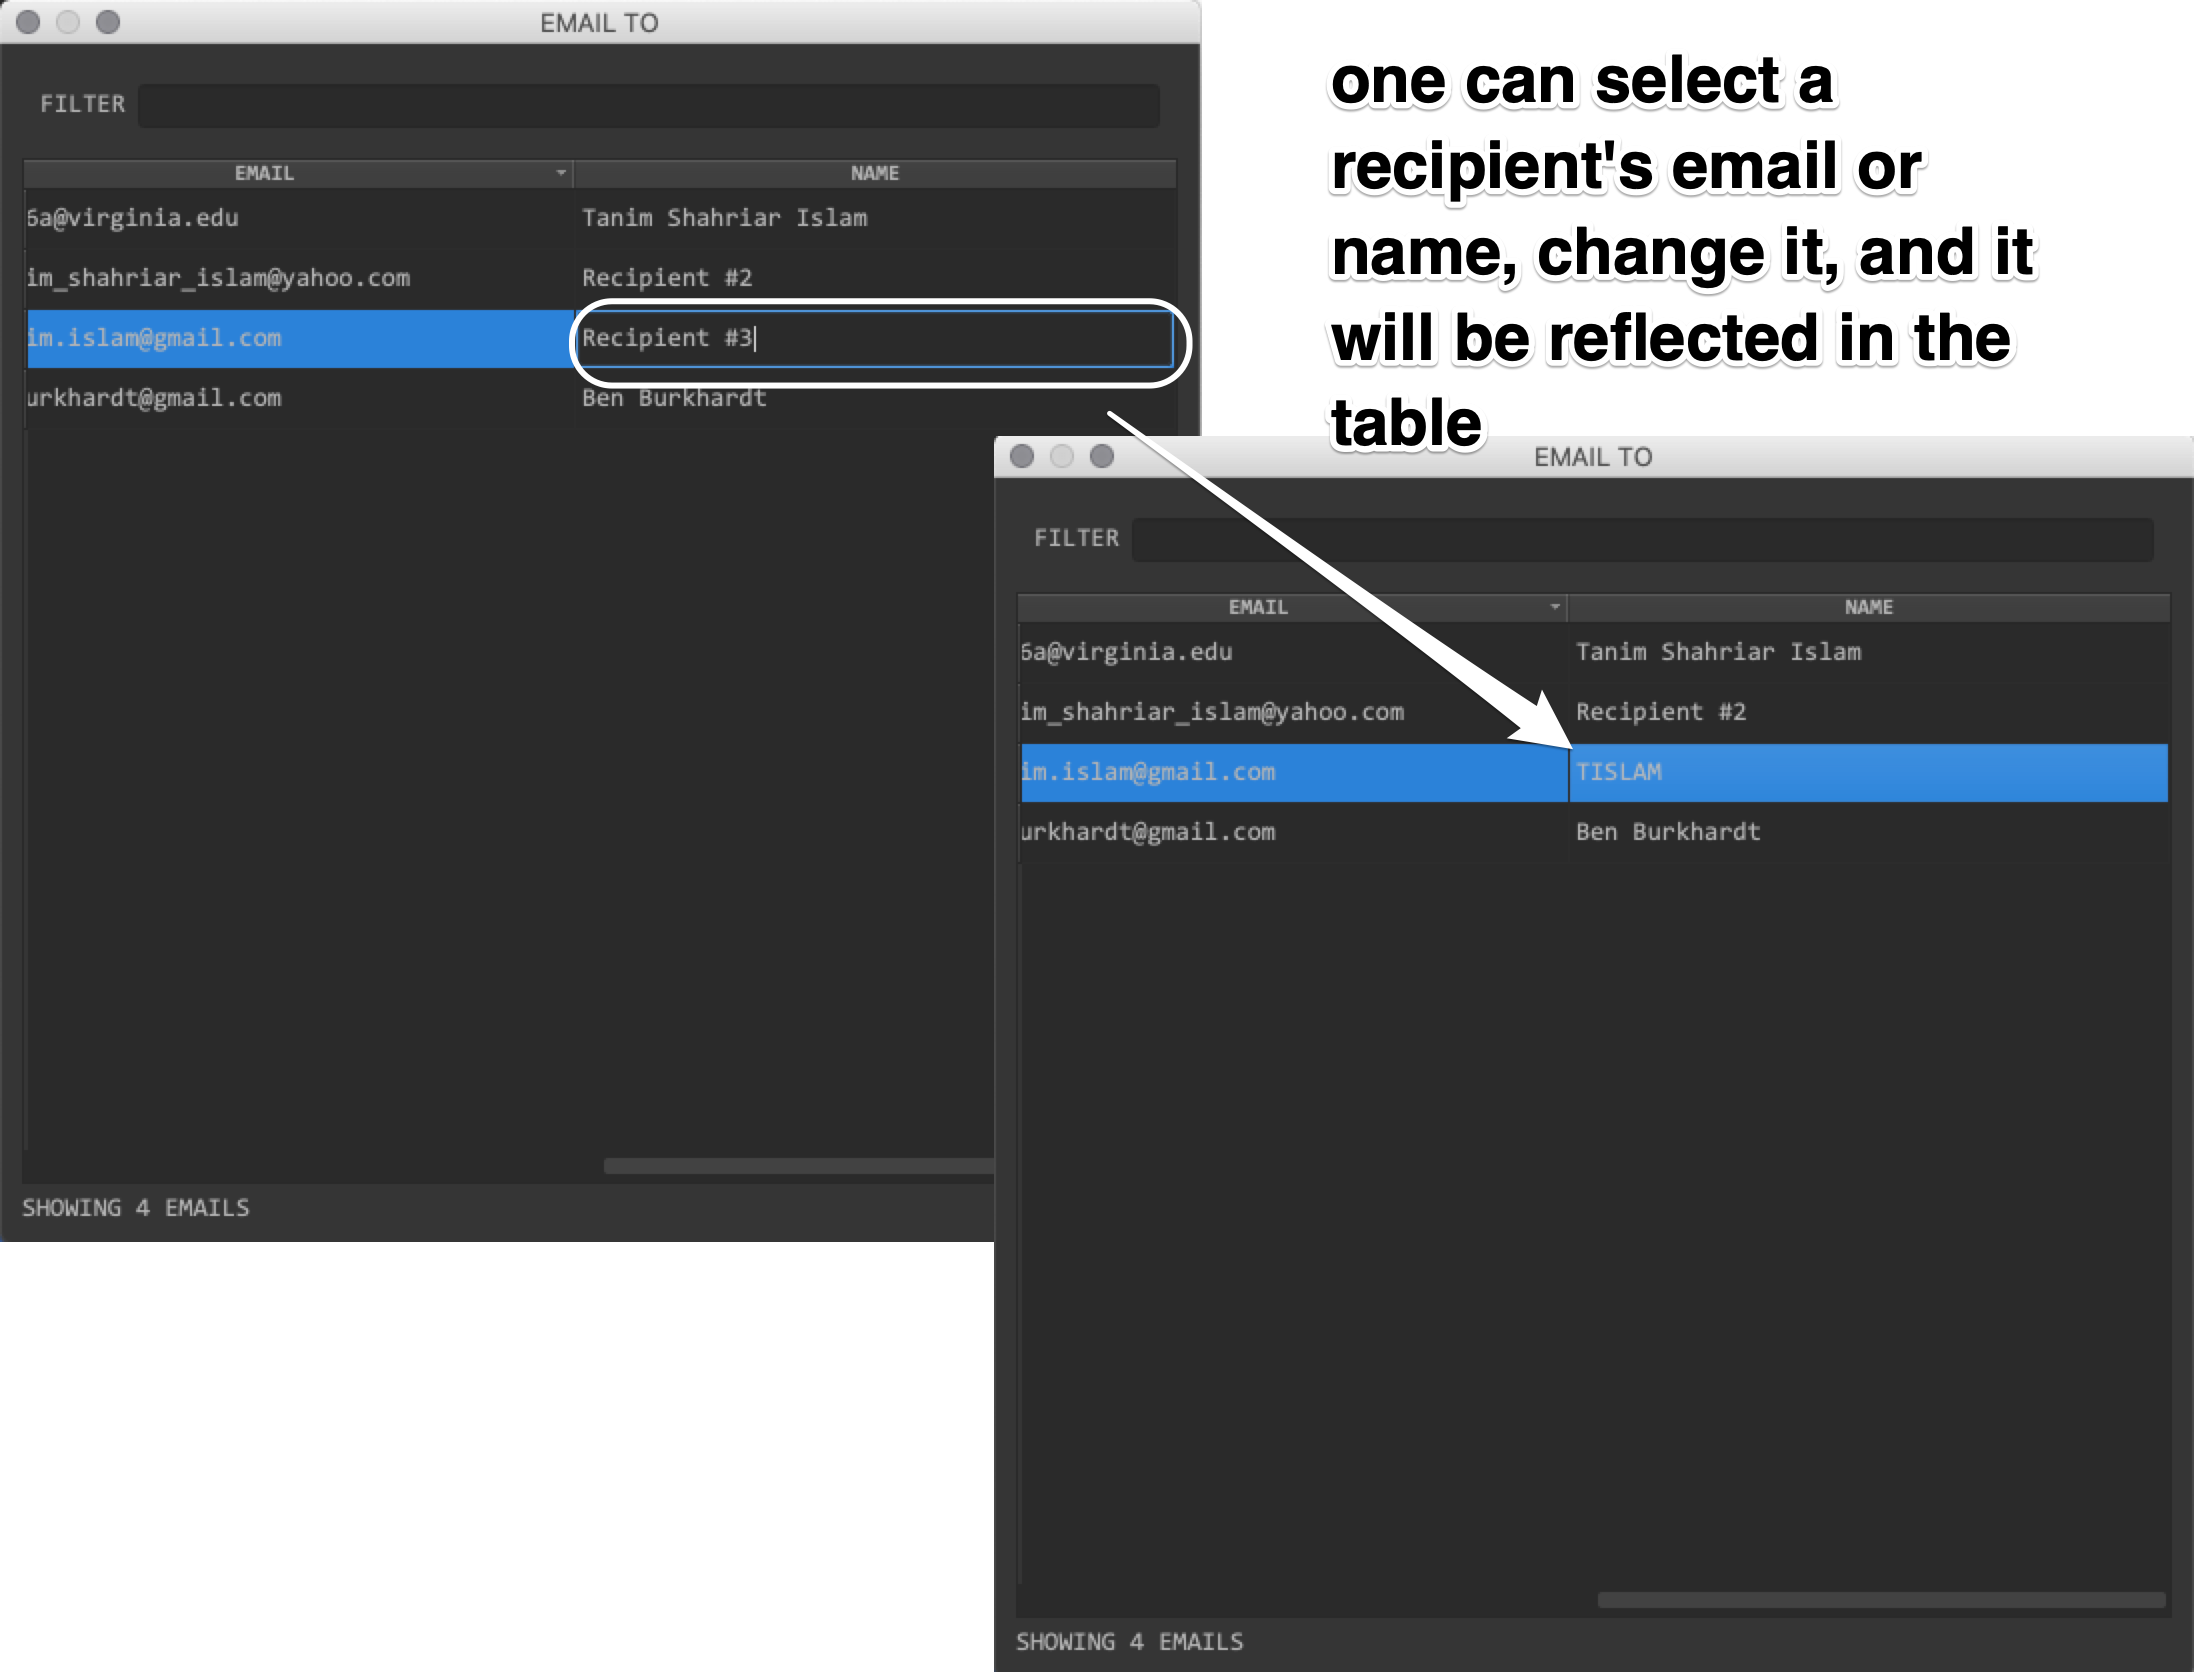
Fig. 8.26 To change an email address or name of a recipient, select the cell (either name or email), double click on it, and then type in a new email or name. Once satisfied, press return or enter. If the name or email is valid, then the single recipient’s name or email is modified.
However, just as in Fig. 8.23, if we change the name or email to something that matches whatever is already in the table of recipients, then that contact will not be changed – like before, this machiinery will not let you add a recipient that is already in the table.
If you have many (say \(\ge 20\)) recipients, filtering functionality can be useful.
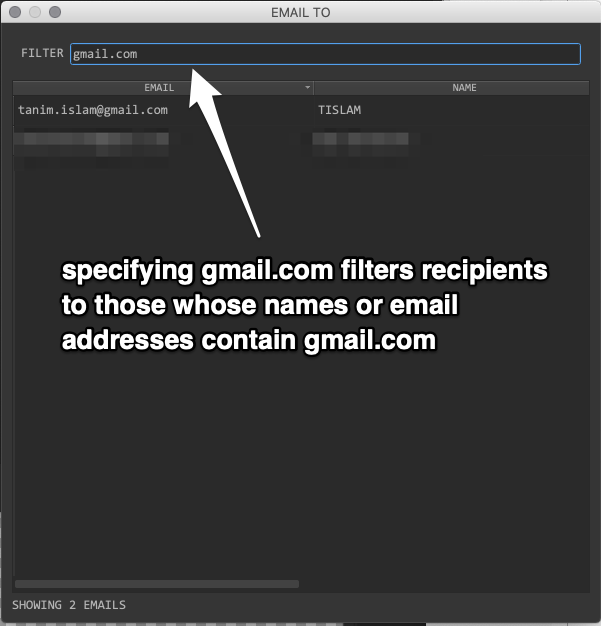
Fig. 8.27 Example regular expression filtering of recipients. Here, we filter on recipients whose names or email addresses contain gmail.com. This filtering specification can also take regular expressions.
You can do a regex filtering by specifying a filter string on the FILTER dialog box at the top of this TO recipient dialog window.
Once you are done specifying your recipients, you can upper-left click on the close box of this recipient dialog window, or press Ctrl/Cmd+W. This will hide this recipient dialog window. If you click TO again, then you will see the recipients you have already specified.
8.3.3. Writing out the subject
Next, just write out the subject into the SUBJECT dialog box. The subject cannot be blank. Once you are satisfied, press Enter or Return in this line. The subject will have all white spaces removed.
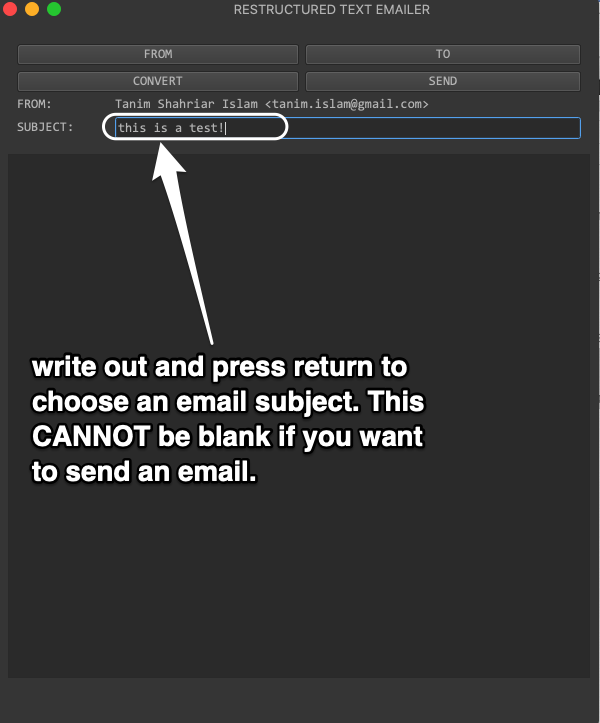
Fig. 8.28 Just type in a subject into the SUBJECT dialog box, and then press enter. Ensure that the whitespace stripped subject you choose is not empty, otherwise this tool will not send an email.
8.3.4. Writing and verifying the email
Now that you have specified a sender, recipients, and subject, you can write an email. You can write some valid reStructuredText into the main text area described in Fig. 8.17, and then click on CONVERT to render the HTML. One can find some good tutorials on how to write valid reStructuredText online or on the Sphinx website. I have included this example restructuredText file that allows one to independently verify how this reStructuredText renders. This is the example file shown in Fig. 8.29.
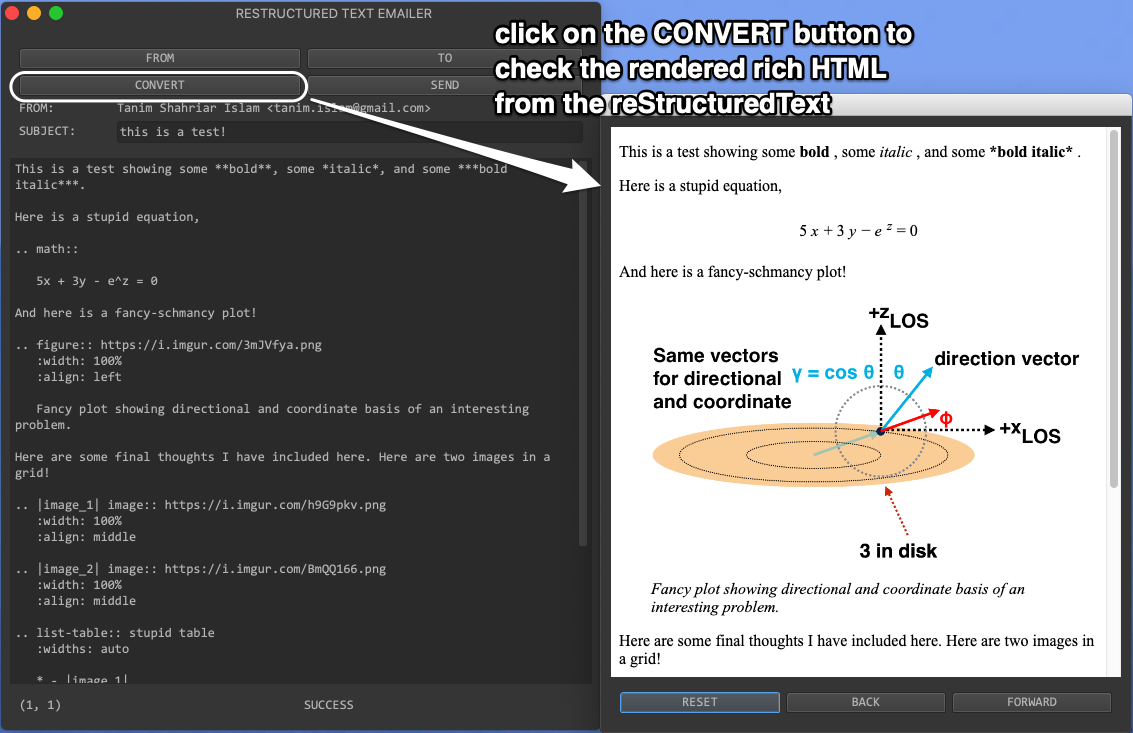
Fig. 8.29 Clicking on CONVERT creates a window showing the accurately rendered rich HTML output of the valid reStructuredText in a new window. Check the HTML to see if this is the email you want to send.
8.3.5. Sending the email
Finally, once you have sender, recipients, subject, and email, you can send the email out. Just click SEND, and the email should go to your TO recipients. The sender, usually yourself, will also receive a BCC email, to allow you to record and archive this email if needed.
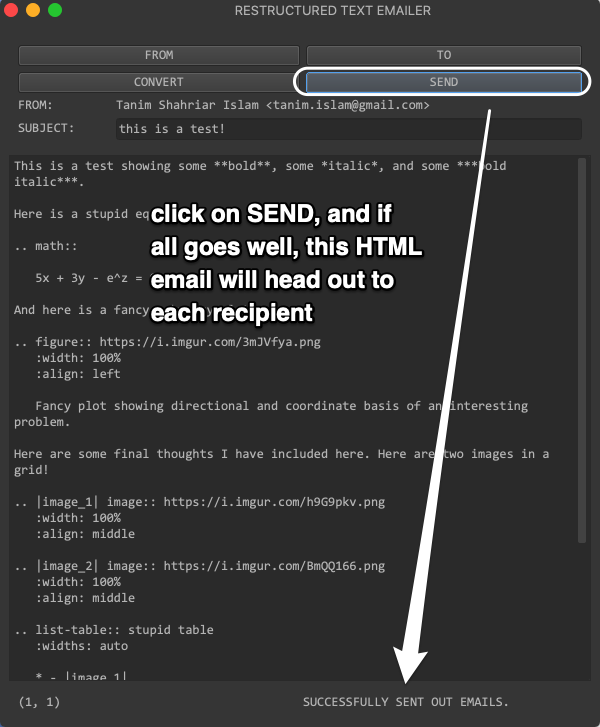
Fig. 8.30 If the sending goes smoothly, after clicking the SEND button, this will be the status text: SUCCESSFULLY SENT OUT EMAILS. Each recipient will receive the HTML email rendered as in Fig. 8.29.
8.3.6. Optional functionalities
In addition to the required operations needed to send emails with a subject and body, from a single sender to multiple TO recipients, there are five other functionalities that can be used to assist or enhance the emails you choose to send out. These optional functionalities are specified in a context menu that is launched from empty real estate in the main email dialog window, as shown in Fig. 8.17.
8.3.6.1. Specifying CC and BCC recipients
One can also specify CC and BCC recipients. The CC and BCC dialog recipients look very similar, and have the same functionality, as the TO recipients. The only difference is that the recipients are CC’d and BCC’d, respectively.
To select the CC or BCC recipients, right-click to launch a context menu event in the empty real estate inside main email dialog window: outside the email text area and outside the subject dialog box. Choose the CC or BCC context menu item to specify CC or BCC recipients, respectively.
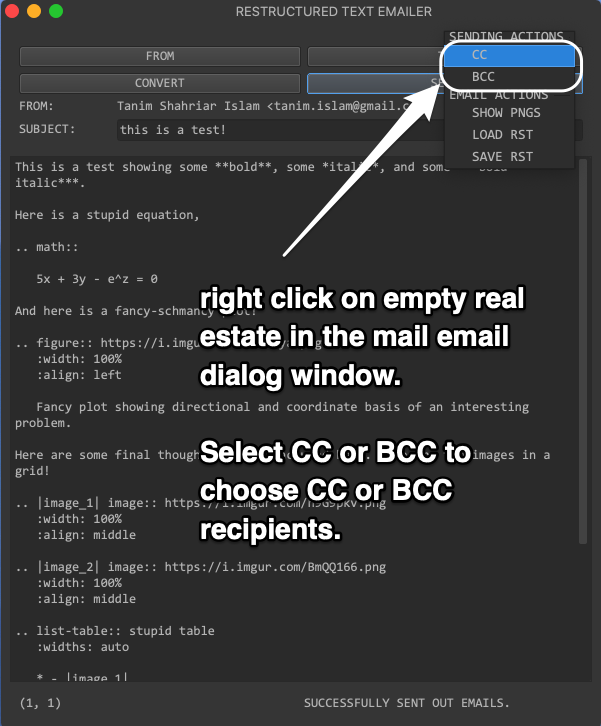
Fig. 8.31 Right-click on some empty real estate to specify CC or BCC recipients from the context menu.
The CC and BCC recipient dialog windows look very similar to the TO recipients dialog window.
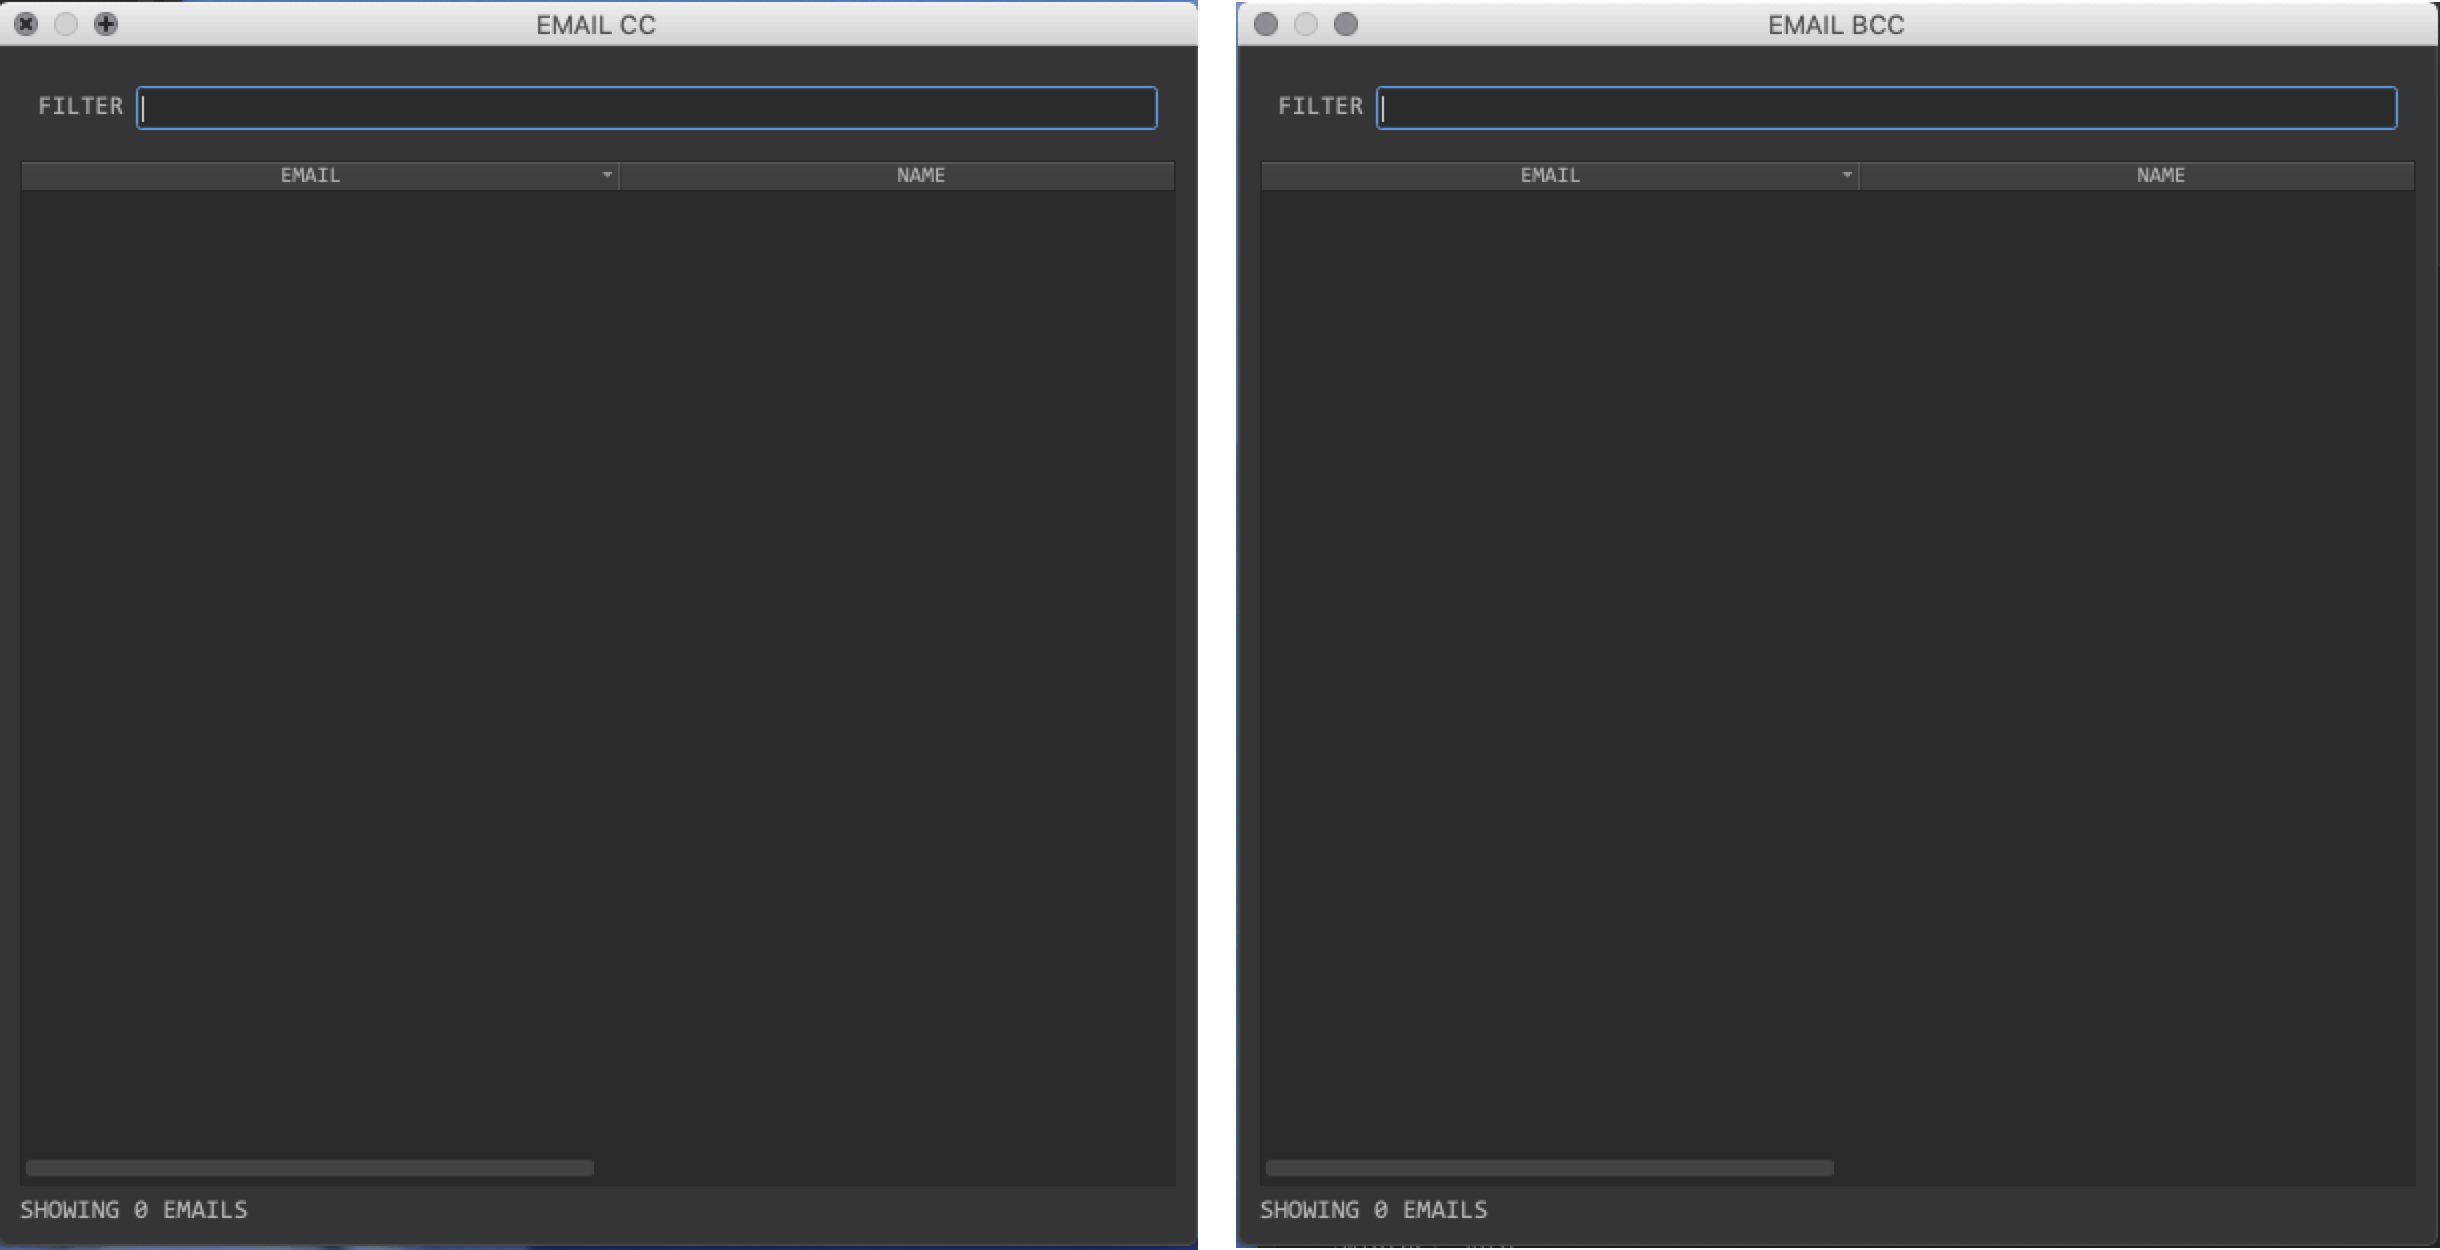
Fig. 8.32 For completeness, here are the CC and BCC recipients dialog windows. The only difference in their functionality to the TO recipients dialog window is that the recipients are CC’d or BCC’d.
8.3.6.2. Identifying and selecting PNG images
You can specify the PNG images from your main Imgur library. To select your PNG images, right-click to launch a context menu event in the empty real estate inside main email dialog window.
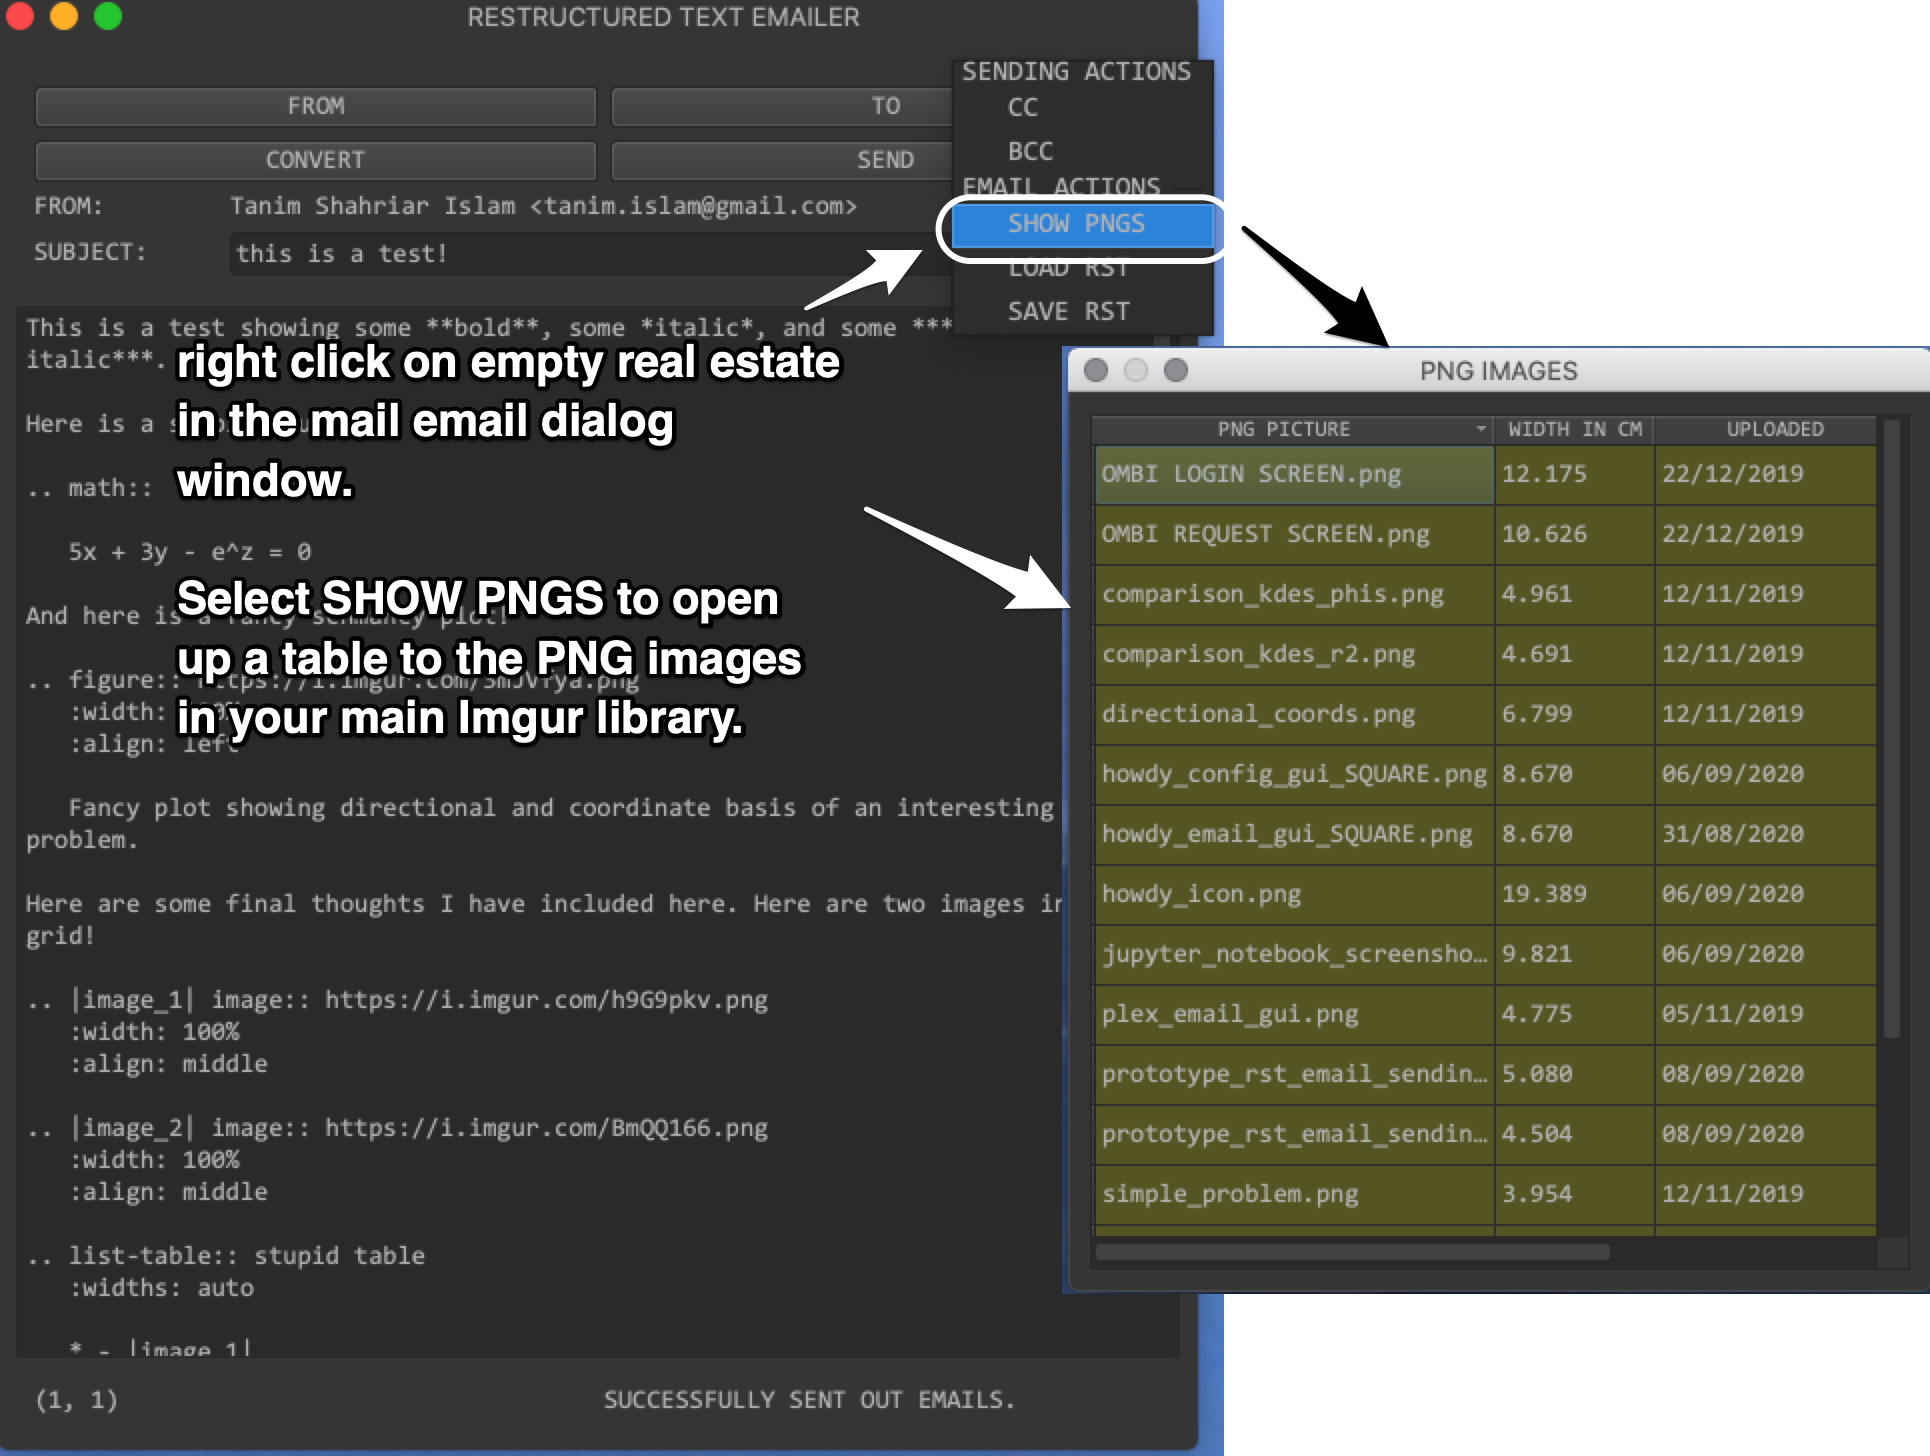
Fig. 8.33 Right-click to open a context menu, and choose SHOW PNGS to launch the dialog window that lets you identify and select those PNG images you want to include in your email.
The PNG image dialog window operates the same as what is described in Section 8.2.1.1 for howdy_email_gui.
8.3.6.3. Loading and saving reStructuredText
Often times, the email you want to send is fairly complicated reStructuredText. It is either hard to remember or reconstruct the document, so you may find it useful to save it to a file (keeping you from starting from scratch if you made a mistake), or load it from a file (if you had made a mistake in your email).
To save the email to a reStructuredText file, let us start from the email we have sent out, taken from example restructuredText file. In some empty real estate, right-click to launch the context menu and select SAVE RST. Save the file with some .rst suffix.
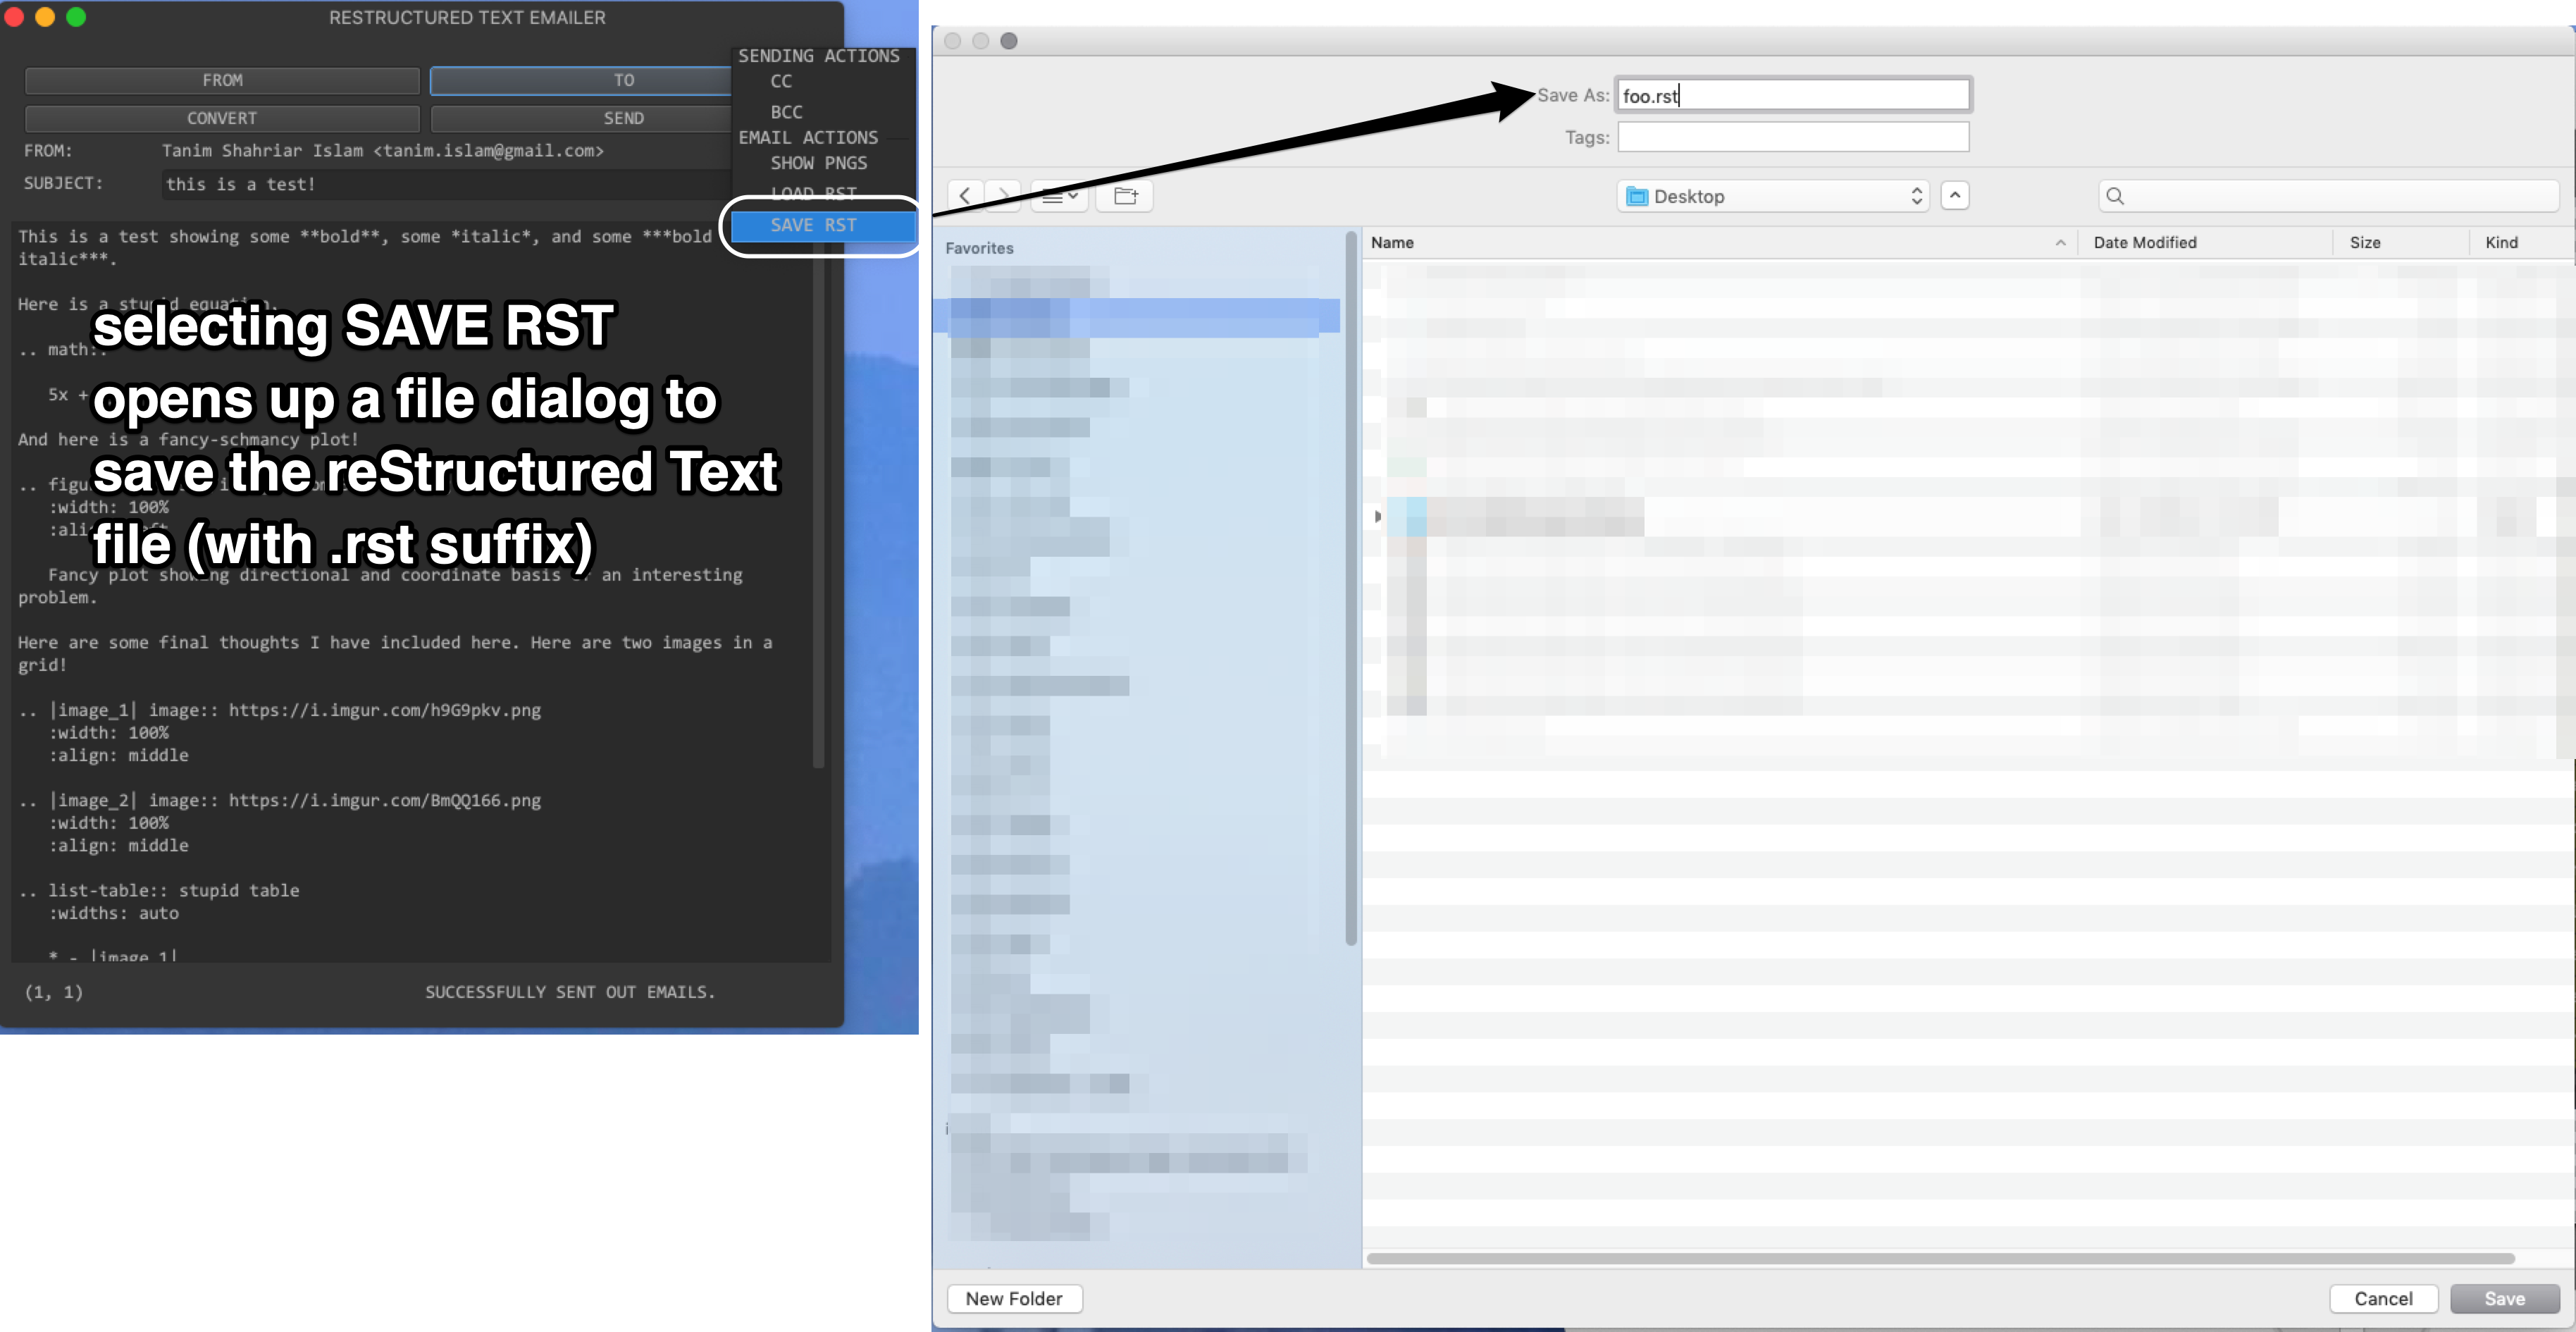
Fig. 8.34 Right-click to open a context menu, and choose SAVE RST. This launches a file dialog where you can save the email text in the main text area as a reStructuredText file.
Likewise, to load a reStructuredText file into the email, right-click on some empty real estate and select LOAD RST.
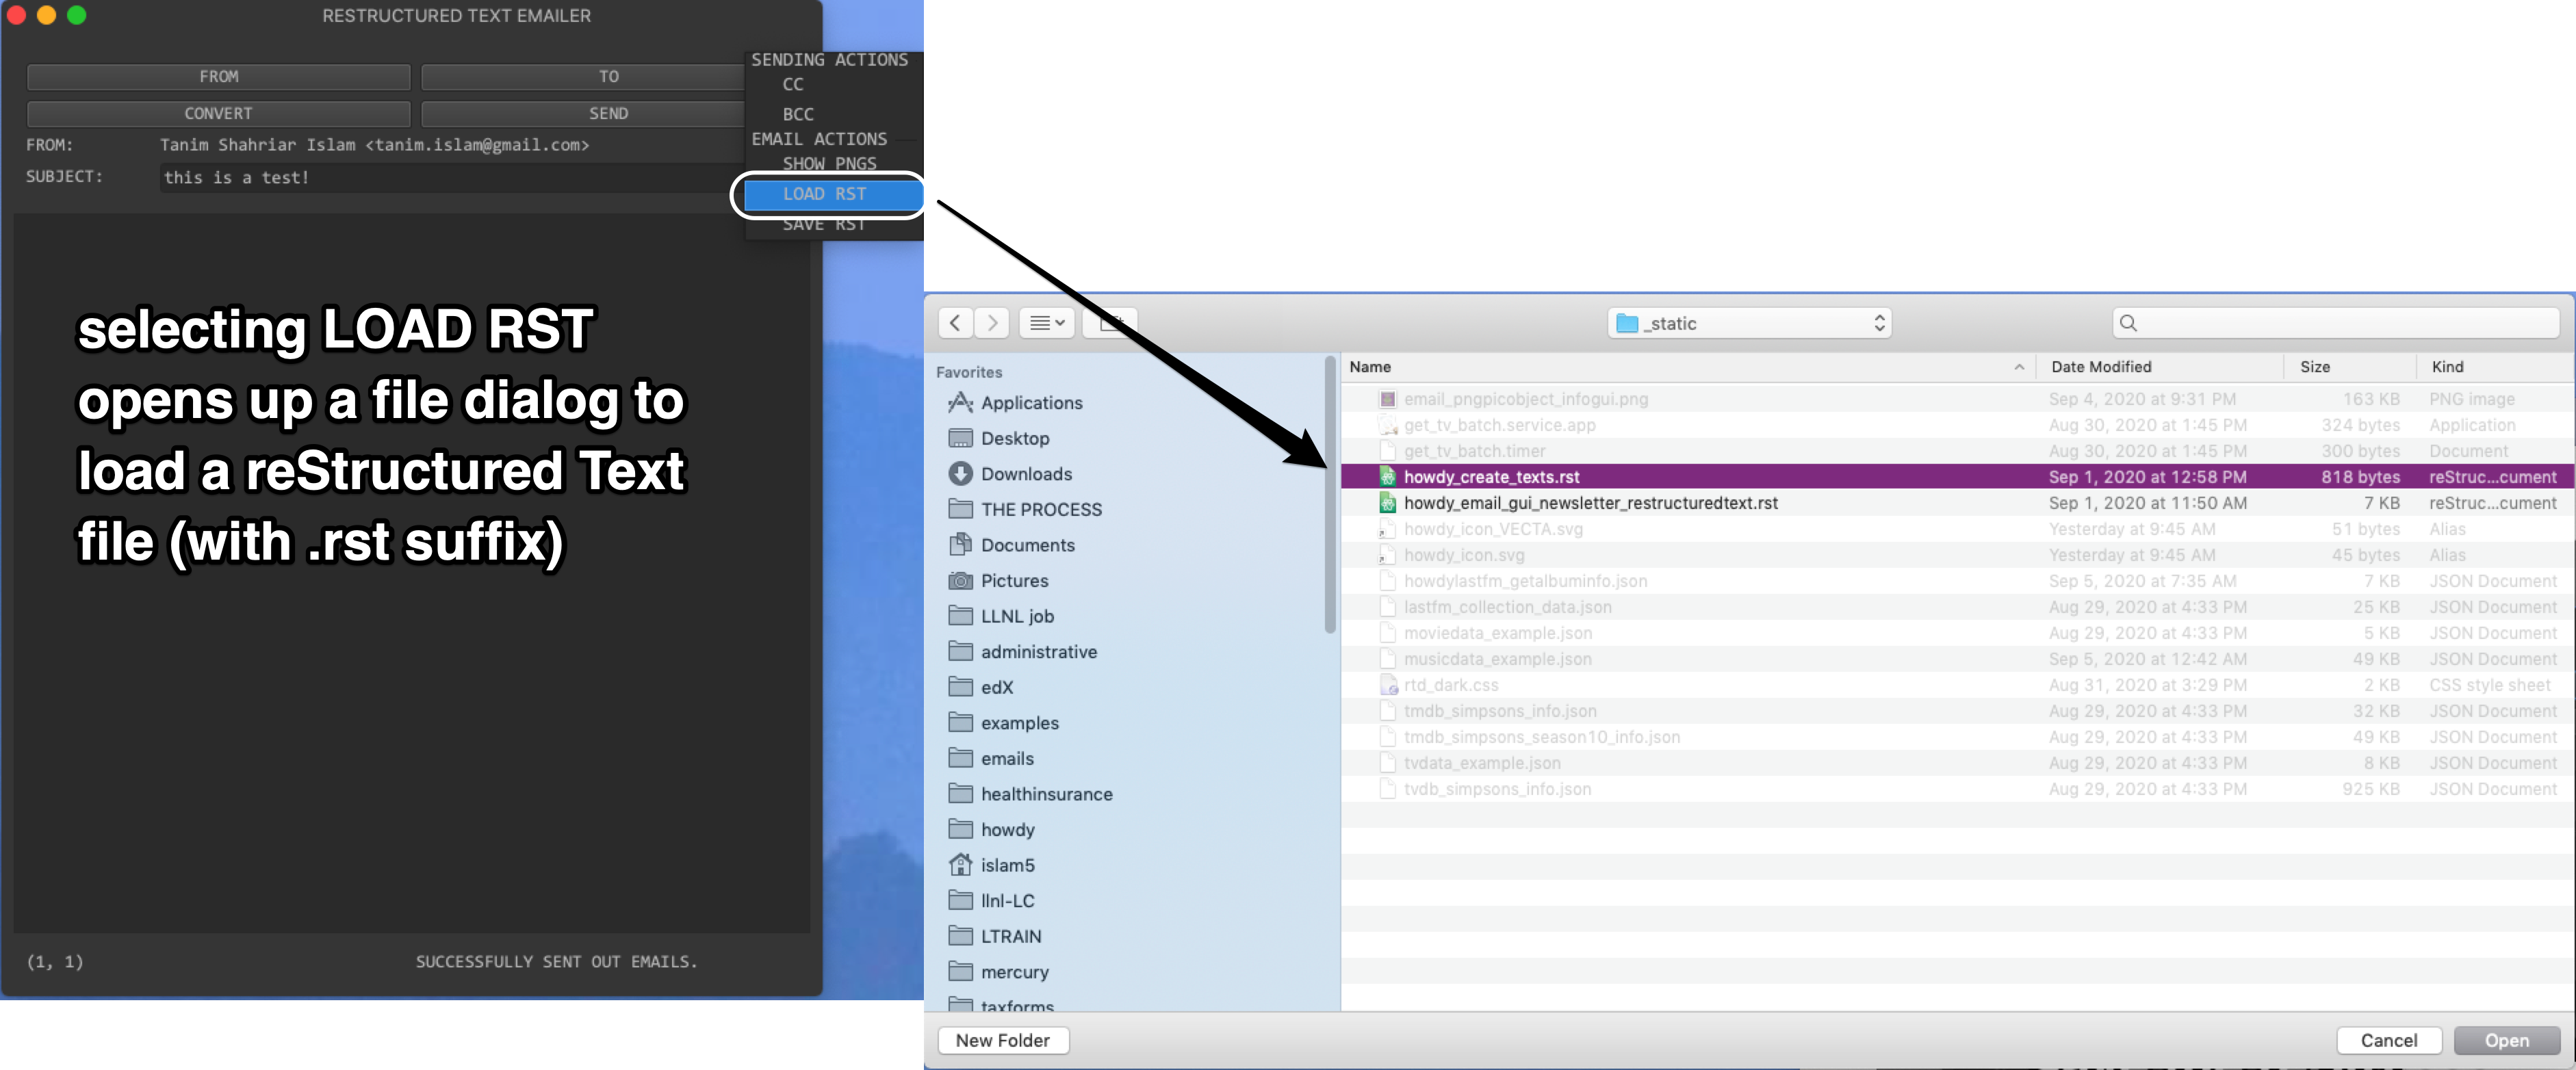
Fig. 8.35 Here, we load in the demonstration reStructuredText file, howdy_create_texts.rst, from docs/source/_static/howdy_create_texts.rst, to reproduce the same email as shown in Fig. 8.29.
This will fill the email text area with that reStructuredText file. You can then click on CONVERT to verify that this is the email you want to send.