2.3.  Consolidating Howdy Configuration With
 howdy_config_gui
Although howdy_config_gui is part of core, and naturally lives in Section 4, I suggest you use this configuration tool to naturally consolidate the services and settings. The final configuration data will live in an sqlite version 3 database that is located in ~/.local/howdy/app.db and is readable only by the user (and root).
Some of the howdy_config_gui screenshots are found in Section 2.1.6 (specifically Fig. 2.7, Fig. 2.10, and Fig. 2.12) and in Section 2.2 (specifically Fig. 2.16 and Fig. 2.17).
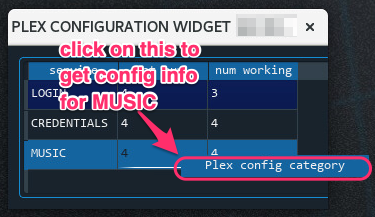
Fig. 2.18 describes the three initial sets of services and settings.

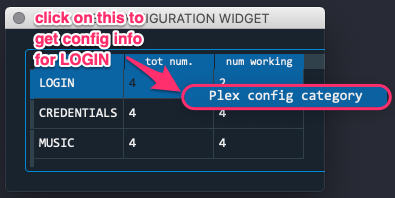
Fig. 2.18 As described in Section 2.1 and Section 2.2, howdy_config_gui start with the initial dialog widget of three sets of services and settings organized into three rows: LOGIN, CREDENTIALS, and MUSIC. The second column shows the number of services for each service set. The third column shows that number of services that are working.
The document is organized into these three sections.
Login Services describes the dialog window that sets the login services.
Credentials Services describes the dialog window that sets the credentials. Section 2.3.2.1 describes how to select one’s main Imgur album used for the storage and retrieval of images when writing newsletter emails (see Section 8.2).
Music Services describes the dialog window that applies the settings for music services.
2.3.1. Login Services
As described in Section 2.2, right click on the LOGIN row in the main widget to launch the PLEX LOGIN CONFIGURATION widget. The relevant screen shot, login window, is shown below.
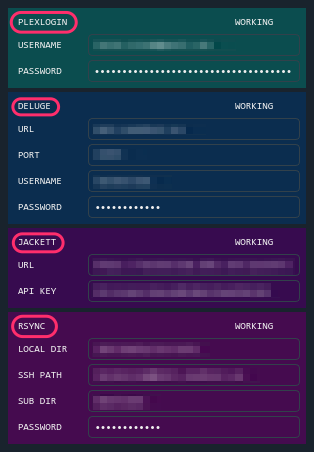
The PLEX LOGIN CONFIGURATION widget is organized into four services, each organized into differently colored sub-widgets. The top row of each widget gives the name of the service, and its status (working or not working). The login widget controls settings for four services:
PLEXLOGIN: the username and password for your Plex account.
DELUGE: necessary settings to access your Deluge torrent server.
JACKETT: the URL and API key for your Jackett torrent searching server.
RSYNC: settings used to securely copy downloaded movies and TV shows from a remote server to the Plex server you control.
Here is a screen shot.
Use your Plex email and password for PLEXLOGIN, as described in Section 2.2.1. Set up at least your Deluge server according to Section 2.2.2. Set up JACKETT as described in Section 2.1.5, and more conveniently using a Jackett server provided by Seedhost (see Section 2.2.2 for more details). Finally, apply RSYNC settings according to Section 2.2.3.
2.3.2. Credentials Services
As described in Section 2.1.6, right click on the CREDENTIALS row in the main widget to launch the PLEX CREDENTIALS CONFIGURATION widget. The relevant screen shot, credentials window, is shown below.

Fig. 2.19: is a screen shot of the PLEX CREDENTIALS CONFIGURATION widget.
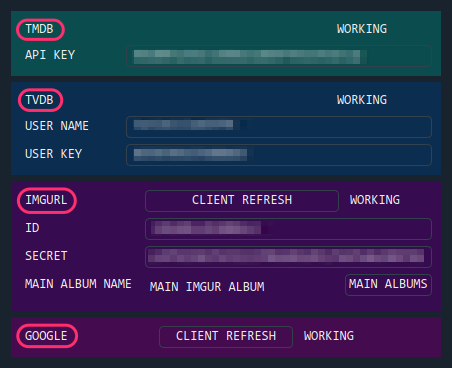
Fig. 2.19 The PLEX CREDENTIALS CONFIGURATION widget is organized into four services: the TMDB service, the TVDB service, the Imgur image hosting service, and Google’s services (see Section 2.1 for a list).
Apply the TMDB service settings according to Section 2.1.1. Apply the TVDB service settings according to Section 2.1.2. Apply the Imgur settings according to Section 2.1.3. Finally, follow instructions in Section 2.1.6 to set up all six of the Google and Google-related services that Howdy uses.
2.3.2.1. Choosing Main Imgur Album
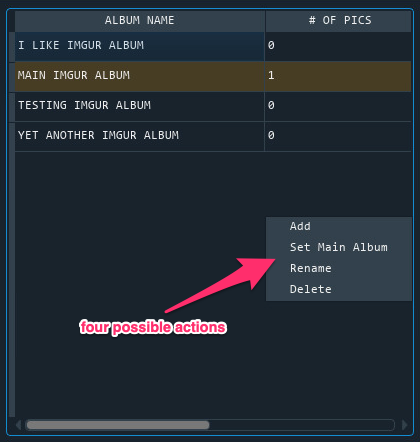
The IMGUR panel in the PLEX CREDENTIALS CONFIGURATION widget has a row that shows the main Imgur album – that contains the PNG images that can accessed, added, and removed – used by howdy_email_gui to insert images. The middle QLabel says the name of the main Imgur album that is being used; in Fig. 2.19 this is MAIN IMGUR ALBUM. The button labeled MAIN ALBUMS launches a GUI that allows us to choose, among other things, the main Imgur album to use for choosing images. In this GUI, the album names are shown alphabetically.
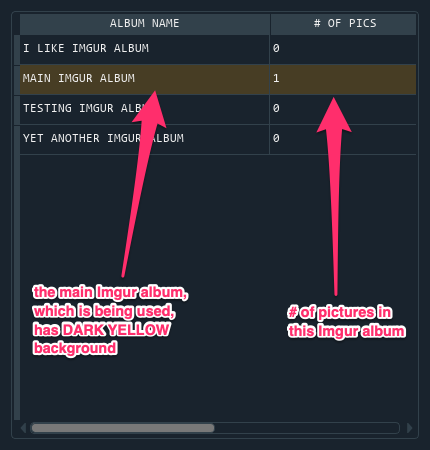
This GUI can do four things: add a new album (and make it the main Imgur album), select an existing album as the main Imgur album, delete an existing Imgur album, and rename the main Imgur album. These all occur through a popup menu triggered with a right click.
We can add a new album, and make it the new Imgur album, by choosing the
Addoption in the popup menu. We give it a name different from the other Imgur albums; if we choose a name that matches, then nothing happens. The new album is created, with (naturally) no images in it, and is made the MAIN Imgur album.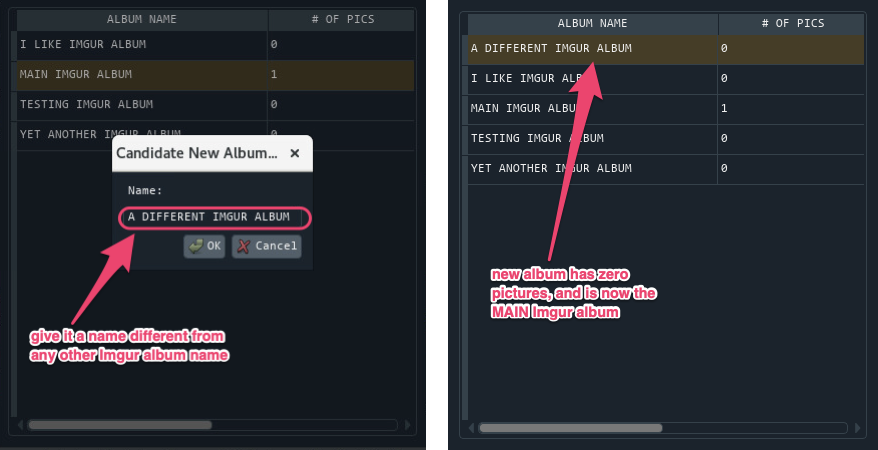
We can set the main Imgur album, by choosing the
Set Main Optionin the popup menu and selecting (in BLUE) the album.
We can delete the Imgur album, by choosing the
Deleteoption in the popup menu. This choice also removes all pictures in this album.If the album we delete is NOT the main Imgur album, then only that album’s entry in this table is removed.
If the album we delete is the main Imgur album, then the main Imgur album’s entry is removed, AND the new main Imgur album is alphabetically the first of the remaining albums.
If there was previously only one album, then the table is empty and there are no main Imgur albums with this account. Images can be used only after creating an Imgur album and then adding new images to it as shown in howdy_email_gui.
Fig. 2.20 demonstrates what happens when we delete a non-main album.
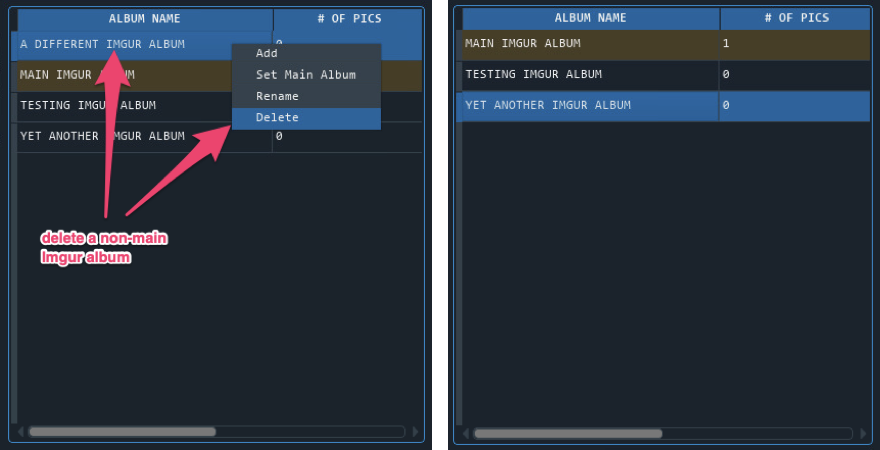
Fig. 2.20 Here is what happens when we delete a non-main album.
2.3.3. Music Services
Right click on the MUSIC row in the main widget to launch the PLEX MUSIC CONFIGURATION WIDGET. Here is a screen shot.
The PLEX MUSIC CONFIGURATION widget is organized into four services, each organized into differently colored sub-widgets: GMUSIC (the unofficial Google Music API service), the LastFM music metadata service, the Gracenote music metadata service, and the MusicBrainz music metadata service. Here is a screen shot.
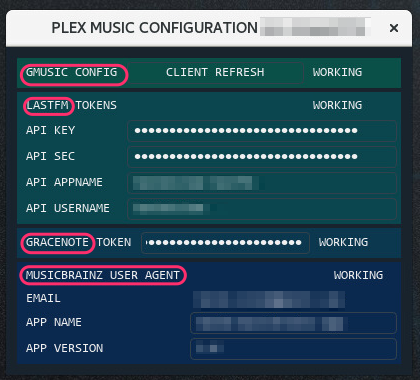
Section 2.1.6 describes how to set up GMUSIC, since the unofficial Google Play API uses Google’s services infrastructure. Copy the relevant information for LASTFM and GRACENOTE according to Section 2.1.4.
Public access to the MusicBrainz service requires a valid user agent. Howdy uses the musicbrainzngs Python module to access the MusicBrainz web service. This module requires an user agent with three elements:
email address.
version number.
app version (as a string).
The email address is taken from the login email for your Plex account. You can probably put nearly any non-empty string into the APP VERSION and APP NAME dialog boxes.