2.1. Howdy Services Configuration
This document contains all the needed information to get started on getting set up with all the services you need to get up and running with Howdy. Here are the following services needed to get all the functionality here.
Identifying movies using the Movie Database.
Identifying television shows and episodes using the Television Database.
Uploading images for emails using the Imgur image service.
Populating music metadata using either the Gracenote API or the LastFM API.
Using the Jackett proxy server to consolidate torrent searches among 20-30 public torrent trackers (such as Torrentz2, RARBG, Kickass Torrents, and The Pirate Bay) through a single search API, and service without CAPTCHAs or other usability restrictions.
A bevy of Google services to do the following.
Sending out emails to your Plex users, using the GMail API, and identifying them from your Google address book using the Google Contacts API.
Identifying songs on YouTube using the YouTube API.
Access to Google spreadsheets using the Google Sheets API.
Upload your music to your Google Play Music account using the unofficial Google Music API.
The document is organized into the following sections.
2.1.1. The Movie Database (TMDB) API
Instructions on getting an access key for the TMDB API start with the TMDB API link.
2.1.2. The Television Database (TVDB) API
The TVDB API registration is more involved and (currently, as of 2 July 2019) not clearly documented. Here is how I got this to work.
Log in or register (if you don’t have an account) onto the television database login page, as shown in Fig. 2.1.
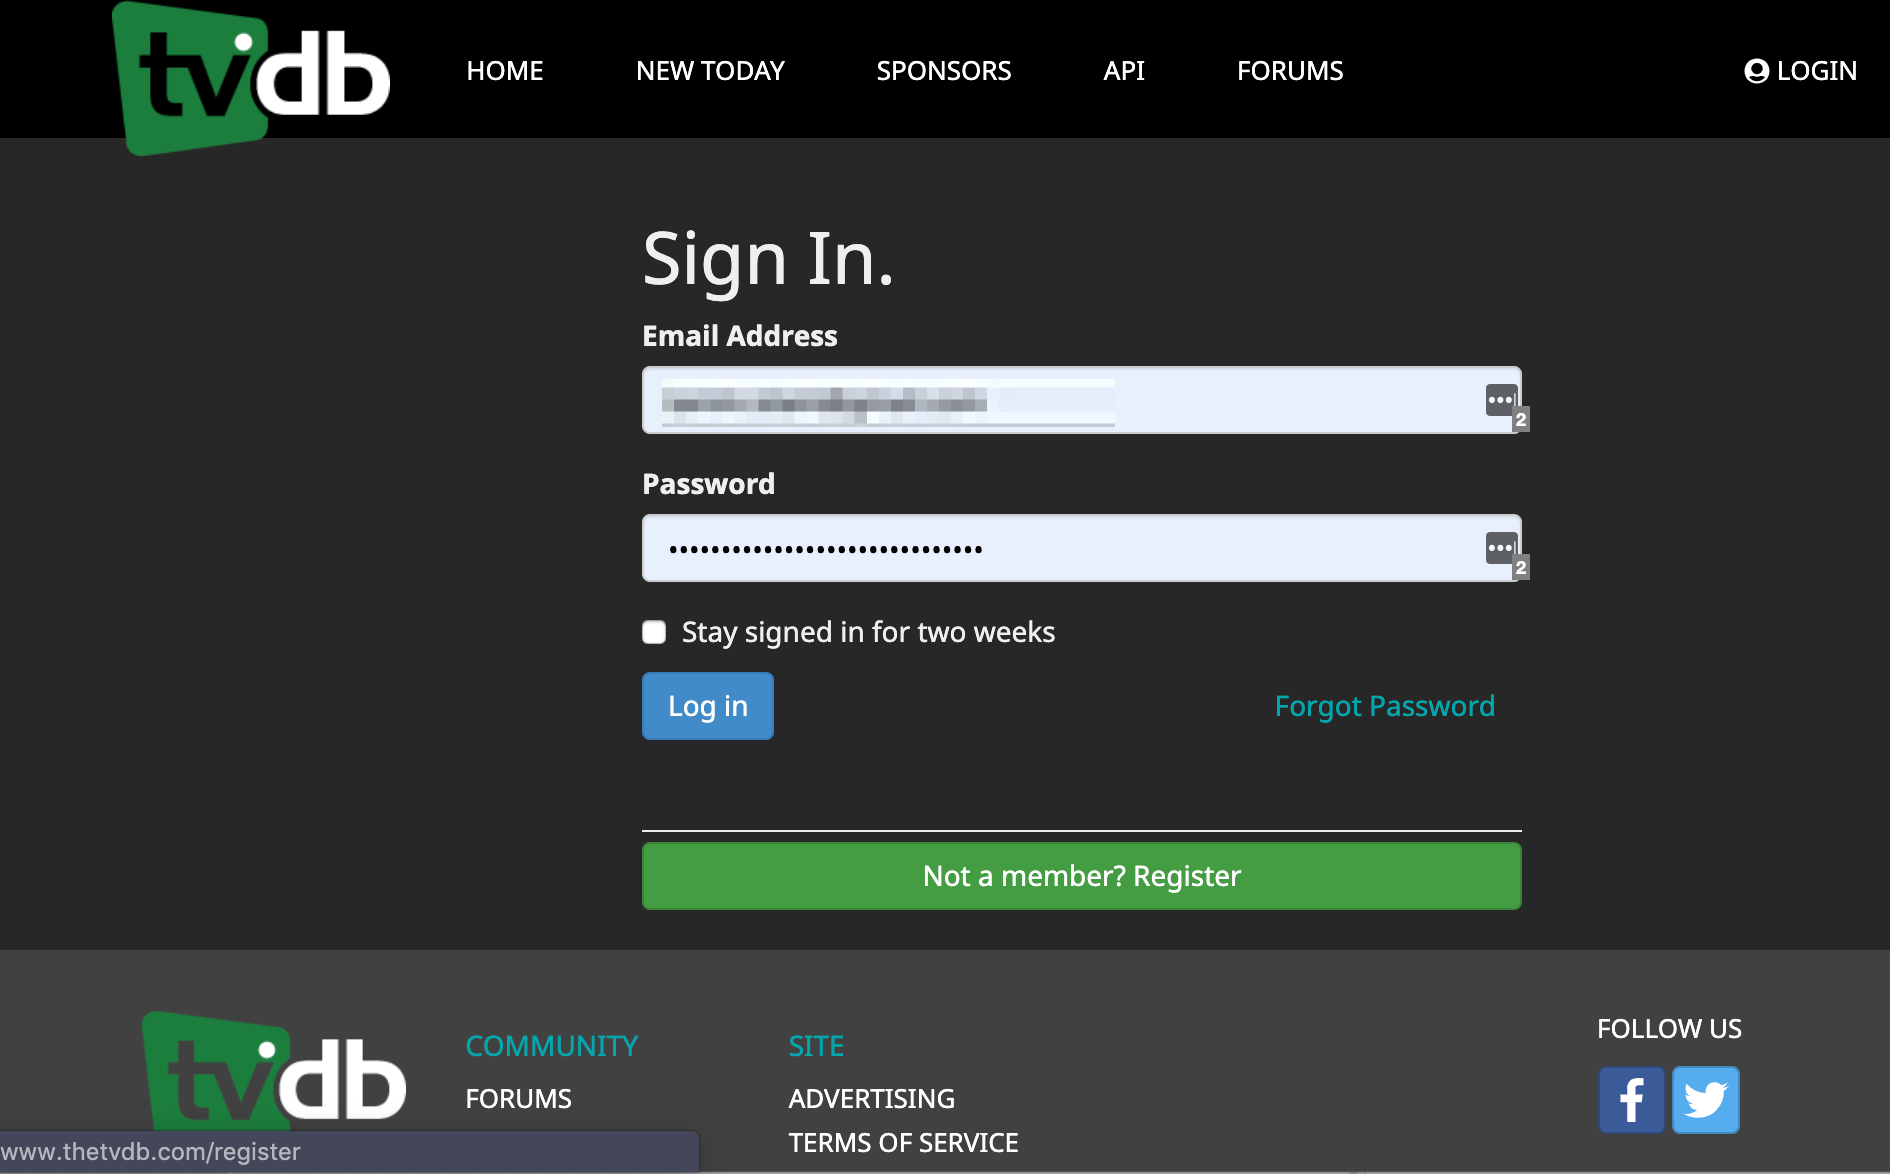
Fig. 2.1 The Movie Database login page.
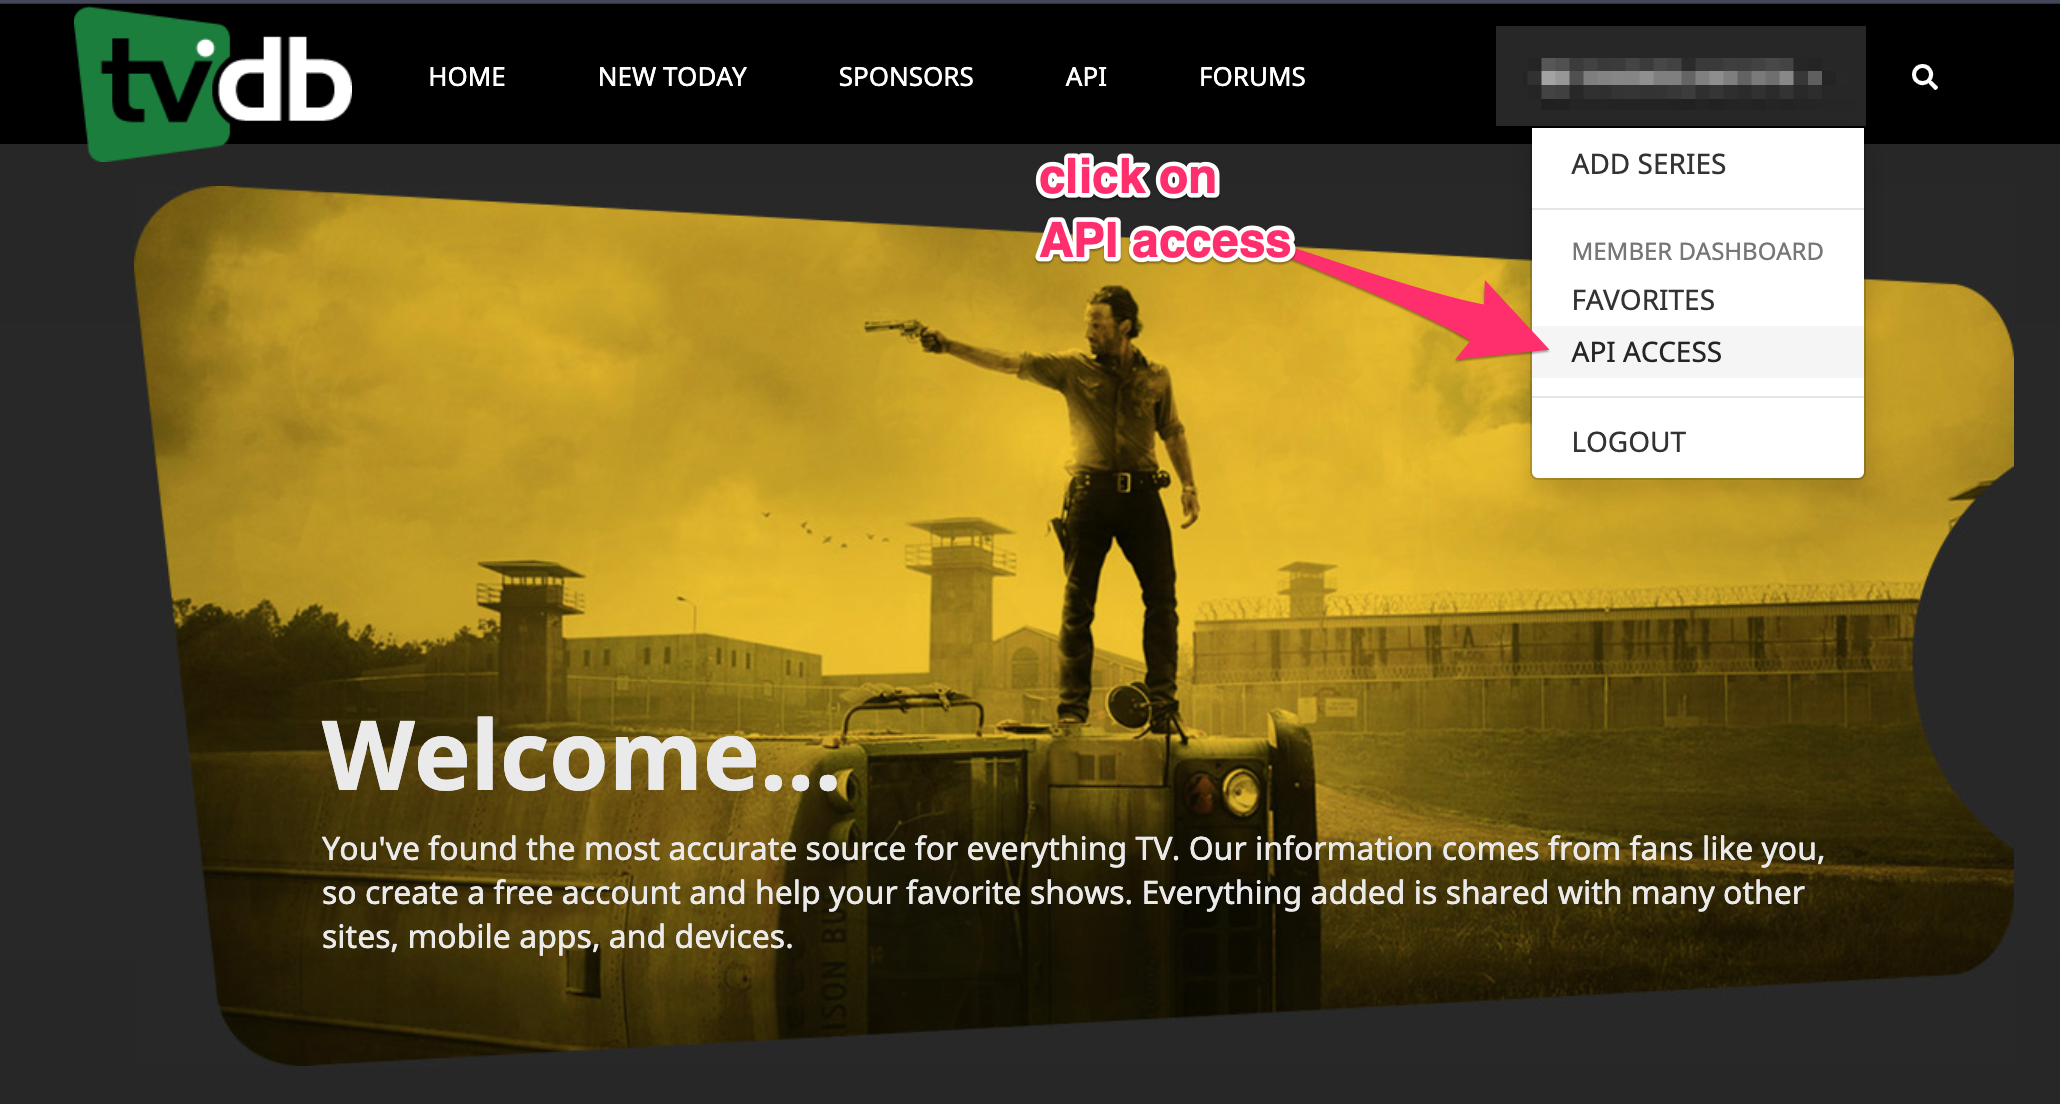
Select the API ACCESS sub menu option in the right most menu option, which is your TVDB username, <USERNAME> → API ACCESS, as shown in Fig. 2.2.
This will send you to the API keys web page for your account. On the top, you will see two labels showing your username, and an unique ID that the TVDB assigns to you. A hopefully illuminating screen shot is shown in Fig. 2.3.
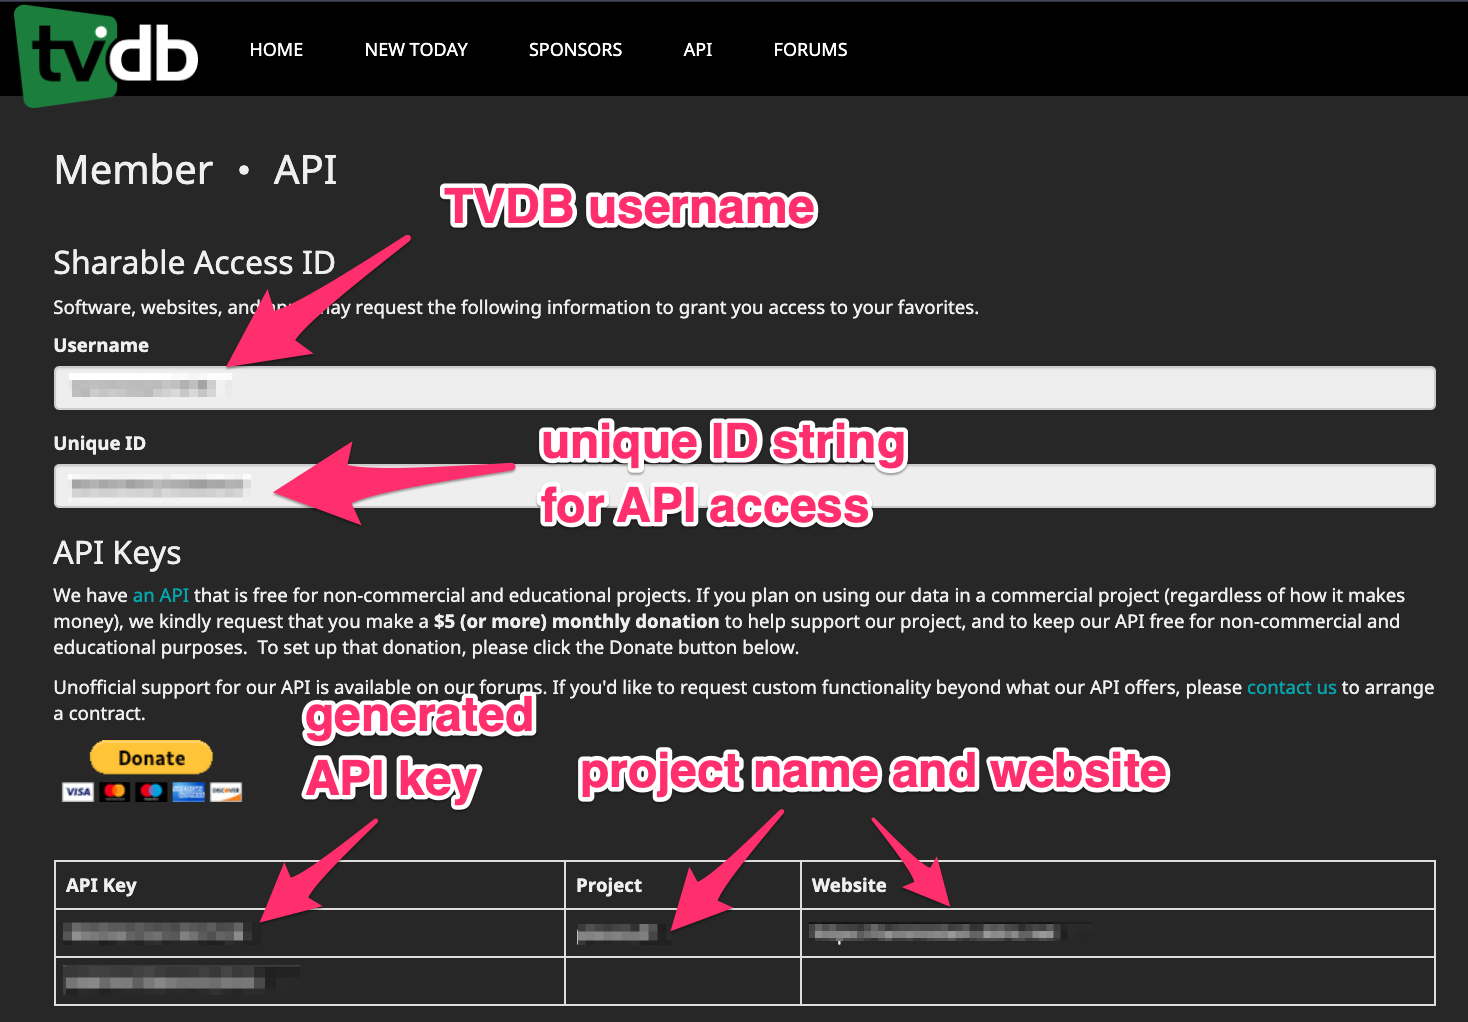
Fig. 2.3 In the middle section is a table showing the API keys you have created, if any. Each row is a project you have created that the TVDB uses to grant you API access. Each project has an API key, the project name, and project website.
Generate an API key by defining a project name, project website, and then click on the Generate API key button, as shown in Fig. 2.4.
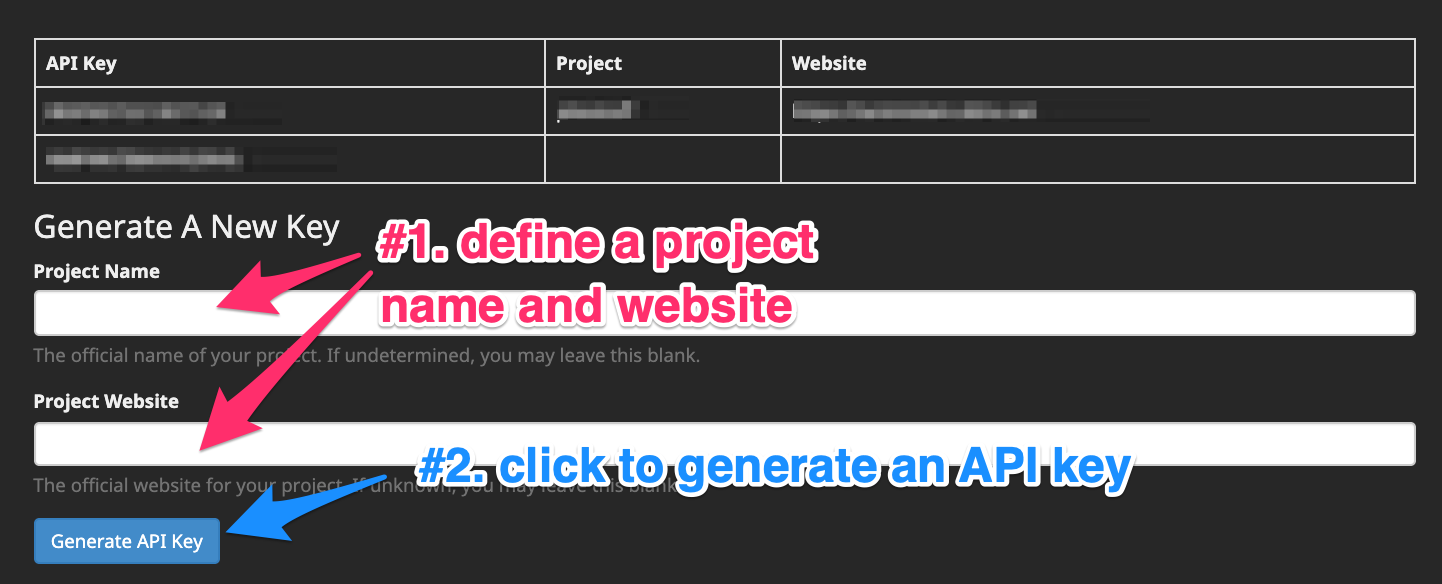
Fig. 2.4 Make sure to record the TVDB project name, API key, and unique ID.
The final information one programmatically sends to the TVDB service, through REST commands, is represented by the following JSON data.
{
  "apikey":  "XXXXXXX",
  "username": "YYYYYY",
  "userkey":  "ZZZZZZ"
 }
2.1.3. The Imgur API
Incomplete information on setting up Imgur API access can be found on this website. High level instructions to generate valid Imgur client credentials are described in Section 2.1.3.1.
2.1.3.1. Generate Imgur Credentials Using Howdy
Here are the steps used to get working Imgur API access using the howdy_config_gui. First register for an Imgur account, if you have not already done so.
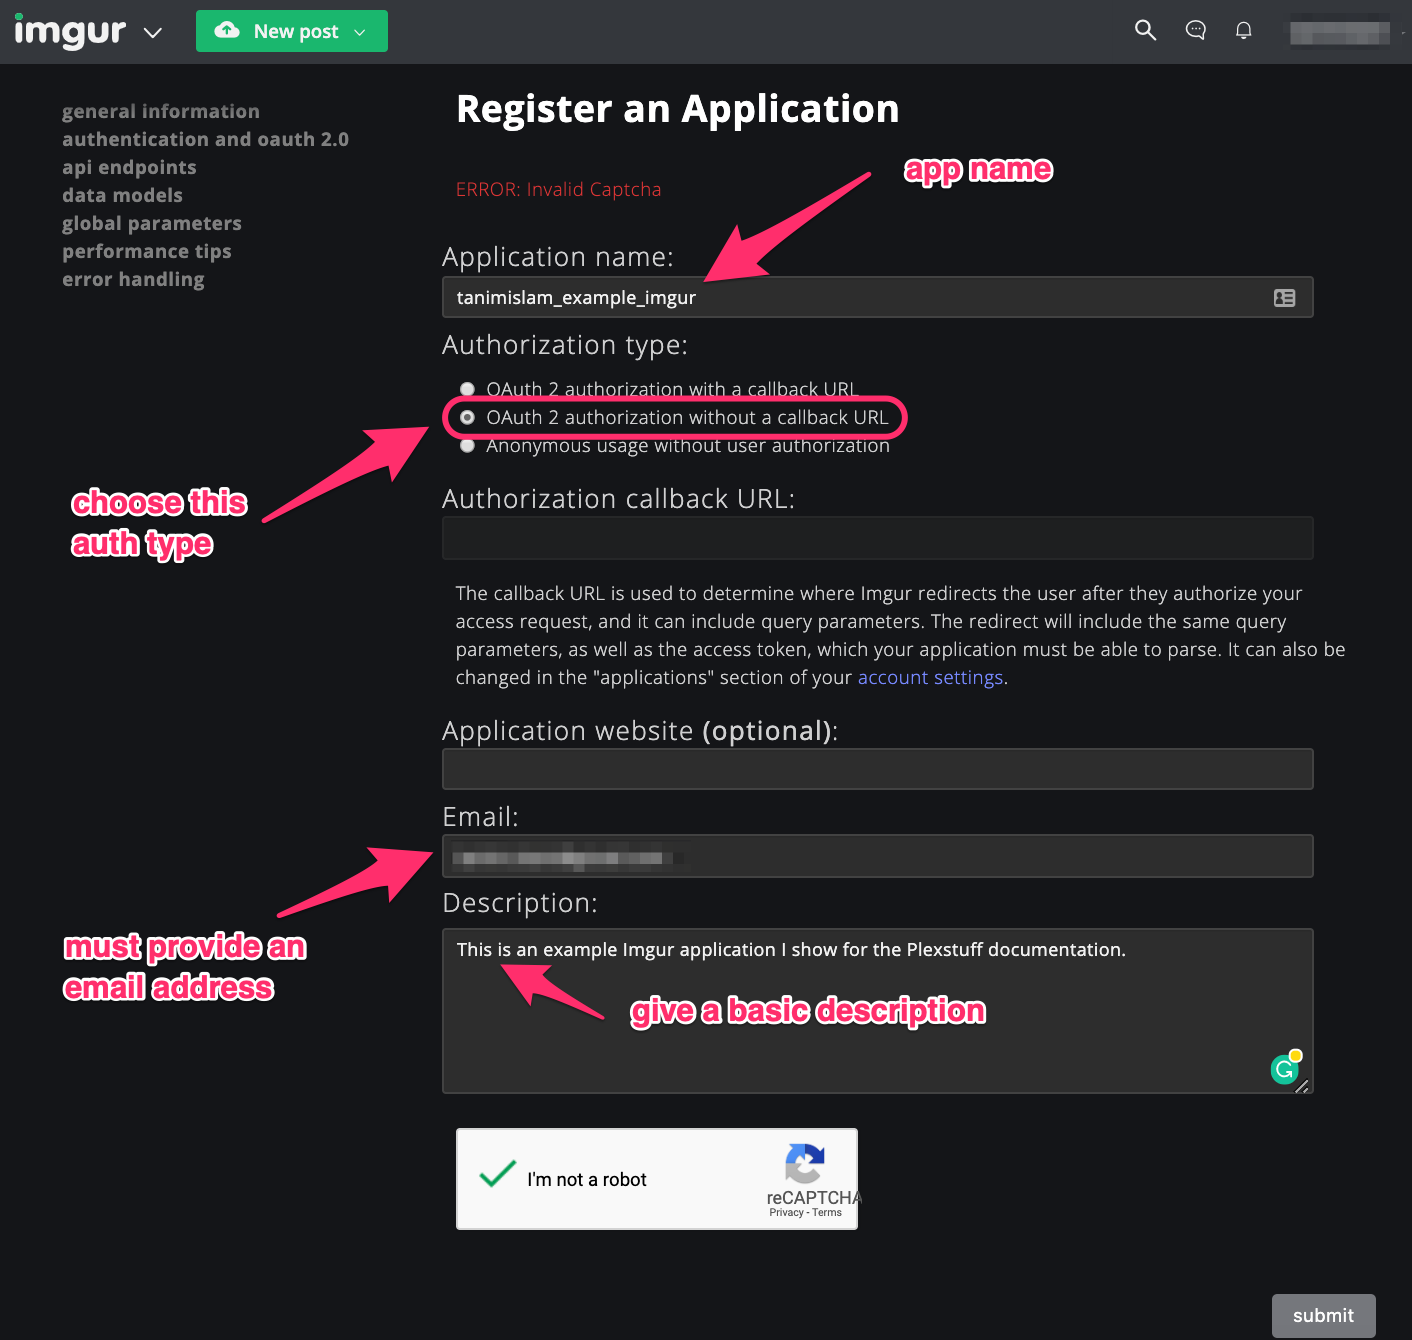
Once you have an account, register an Imgur application. Specify an application name, choose the “OAuth2 authorization without a callback URL” option, provide an email address, and provide a basic description of the application. Here is a screen shot.
Now go to your Imgur application’s webpage and click on the generate new secret to generate an application Oauth2 secret ID. Here is a screen shot.
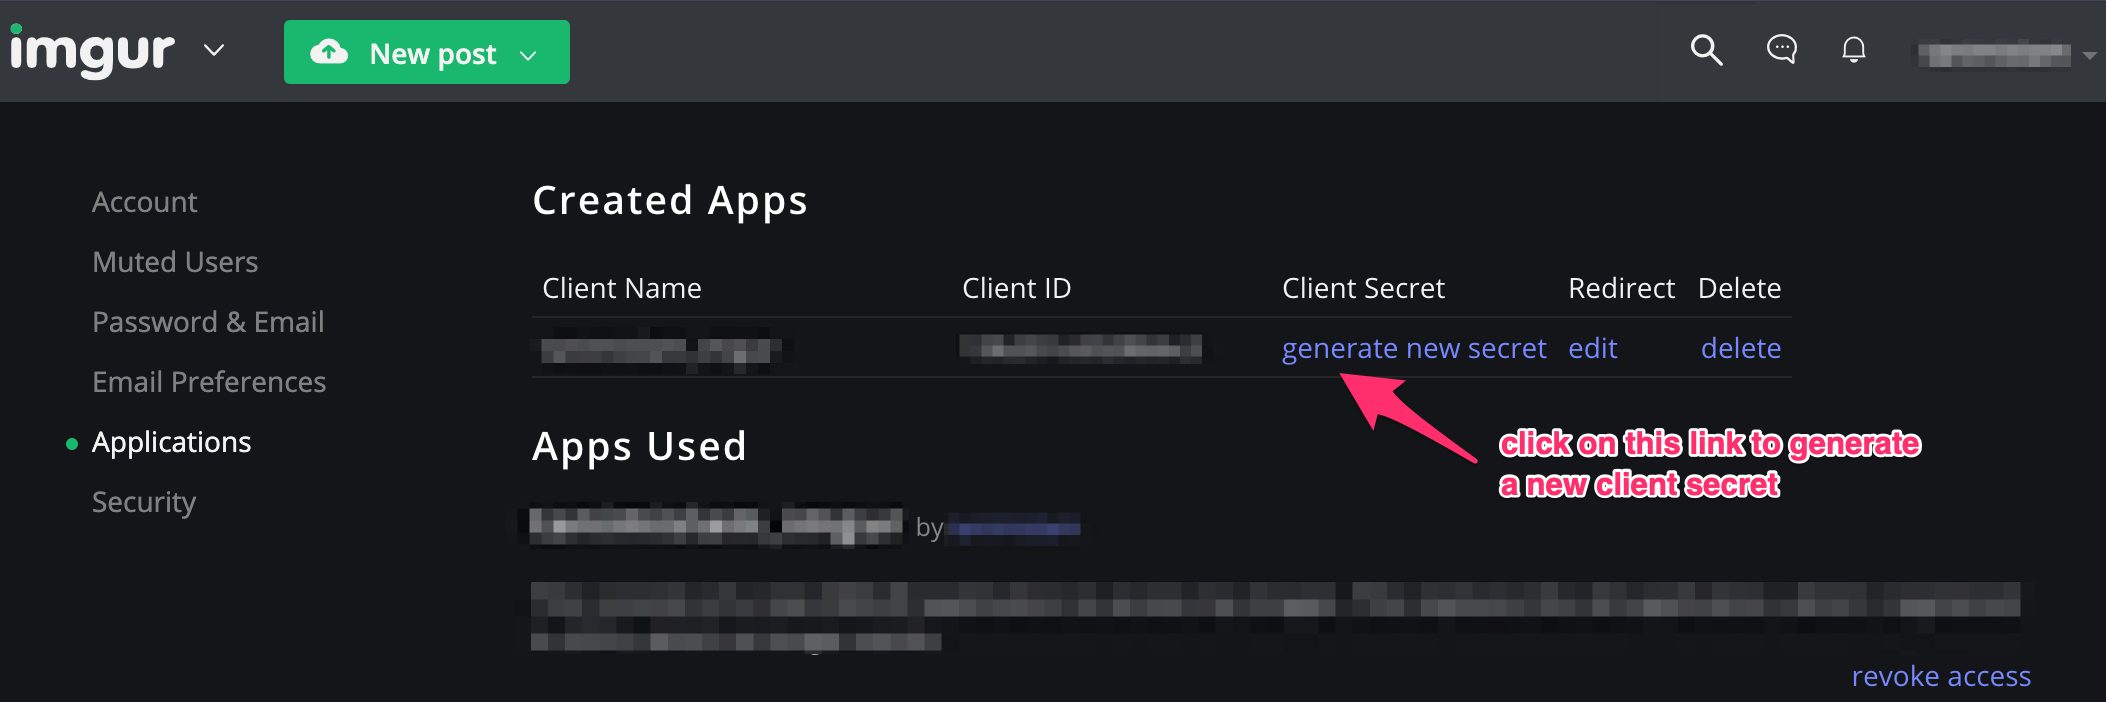
Fig. 2.5 Generate the secret on the Imgur‘s application web page.
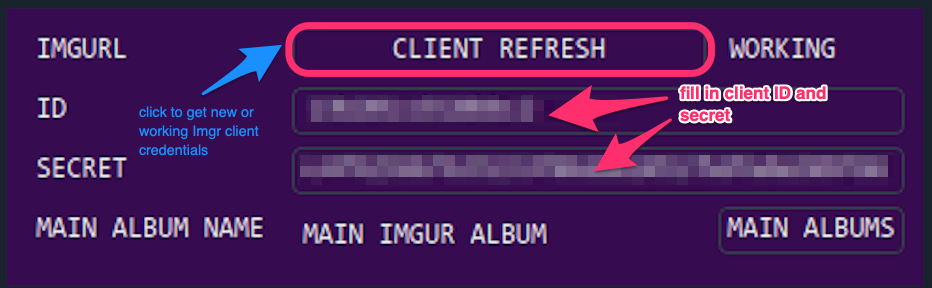
Then record the client ID and client secret, which will be used in
howdy_config_gui. Here is a screen shot.

Launch
howdy_config_gui, which starts with a three row table: LOGIN, CREDENTIALS, and MUSIC. Right click on the CREDENTIALS row to launch a context menu with a single item, Plex config credentials. Click on Plex config credentials. Here is a screen shot.
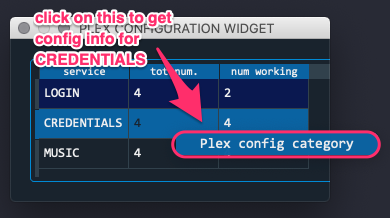
Fig. 2.7 Click on Plex config credentials.
Fill in the Imgur client ID and Imgur client secret as shown in Fig. 2.6 and then press the REFRESH CLIENT button. Here is a screen shot.
At this point, two things occur. First, a new web browser window (or tab, if a browser window is open) that resolves to the URL that the Imgur client must use in order to finally authenticate the client. Copy the full URL in the browser’s tab, as shown in Fig. 2.8 into the new dialog window shown in Fig. 2.9. Press return in that dialog window.
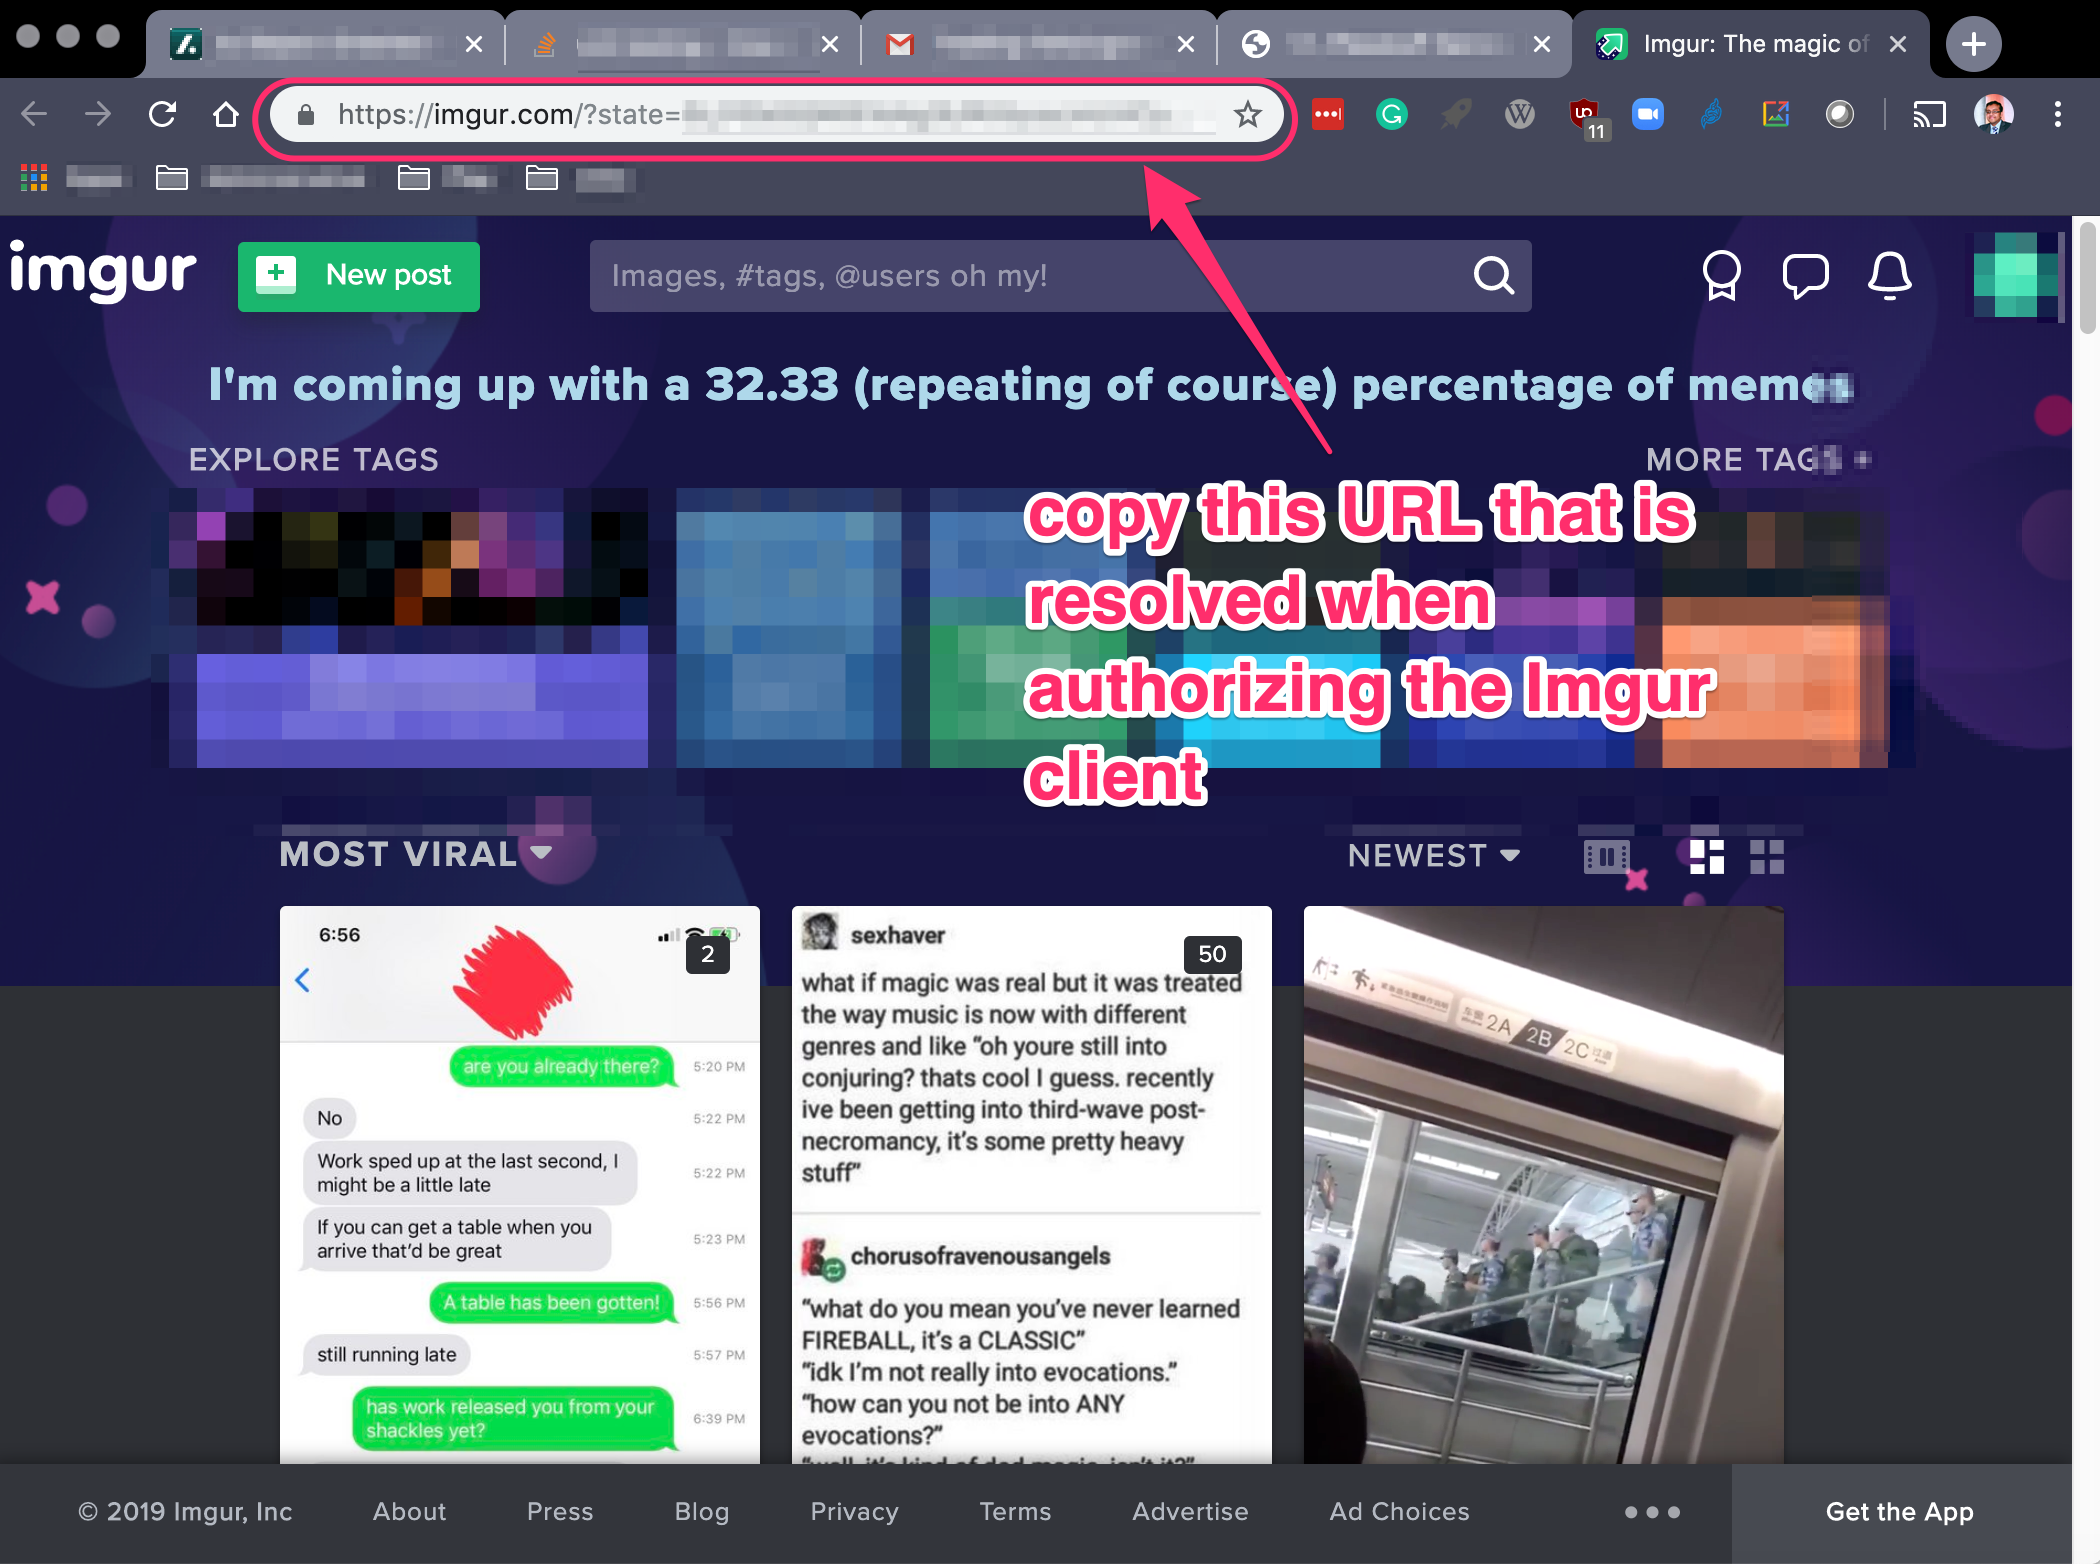
Fig. 2.8 This is the full URL in the browser’s tab.
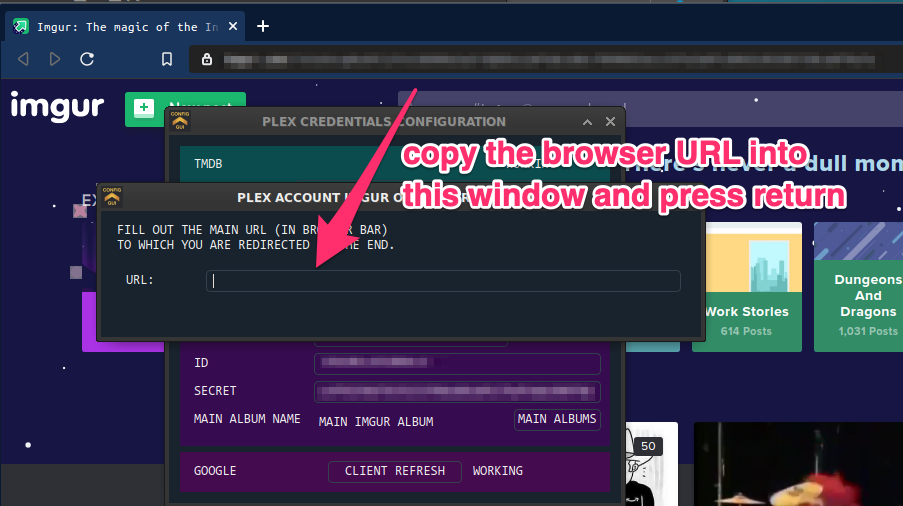
Fig. 2.9 Copy the full URL in Fig. 2.8 into the Imgur configuration URL dialog.
This should work – the Plex config credentials widget should show WORKING under the Imgur settings panel. If this does not work, then close the Imgur URL dialog in Fig. 2.9 with the
Esckey, and generate a new client secret as shown in Fig. 2.5, and repeat until you are able to generate good Imgur client credentials.
2.1.3.2. Low Level Imgur Credentials
The lower level generation of Imgur credentials use requests-oauthlib to generate the Imgur credentials.
Follow steps 1-3 in Section 2.1.3.1 to get the Imgur client ID and client secret.
Generate the Oauth2
authorization_urlandstatevariables, using this piece of example Python code. We also allow one to choose whether to verify SSL connections with averifyboolean variable.from requests_oauthlib import Oauth2Session client_ID = "XXXXXXXX" client_SECRET = "YYYYYYY" variable = True auth_url = "https://api.imgur.com/oauth2/authorize" token_url = "https://api.imgur.com/oauth2/token" imgur = Oauth2Session( client_ID ) authorization_url, state = authorization_url, state = imgur.authorization_url( auth_url, verify = False )
Launch a browser at the
authorization_urleither manually or by runningimport webbrowser webbrowser.open_new_tab( authorization_url )
Copy the browser URL, as described in Fig. 2.8, into
response_url, and generate the final OAuth2 token into atokendictionary object.imgur = Oauth2Session( client_ID, state = state ) token = imgur.fetch_token( token_url, authorization_response=response_url, client_secret=client_secret)
If the process does not work, an Exception will be emitted. If successful, the final
tokenobject looks like the following,{'access_token': 'xxxxxx', 'expires_in': 315360000, 'token_type': 'bearer', 'scope': None, 'refresh_token': 'rrrrrr', 'account_id': <account_ID>, 'account_username': <account_username>, 'expires_at': zzzzz }
Copy
token['refresh_token']withclient_IDandsecret_IDto authorize your Imgur client. Here, you can follow instructions as given in the Imgur API page.
2.1.4. The Gracenote and LastFM APIs
Instructions for the Gracenote API registration can be found here. The implementation of metadata population using Gracenote uses the pygn Python module.
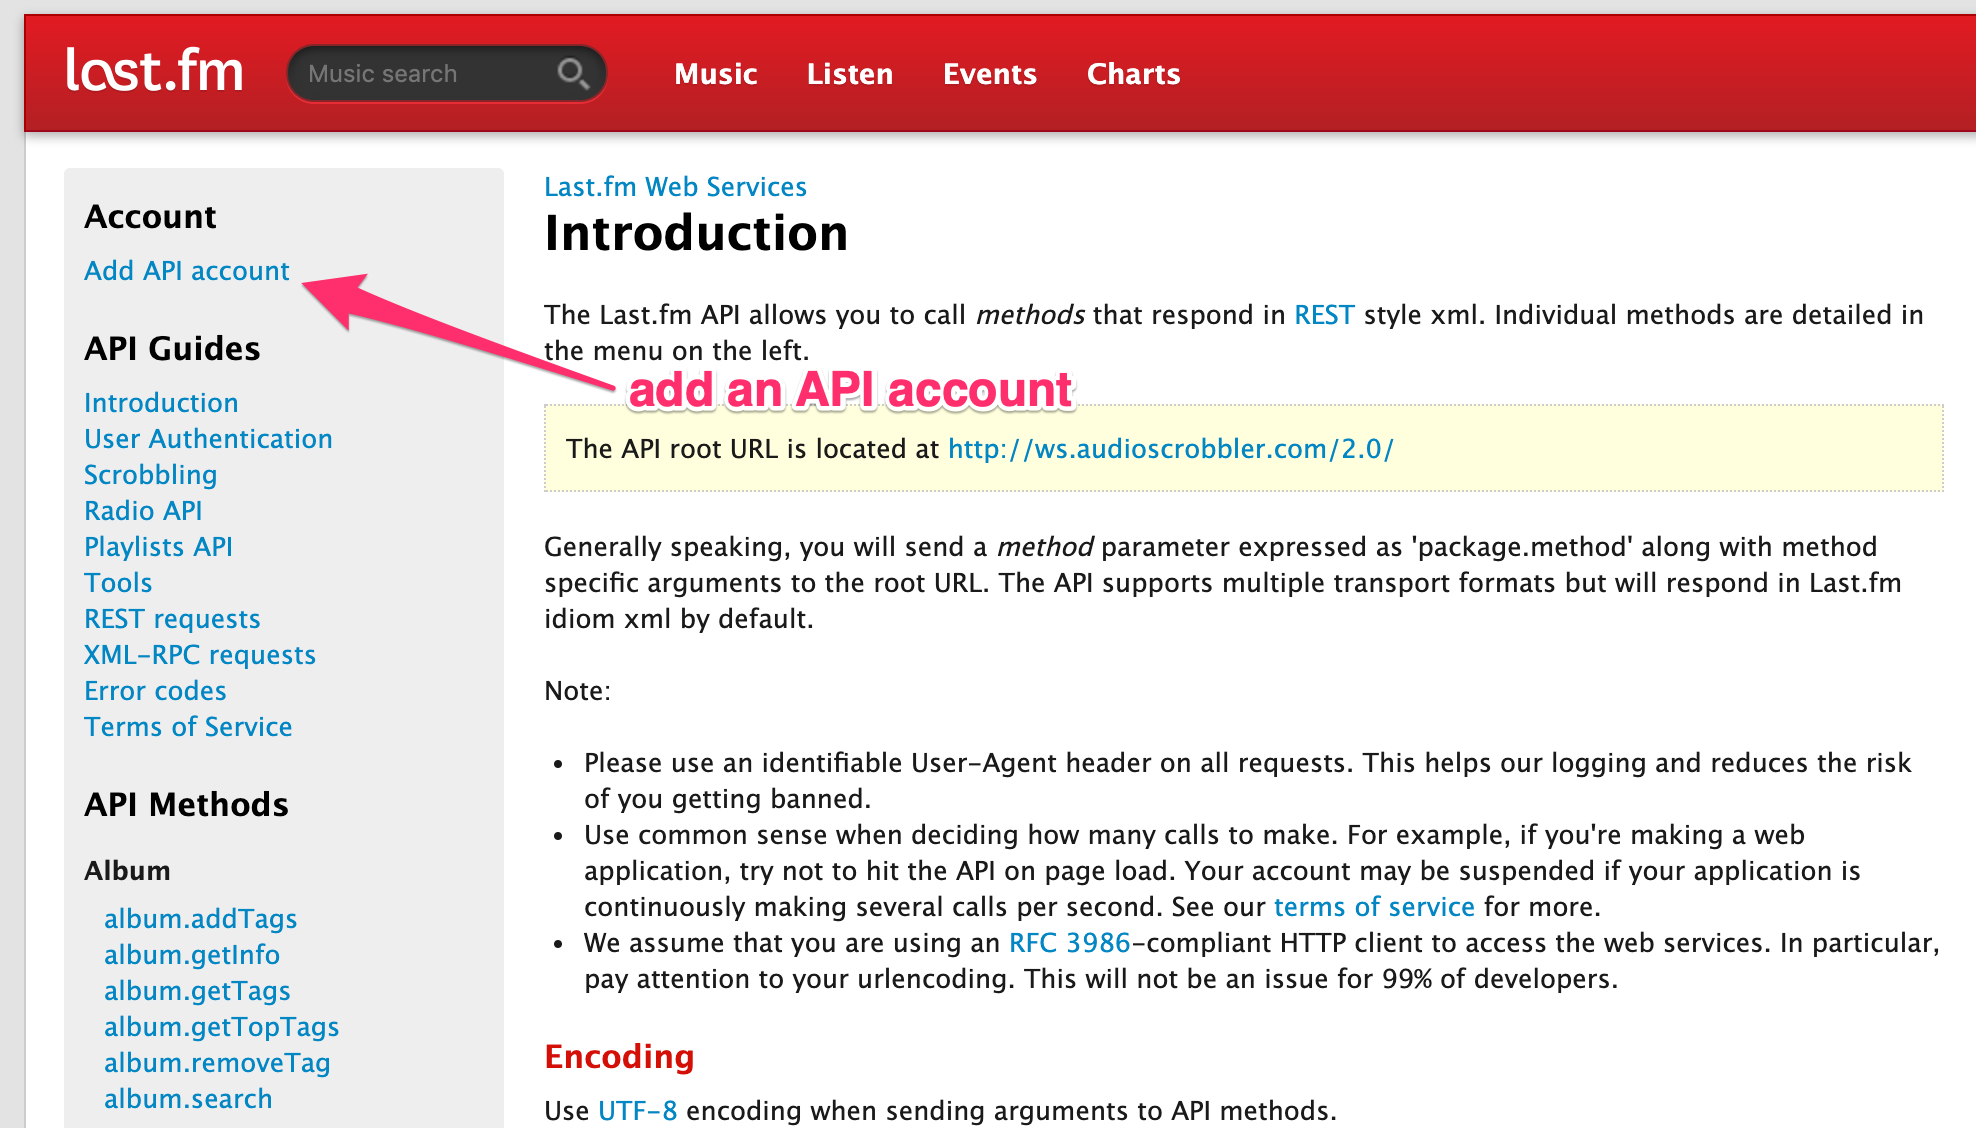
The instructions for the LastFM API registration start here. Here are the steps to get an API key and register your service to use the LastFM API to get music metadata.
On the API intro page, click on the the Add API account link. Here is a screen shot.
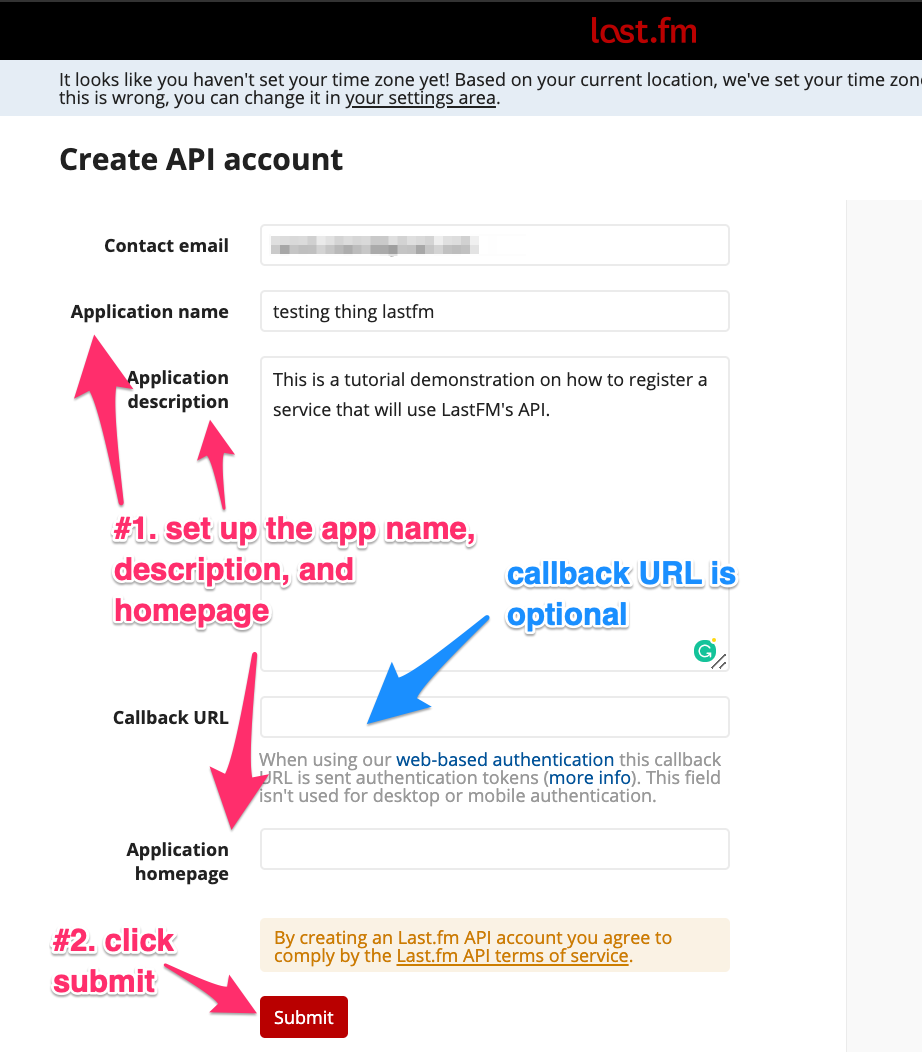
You will land on the LastFM API creation page. Fill in the forms for Application name, Application description, and Application homepage. Leave Callback URL empty because it is optional. Click on the Submit button once done. Here is a screen shot.
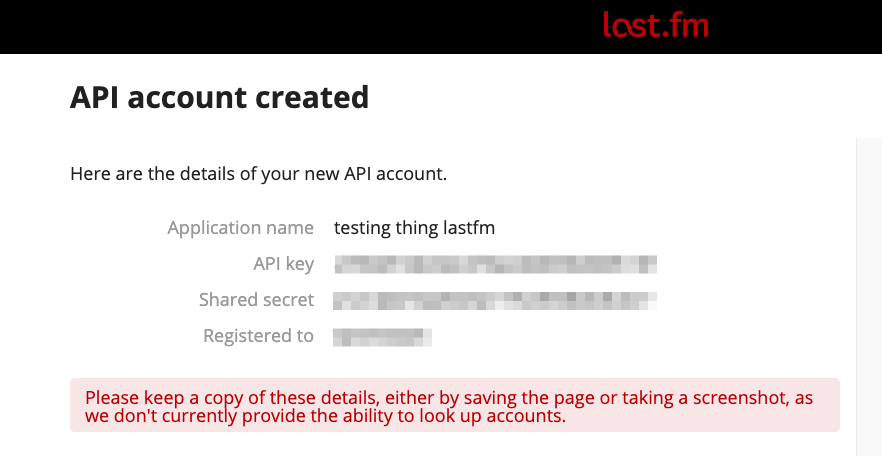
If everything has worked out, after clicking Submit you will see the Application name, API key, Shared secret, and Registered to fields. Record this information. Here is a screen shot.
2.1.5. The Jackett Server
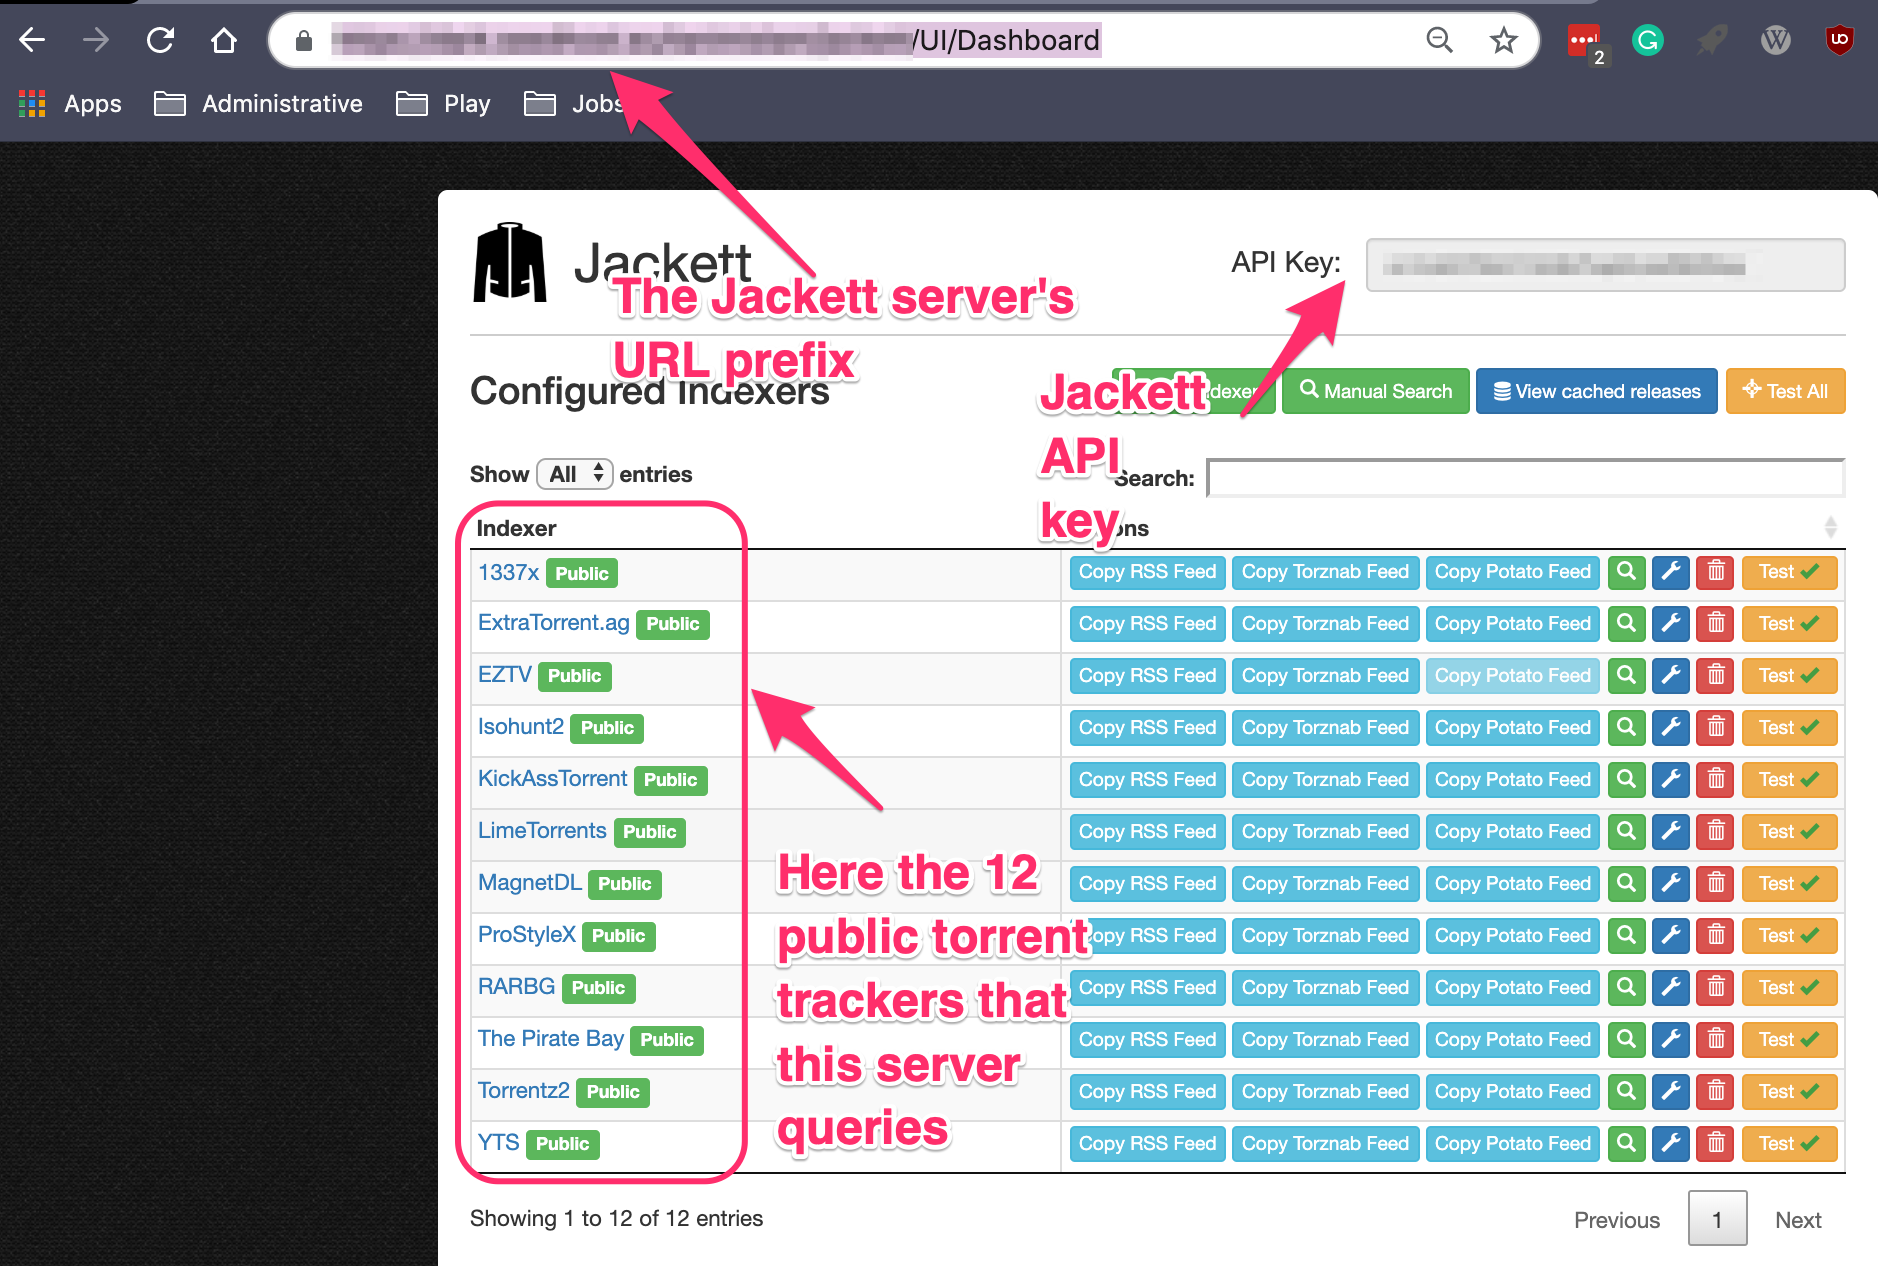
Jackett is a relatively successful proxy server that consolidates the torrent search from a large number of public, private, and semi-private torrent trackers and services into a single search user interface and API. It is used as the torrent searching back end for higher level media automated downloaders/maintainers such as Sonarr, Sickrage, Radarr, Lidarr, Couchpotato, and yet many others that I have not included.
Howdy needs the main URL prefix of the Jackett server, and the Jackett API key, in order to use Jackett programmatically to search for movie and television torrents. The URL prefix is the part of the Jackett Web UI page before the UI/dashboard in the address. The API key is clearly shown and can be copied.
2.1.6. Summary of Setting Up Google Credentials
We set up Google services that use YouTube, GMail, Google Contacts, Google Spreadsheets, and the unofficial Google Music API.
Since these are all Google services, a single tool sets all of them up given a single Google account using Google’s OAuth2 authentication mechanism. The easiest way to do this is through the howdy_config_gui executable, which is part of Howdy.
Launch howdy_config_gui, which starts with a three row table: LOGIN, CREDENTIALS, and MUSIC (see Fig. 2.18). Right click on the CREDENTIALS row to launch a context menu with a single item, Plex config credentials. Click on Plex config credentials. These instructions are the same as in step 4 in Section 2.1.3 and in step 4, which we reproduce here.

A PLEX CREDENTIALS CONFIGURATION widget will open. Click on the CLIENT REFRESH button in the Google section of this widget. Here is a screen shot.
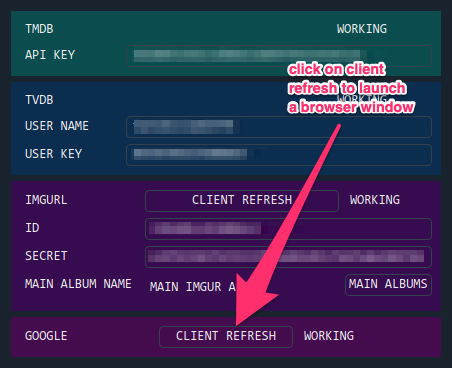
Fig. 2.10 Refresh Google credentials.
A browser window in your default internet browser will launch, asking you to authorize access to a Google account. Here is the first screen shot.
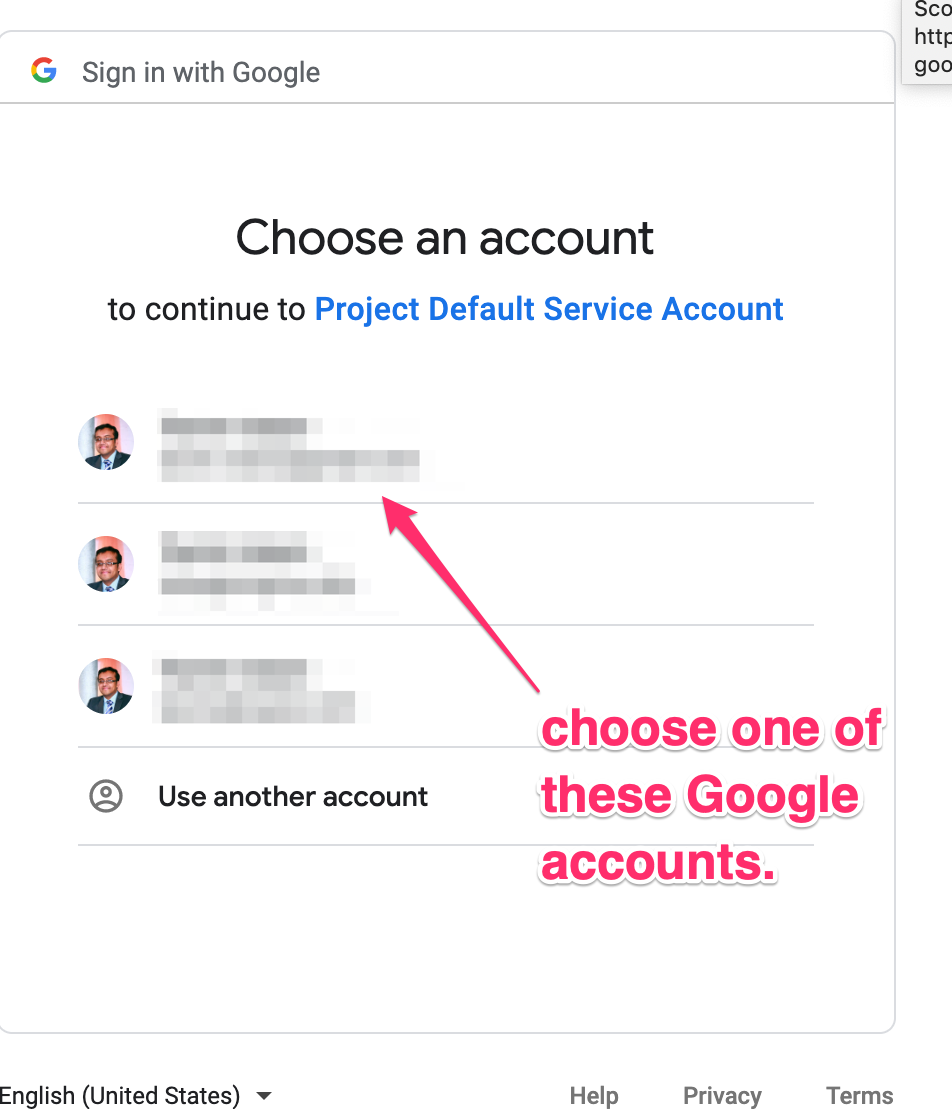
Fig. 2.11 First authorize your Google account.
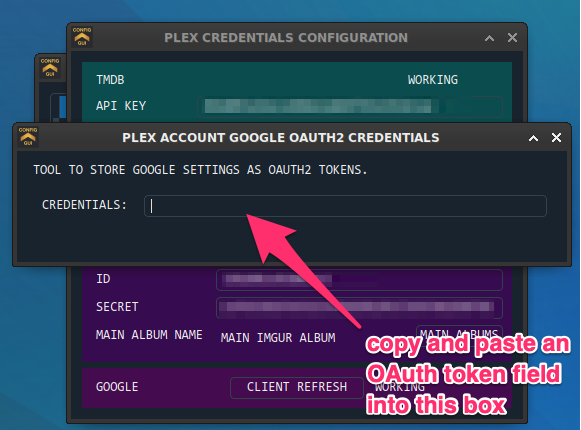
Also, a new dialog widget will open asking you to put in an OAuth2 token string once you have given permission. Here is the second screen shot.
In step 3, when you choose a Google account, currently you will be redirected to a scary browser page that says “this app isn’t verified”. It isn’t, but the services still work. If you use Google Chrome or derived browser, click on the Show Advanced toggling link. Then click on Go to Project Default Service Account (unsafe) to go forward. Here is a screen shot.
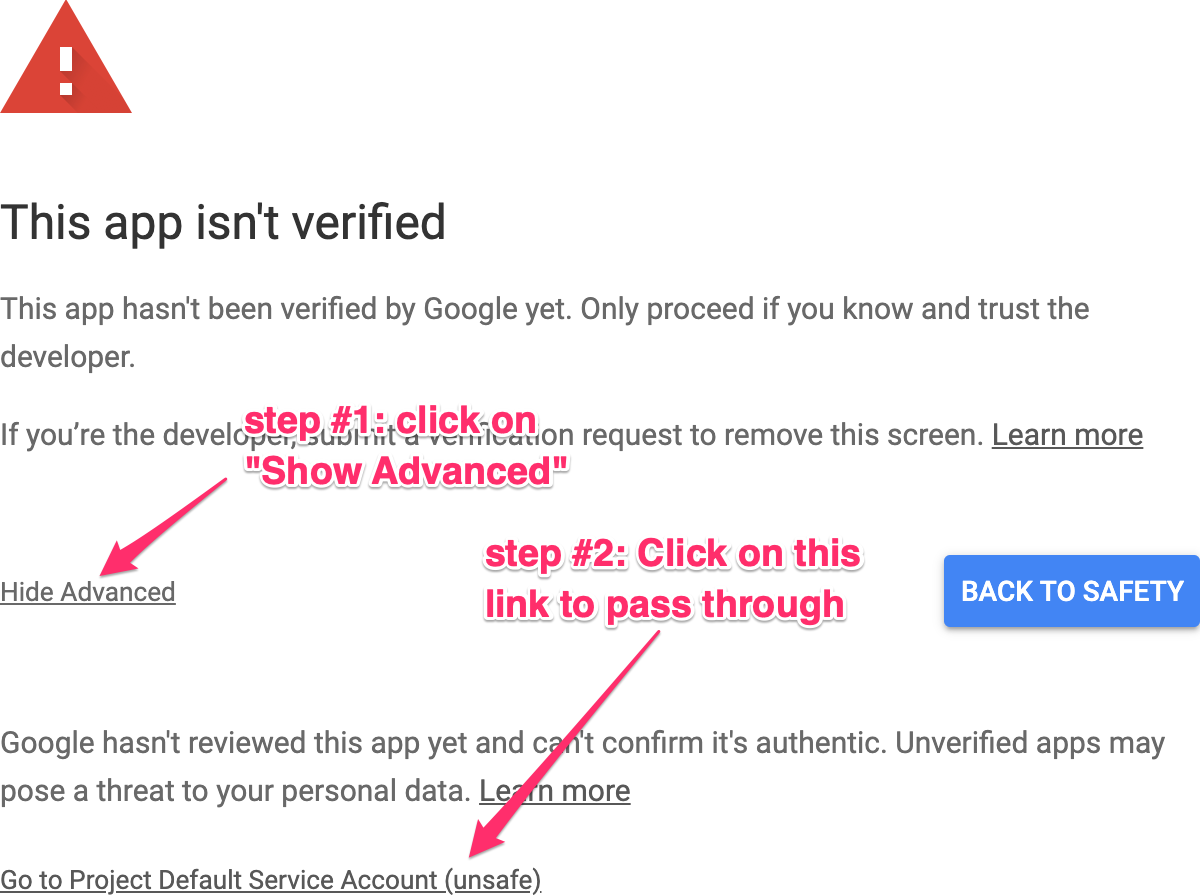
Fig. 2.13 The very scary screen that Google spits out, saying your app is not verified.
Howdy asks for six different Google authorizations. Click on the Allow button.
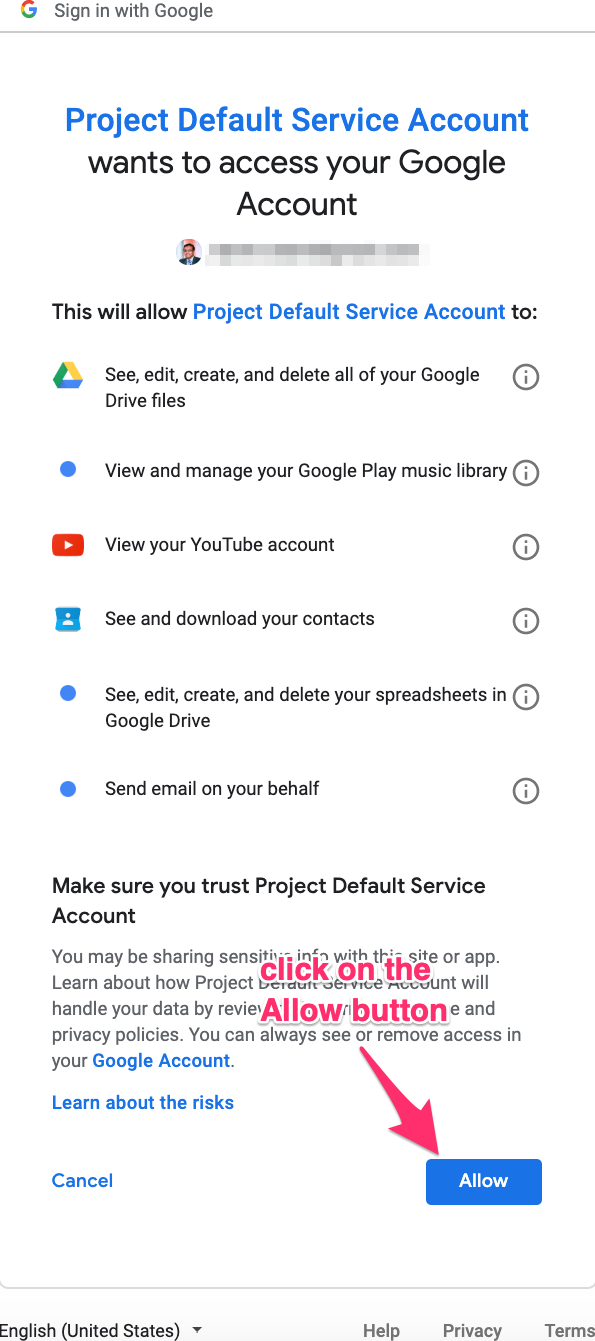
Fig. 2.14 Allow Howdy to access these six Google APIs through your Google account.
The final browser window shows a text box with the OAuth2 token string. Copy that string into the GUI dialog widget in step 4, and press return on the text box in that widget.
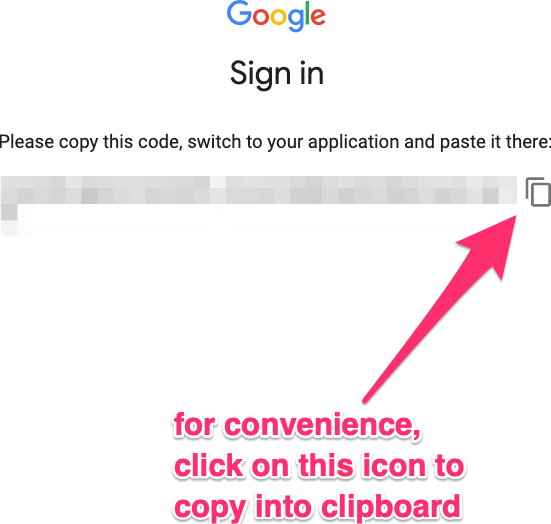
Fig. 2.15 Copy this string into the GUI dialog widget in step 4.
If all goes well, then you will have authorized all the Google services needed by Howdy.