1. Core Functionality
This consists of the main functionality of IVE_TANIM.
1.1. autoCropImage
autoCropImage automatically crops image (PNG, JPEG, TIFF, etc.) and PDF files to remove whitespace. The default whitespace color is white. The help screen for this command line tool is here,
usage: autoCropImage [-h] --input INPUT [--output OUTPUT] [--color COLOR] [--trans] [--newwidth NEWWIDTH] [--show]

optional arguments:
  -h, --help           show this help message and exit
  --input INPUT        Name of the input file.
  --output OUTPUT      Name of the output file. Optional.
  --color COLOR        Name of the color over which to autocrop. Default is white.
  --trans              If chosen, also remove the transparency wrapping around the image. Works only for non-PDF images.
  --newwidth NEWWIDTH  New width of the image.
  --show               If chosen, then show the final image after cropped.
In the two examples shown here, I use only white (default) background. The first example, Fig. 1.1 demonstrates how this tool autocrops a PNG image file.

Fig. 1.1 On the left (with dark black borders) is the uncropped file, iwanttobelieve_uncropped.png, and on the right is the cropped-without-any-whitespace (with dark black borders) file, iwanttobelieve_cropped.png.
You can generate iwanttobelieve_cropped.png from iwanttobelieve_uncropped.png by running,
autoCropImage --input=iwanttobelieve_uncropped.png --output=iwanttobelieve_cropped.png
The second example, Fig. 1.2 demonstrates how this tool autocrops a PDF image file.
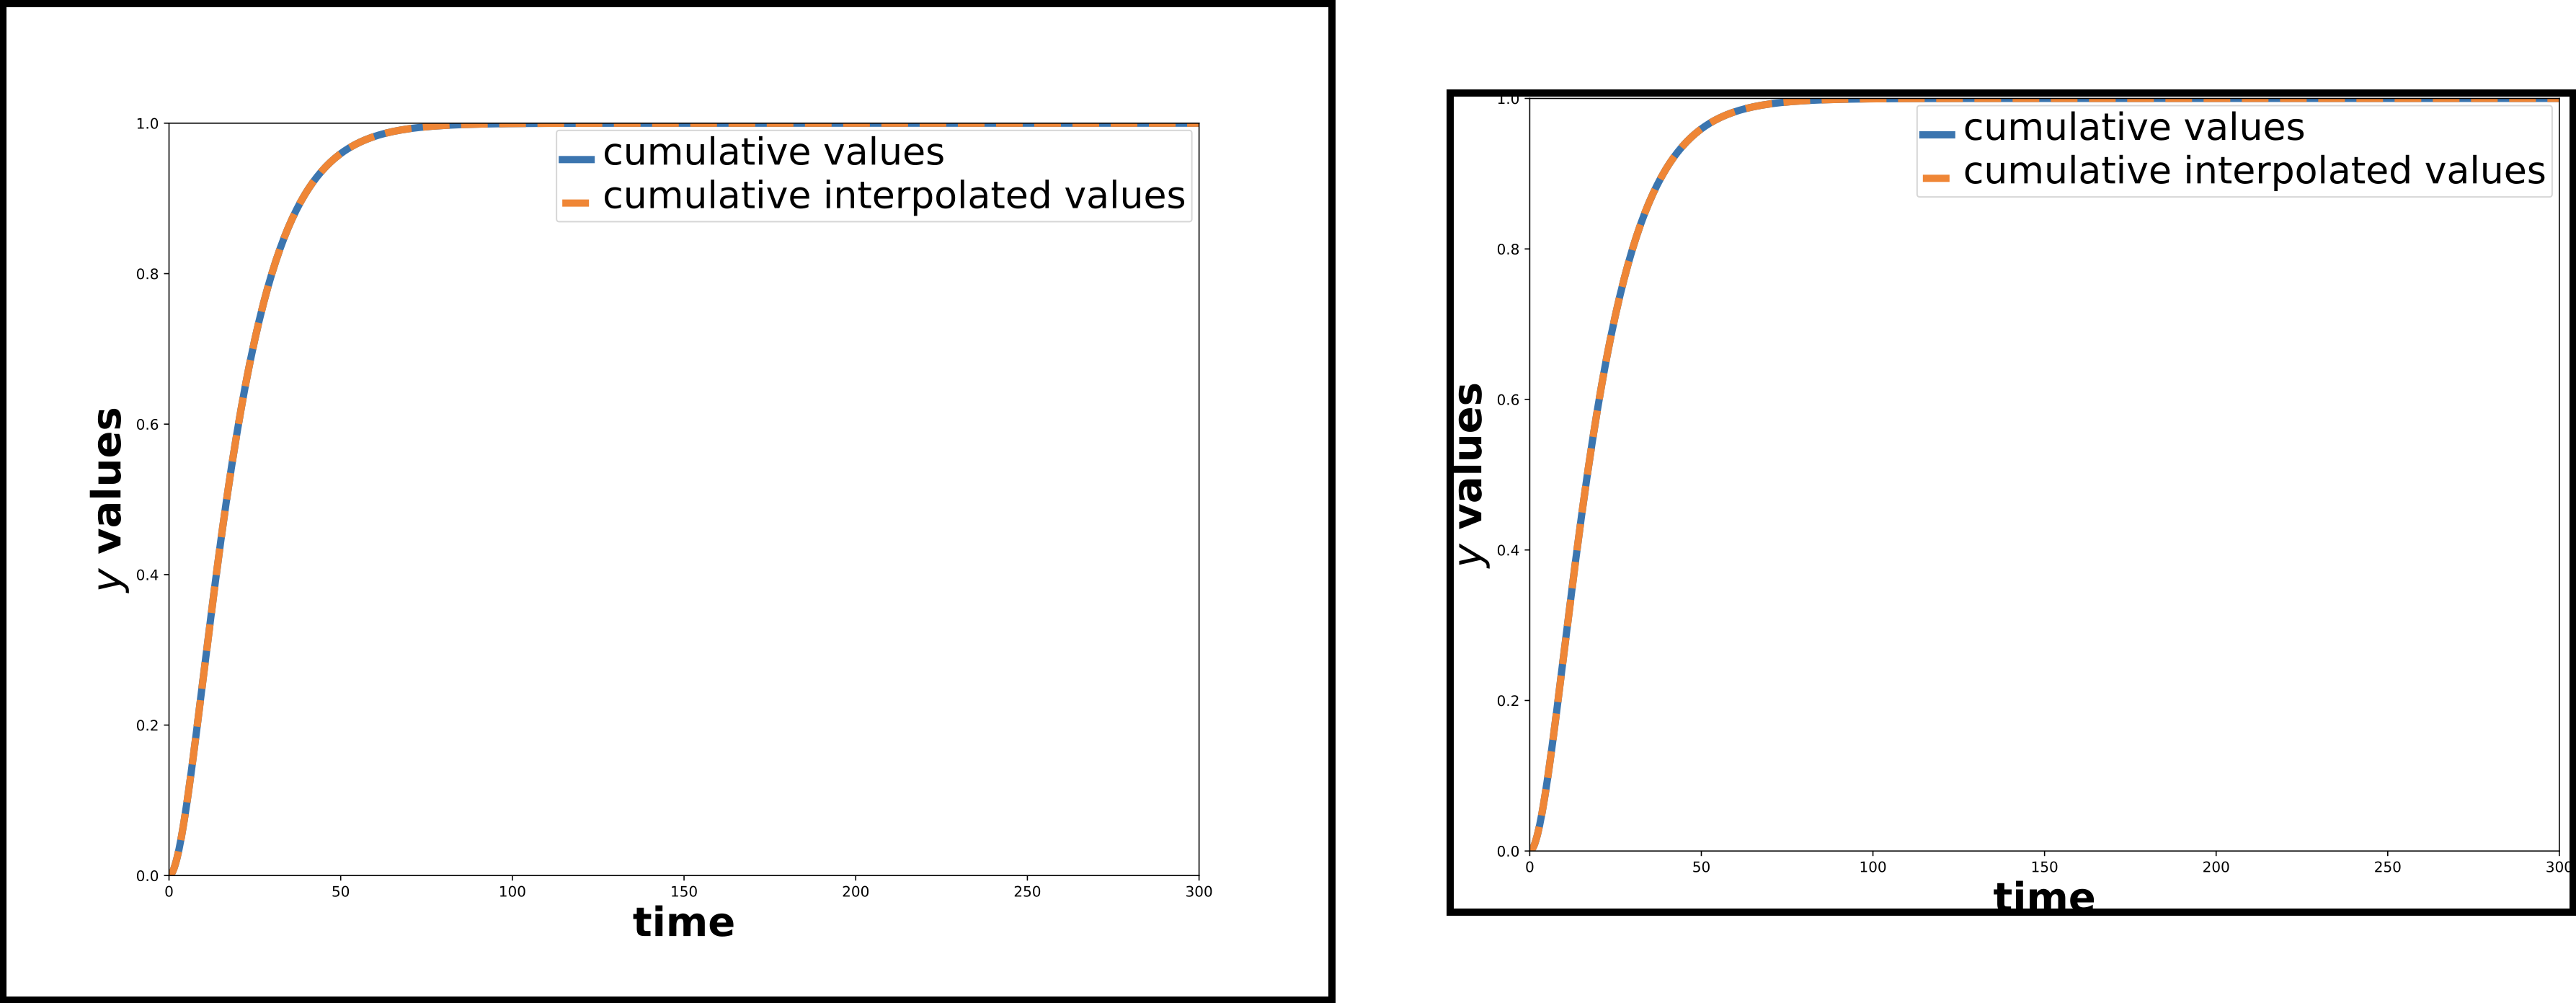
Fig. 1.2 On the left (with dark black borders) is the uncropped file, cumulative_plot_emission_uncropped.pdf, and on the right is the cropped-without-any-whitespace (with dark black borders) file, cumulative_plot_emission_cropped.pdf.
You can generate cumulative_plot_emission_cropped.pdf from cumulative_plot_emission_uncropped.pdf by running,
autoCropImage --input=cumulative_plot_emission_uncropped.pdf --output=cumulative_plot_emission_cropped.pdf
1.2. convertImage
convertImage does three things, as seen when running convertImage -h.
usage: convertImage [-h] [--noverify] [--info] {movie,aspected,fromimages} ...

Now does five different things, where only "image" operates on image files!

positional arguments:
  {movie,aspected,fromimages}
                        Choose whether to convert a video or an image
    movie               If chosen, convert an MP4 into an animated GIF.
    aspected            If chosen, create an aspected MP4 file from an input MP4 file.
    fromimages          If chosen, then convert a sequence of PNG/JPEG/TIF images into an MP4 file.

optional arguments:
  -h, --help            show this help message and exit
  --noverify            If chosen, do not verify the SSL connection.
  --info                If chosen, then print out INFO level logging.
There are two optional top-level flags.
--infoprints outINFOlevelloggingoutput.--noverifyignores verification of SSL transactions. It is optional and defaults toFalse.
convertImage fromimages creates an MP4 file from a sequence of PNG as frames. convertImage movie creates an animated GIF file from an MP4 file. Finally, convertImage aspected creates an aspected MP4 file from an input MP4 file.
convertImage movie, and convertImage fromimages use FFmpeg underneath the hood, using a subprocess.check_output that implements this tutorial on high quality movie to animated GIF conversion.
Note
A recent Medium article describes two ways to produce similarly high quality animated GIF files.
1.2.1. convertImage movie
convertImage movie converts an MP4 file into an animated GIF. Its help screen, when running convertImage movie -h, is,
usage: convertImage movie [-h] -f filename [-s scale] [-d PARSER_MOVIE_DIRNAME]

optional arguments:
  -h, --help            show this help message and exit
  -f filename, --filename filename
                        Name of the input video (MP4) file.
  -s scale, --scale scale
                        Multiply the width and height of the input MP4 file into the output GIF. Default is 1.0 (GIF file has same dimensions as input MP4 file).
                        Must be greater than 0.
  -d PARSER_MOVIE_DIRNAME, --dirname PARSER_MOVIE_DIRNAME
                        Optional argument. If defined, the directory into which to store the file.
The required flag is -f or --filename, to specify the input MP4 file. There are two optional flags.
-sor--scaleresizes the width and height of the input MP4 file by some factor. Its default is 1.0, and it must be greater than zero.-dor--dirnamespecifies the directory into which to store the output animated GIF. By default, it is the same directory as the MP4 file.
For example, when we run convertImage movie on covid19_conus_LATEST.mp4 (2.6 MB in size) with a scale factor of 0.5 with this command,
convertImage movie -f covid19_conus_LATEST.mp4 -s 0.5
Then we get this animated GIF in Fig. 1.3 (13M in size).
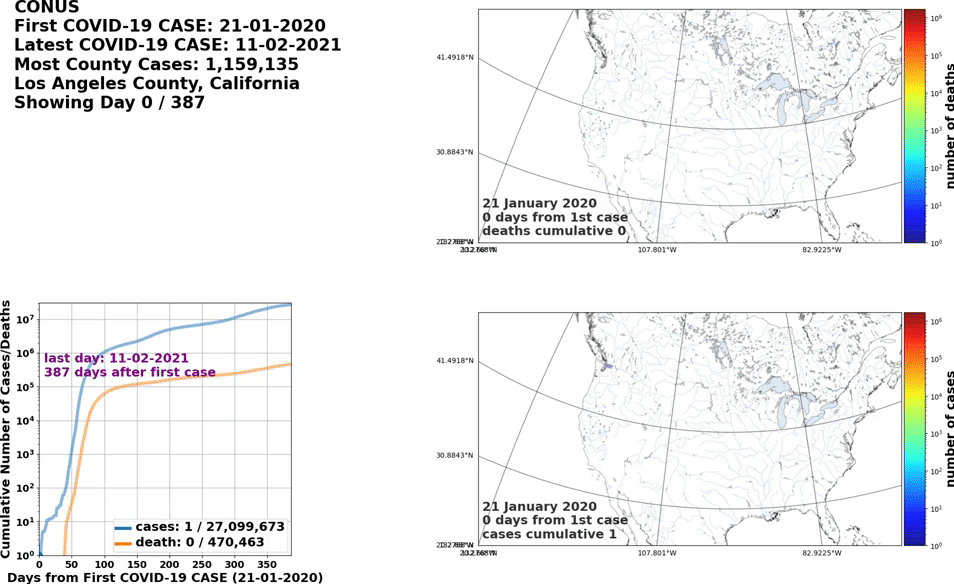
Fig. 1.3 The animated GIF of COVID-19 cumulative cases and deaths in the CONUS, as of 11 February 2021: nearly 27.1 million cases, and over 470k deaths.
1.2.2. convertImage aspected
convertImage aspected symmetrically letterboxes a non-square input MP4 file, so that the output MP4 file is either square, or 9/16 aspect ratio (9 width units and 16 height units), or 16/9 aspect ratio (16 width units and 9 height units). This letterboxing color can be either black or white. If the input MP4 file’s width is greater than the aspect ratio times height, the output MP4 file will have equal width padding on the top and bottom to get the correct aspect ratio. If the input MP4 file’s width is smaller than the aspect ratio times height, the output MP4 file will have equal width padding on the left and right to get the correct aspect ratio.
Its help screen, when running convertImage aspected -h, is,
usage: convertImage aspected [-h] -f filename -o OUTPUTFILENAME [-a {square,916,169}] [-b]

optional arguments:
  -h, --help            show this help message and exit
  -f filename, --filename filename
                        Name of the input video (MP4) file.
  -o OUTPUTFILENAME, --output OUTPUTFILENAME
                        Name of the output MP4 video that will be square.
  -a {square,916,169}, --aspect {square,916,169}
                        The aspect ratio to choose for the final video. Can be one of three: "square" is 1:1, "916" is 9/16 (width 9 units, height 16 units), and
                        "169" is 16/9 (width 16 units, height 9 units). Default is "square".
  -b, --black           If chosen, then pad the sides OR the top and bottom with BLACK instead of WHITE. Default is to do WHITE.
-f or --filename specifies the input MP4 file. -o or --output specifies the output file name.
The aspect ratio is specified with the -a or --aspect flag. It can be either square (equal width and height), 916 (final width is 9/16 of height), or 169 (final width is 16/9 of height). The default aspect ratio is square.
The letterboxing color is by default white. However, the -b or --black flag sets the letterboxing color to be black.
Here are two examples, for the default square aspect ratio and white letterboxing.
For an MP4 file wider than it is high, this command,
convertImage aspected -f covid19_conus_LATEST.mp4 -o covid19_conus_LATEST_square.mp4Converts
covid19_conus_LATEST.mp4intocovid19_conus_LATEST_square.mp4, which has black letterboxes on its top and bottom.For an MP4 file higher than it is wide, this command,
convertImage aspected -f covid19_california_LATEST.mp4 -o covid19_california_LATEST_square.mp4Converts
covid19_california_LATEST.mp4intocovid19_california_LATEST_square.mp4, which has black letterboxes on its left and right.
1.2.3. convertImage fromimages
convertImage fromimages creates an MP4 movie file from a collection of image files as frames. Say the files live in a directory dirname, the prefix of the image files is PREFIX, and the suffix of the image files is png so that the PNG images are named, say, PREFIX0000.png sequentially to PREFIX0401.png. This command will create an MP4 file, named PREFIX.mp4, in dirname.
Its help screen, when running convertImage fromimages -h, is,
usage: convertImage fromimages [-h] [-d dirname] -p prefix [-s suffix] [-f fps] [--autocrop]

optional arguments:
  -h, --help            show this help message and exit
  -d dirname, --dirname dirname
                        The name of the directory to look for a sequence of PNG/JPEG/TIF images. Default is <CURRENT_DIRECTORY>.
  -p prefix, --prefix prefix
                        The prefix of PNG/JPEG/TIF files through which to go.
  -s suffix, --imagesuffix suffix
                        The suffix of the image files. Default is png.
  -f fps, --fps fps     The number of frames per second in the MP4 file. Default is 5.
  --autocrop            If chosen, then perform an autocrop, and then (where necessary) resize each image so that their widths and heights are multiples of 2.
Here are the command line arguments.
-dor--dirnamespecifies the directory where the image files live. By default it is the current working directory.-por--prefixis the prefix to the collection of image files as frames.-sor--imagesuffixis the suffix of the image files. By default it ispng, but could be anything that ffmpeg can read.-for--fpsis the frames per second for the output MP4 file. The default is 5, but it must be \(\ge 1\).--autocropspecifies whether you want to automatically crop out white space from the image files.
<CURRENT_DIRECTORY> refers to the current working directory in which convertImage fromImages has been launched.
1.3. myrst2html
myrst2html acts almost like rst2html. In default mode, it uses math.css for LaTeX math formulae. However, one can also specify it to use MathJax with the correct CDN, which in this case is https://cdn.mathjax.org/mathjax/latest/MathJax.js?config=TeX-AMS-MML_HTMLorMML. I borrow shamelessly from this GitHub gist with some slight modifications.
Its help screen, when running myrst2html -h, is,
usage: myrst2html [-h] -i INPUTFILE [-M]

options:
  -h, --help            show this help message and exit
  -i INPUTFILE, --input INPUTFILE
                        Name of the input RST file. Required argument.
  -M, --mathjax         If chosen, then use the MathJAX JS CDN to display LaTeX formulae. Default is turned off.
This generates the HTML file, filename.html, from the RST markup file, filename.rst, but now with MathJax if you run with -M or --mathjax.
1.4. simple_email_config
I gave birth to a new CLI, simple_email_config, to simplify sending (use much-much-much-fewer typing characters and smaller chances of fat-fingeritis) technical emails with simple_email. Here one can set default identity for sending email; set the default SMTP server; and add or remove email aliases. Likewise, one can do the following: show the default identity for sending email; show the default SMTP server and port; and show the list of email aliases with and without the full email address (showing just the list of ordered email aliases).
An email alias is a lower-case non-spaced string that identifies an email address or an RFC 5322 full email address. For example, I have identified the alias tanimg with the full email address, Tanim Islam <tanim.islam@gmail.com>.
The full help command demonstrating all the commands by running, simple_email_config -h.
positional arguments:
  {show_aliases,show_me,show_smtp,add_alias,remove_aliases,set_me,set_smtp}
                        Choose one of these six options (stuff before the first colon): show_aliases: show the list of email aliases I have. show_me: show whether I have a default sender (me). If so, then show sender's default email identity.
                        show_smtp: show the settings for the SMTP server I have identified. add_alias: add an email alias. remove_aliases: remove email aliases. set_me: set up the default sender's identity. set_smtp: set up the default SMTP server.
    show_aliases        If chosen, show the list of email aliases I have.
    show_me             show whether I have a default sender (me). If so, then show sender's default email identity.
    show_smtp           show the settings for the SMTP server I have identified.
    add_alias           add an email alias.
    remove_aliases      remove email aliases.
    set_me              set up the default sender's identity.
    set_smtp            set up the default SMTP server.

optional arguments:
  -h, --help            show this help message and exit
  --info                If chosen, then print out INFO level logging statements.
As of 4 MARCH 2023, 7 choices. Subsequent functionalities are in separate subsections under simple_email_config.
1.4.1. simple_email_config show_me and set_me
You set the default sender information by running simple_email_config set_me. Its help screen is simple_email_config set_me -h,
usage: simple_email_config set_me [-h] -e PARSER_SETME_EMAIL

optional arguments:
  -h, --help            show this help message and exit
  -e PARSER_SETME_EMAIL, --email PARSER_SETME_EMAIL
                        The RFC 5322 email format of the sender.
So for example, running simple_email_config set_me -e "Tanim Islam <tanim.islam@gmail.com>" sets the default RFC 5322 email to Tanim Islam <tanim.islam@gmail.com>.
You show the default sender information by running simple_email_config show_me. In the example below,
$ simple_email_config show_me
DEFAULT EMAIL ADDRESS: Tanim Islam <tanim.islam@gmail.com>.
And that’s it!
1.4.2. simple_email_config set_smtp and show_smtp
You set the default SMTP server information by running simple_email_config set_smtp. Its help screen, simple_email_config set_smtp -h is,
usage: simple_email_config set_smtp [-h] -S SMTP_SERVER -p SMTP_PORT

optional arguments:
  -h, --help            show this help message and exit
  -S SMTP_SERVER, --server SMTP_SERVER
                        The name of the default SMTP server.
  -p SMTP_PORT, --port SMTP_PORT
                        The port number of the default SMTP server.
I go through each command line argument like so.
-Sor--serverspecifies the required address or name of the default SMTP server. A common default choice islocalhost.-por-portspecifies the required port number of the default SMTP server. A common default choice is 25.
You can then show the default SMTP server information by running simple_email_config show_smtp. In the example below,
$ simple_email_config show_smtp
DEFAULT SMTP SERVER: localhost.
DEFAULT SMTP PORT: 25.
And that’s it!
1.4.3. simple_email_config show_aliases, add_alias, remove_aliases
An enhancement to simple_email is that one can also specify TO/CC/BCC recipients with aliases in addition to their email addresses or full RFC 5322 email addresses. I use anonymized examples from aliases that I (Tanim Islam) have set up as of 5 MARCH 2023.
You can show email aliases by running
simple_email_config show_aliases. Its help screen issimple_email_config add_aliases -h,usage: simple_email_config show_aliases [-h] [-H] optional arguments: -h, --help show this help message and exit -H, --hidealiases If chosen, then HIDE the email addresses when showing the list of aliases. Default is to SHOW.
The
-Hor--hidealiasesflag is useful to demonstrate the list of email aaliases that you have, because it hides the email or RFC 5322 email address for each alias. For example, for me (Tanim Islam$ simple_email_config show_aliases -H FOUND 14 EMAIL ALIASES ALIAS ------------ bcohan chrismay cschroder drflask dstrozzi dstrozzig marinak mehulp tanimg tanimv tanimw tbailey tipton woodyh_sacpy
This displays the email aliases in alphabetical order.
You can add an email alias by running
simple_email_config add_alias. Its help screen issimple_email_config add_alias -h,usage: simple_email_config add_alias [-h] -a ALIAS -e EMAIL optional arguments: -h, --help show this help message and exit -a ALIAS, --alias ALIAS Name of the alias to use for an emailer. -e EMAIL, --email EMAIL The RFC 5322 email format of the emailer.
I go through each command line argument like so.
-aor--aliasspecifies the required email alias, which is a no-spaces string. Any string that has uppercase characters will be lowercased.-eor--emailspecifies the required email address or RFC 5322 email address for that email alias.
For example, let’s look at the anonymized email aliases before adding the alias
tanimg.FOUND 13 EMAIL ALIASES ALIAS ------------ bcohan chrismay cschroder drflask dstrozzi dstrozzig marinak mehulp tanimv tanimw tbailey tipton woodyh_sacpy
Next, let us add an email alias
tanimgforTanim Islam <tanim.islam@gmail.com>with this command,$ simple_email_config add_alias -a tanimg -e "Tanim Islam <tanim.islam@gmail.com>" SUCCESSFULLY ADDED ALIAS = tanimg, EMAIL = Tanim Islam <tanim.islam@gmail.com>.
Finally, look at the anonymized email aliases after adding this alias.
 1FOUND 14 EMAIL ALIASES
 2
 3ALIAS
 4------------
 5bcohan
 6chrismay
 7cschroder
 8drflask
 9dstrozzi
10dstrozzig
11marinak
12mehulp
13tanimg
14tanimv
15tanimw
16tbailey
17tipton
18woodyh_sacpy
Notice
tanimgin line 13.You can remove email aliases by running
simple_email_config remove_aliases. Its help screen issimple_email_config remove_aliases -h,usage: simple_email_config remove_aliases [-h] [-r [ALIAS ...]] optional arguments: -h, --help show this help message and exit -r [ALIAS ...], --removealias [ALIAS ...] The set of aliases to REMOVE.
You can specify multiple email aliases to remove. Example with removing
tanimgfollows.First, look at the set of anonymized email aliases that also contain and emphasize
tanimg.1FOUND 14 EMAIL ALIASES 2 3ALIAS 4------------ 5bcohan 6chrismay 7cschroder 8drflask 9dstrozzi 10dstrozzig 11marinak 12mehulp 13tanimg 14tanimv 15tanimw 16tbailey 17tipton 18woodyh_sacpy
Run this command to remove the email alias
tanimg.$ simple_email_config remove_aliases -r tanimg set of aliases to remove: ['tanimg'].
Finally, check that
tanimgis no longer of the email aliases.1FOUND 13 EMAIL ALIASES 2 3ALIAS 4------------ 5bcohan 6chrismay 7cschroder 8drflask 9dstrozzi 10dstrozzig 11marinak 12mehulp 13tanimv 14tanimw 15tbailey 16tipton 17woodyh_sacpy
And that’s it.
1.5. simple_email
simple_email is the simplest SMTP based email sender I could make! One specifies the reStructuredText file; (optional) attachments; sender; TO recipients; (optionally) CC and BCC recipients; and (optional) details of the SMTP server. Its help screen is simple_email -h,
usage: simple_email [-h] -f EMAILFILE [-s SUBJECT] [-F SENDER] -T [TO ...] [-C [CC ...]] [-B [BCC ...]] [-A [ATTACH ...]] [-p SMTPPORT] [-S SMTPSERVER] [-I]

optional arguments:
  -h, --help            show this help message and exit
  -f EMAILFILE, --emailfile EMAILFILE
                        Name of the restructuredtext email file to convert into HTML, THEN email out.
  -s SUBJECT, --subject SUBJECT
                        Email subject. Default is "test subject".
  -F SENDER, --from SENDER
                        Email and/or name of the sender. Use RFC 5322 email format. Default is "Tanim Islam <tanim.islam@gmail.com>".
  -T [TO ...], --to [TO ...]
                        List of email and/or names of the recipients. Use RFC 5322 email format OR email alias.
  -C [CC ...], --cc [CC ...]
                        List of CC email and/or names. Use RFC 5322 email format OR email alias.
  -B [BCC ...], --bcc [BCC ...]
                        List of BCC email and/or names. Use RFC 5322 email format OR email alias.
  -A [ATTACH ...], --attach [ATTACH ...]
                        List of files to attach to this email.
  -p SMTPPORT, --smtpport SMTPPORT
                        The port number for the SMTP server to send the SMTP email. Default is 25.
  -S SMTPSERVER, --smtpserver SMTPSERVER
                        The name of the SMTP server to send the SMTP email. Default is 'localhost'.
  -I, --info            If chosen, then do INFO logging.
I go through each command line argument like so. -I or --info turns on INFO logging, which is right now extremely useful to figure out what happened to your email if something went wrong!
-foremailfilesspecifies the reStructuredText file, which has the same structure as I describe in the myrst2html description.Email stuff consists of the following:
-sor--subjectspecifies the non-default email subject. Default istest subject.-For-fromspecifies the sender. This is in the format of email address only, such astanim.islam@gmail.com, or in the standard email-with-name format, such asTanim Islam <tanim.islam@gmail.com>. If not specified, this uses the default sender address defined or shown in Section 1.4.1.-Tor--tospecifies the list of recipients (can be multiple ones). This is in the format of email address only, in the standard email-with-name format (RFC 5322), or as an email alias.-Cor-ccoptionally specifies the list of CC recipients (can be multiple ones). This is in the format of email address only, or in the standard email-with-name format (RFC 5322), or as an email alias.-Bor--bccoptionally specifies the list of BCC recipients (can be multiple ones). This is in the format of email address only, or in the standard email-with-name format (RFC 5322), or as an email alias.Note
simple_emailimplements an implicit BCC add of the sender email address, so that the sender (likeTanim Islam <tanim.islam@gmail.com>) also receives an email showing that they have sent this email to the TO/CC/BCC recipients.-Aor--attachoptionally specifies the list of files to attach to this email.
SMTP server stuff consists of the following:
-por--smtpportspecifies the port to use for SMTP email sending. Default is whatever is the default SMTP port set or shown in Section 1.4.2.-Sor--smtpserverspecifies the name of the SMTP server. Default is Default is whatever is the default SMTP server set or shown in Section 1.4.2.
To help myself and others, I have the following elements needed to send a demonstration email.
The email file,
demo_email.rst, whose source I have included below,1Hello World! 2 3This is a test email where I demonstrate using |rst| to write out rich emails. I also use |inline_images| to move the figures from remote links to embedded within the HTML. 4 5|rst| is another markup language, used to create HTML documents in a pretty structured way rather than going down to the low level HTML + CSS + JavaScript. 6 7So here's some example stuff, inline math here, like :math:`5x + 4y^2 - 3z = 0`. Some math delimited into its own blocks like here, 8 9.. math:: 10 11 \frac{\partial^2\phi}{\partial x^2} + \frac{\partial^2\phi}{\partial y^2} + \frac{\partial^2\phi}{\partial z^2} + \frac{\omega^2}{c^2}\phi = 0. 12 13And some other crap, like putting in images inline into here. 14 15.. list-table:: here's a table of two images 16 :widths: auto 17 18 * - |iwanttobelieve_uncropped_cropped_local| 19 - |turn_cartoon_local| 20 * - Here's the demonstration image of autoCropImage_. 21 - Here's my philosophy on driving shown here_. 22 23And here we have an animated GIF_ of the *latest* (as of ``5 DECEMBER 2022``) 7-day rolling average of COVID-19 cases and deaths in the CONUS_. 24 25.. list-table:: table showing an animated GIF 26 :widths: auto 27 28 * - |covid19_7day_conus_LATEST_CLIPPED| 29 * - ``5 DECEMBER 2022`` 7-day rolling average of COVID-19 cases and deaths in the CONUS_. We create this animated GIF_ using `convertImage movie <https://tanimislam.github.io/iv_tanim/core_functionality.html#convertimage-movie>`_. Produces something that is 4.0 MB in size. 30 31I generated the above image by following these steps. The final image filename is ``covid19_7day_conus_LATEST_CLIPPED.gif``. I needed `wget <https://www.gnu.org/software/wget/>`_, `ffmpeg <https://ffmpeg.org/>`_, and of course `convertImage movie <https://tanimislam.github.io/iv_tanim/core_functionality.html#convertimage-movie>`_. 32 33.. code-block:: console 34 35 wget -c "https://tanimislam.sfo3.digitaloceanspaces.com/covid19movies/covid19_7day_conus_LATEST.mp4" 36 37 ffmpeg -ss 00:03:00 -i covid19_7day_conus_LATEST.mp4 -codec copy covid19_7day_conus_LATEST_CLIPPED.mp4 38 39 convertImage movie -f covid19_7day_conus_LATEST_CLIPPED.mp4 -s 0.5 40 41Now here's some stupid code blocks, some Python code in fact that I have here. 42 43.. code-block:: python 44 45 def _create_image_base64( img_path ): 46 assert( os.path.exists( img_path ) ) 47 with Image.open( img_path ) as img, BytesIO( ) as buffered: 48 img.save( buffered, format = img.format ) 49 img_str = base64.b64encode( buffered.getvalue()).decode('utf8') 50 return img_str 51 52And here is some other code, this time another code block, this time |rst|. 53 54.. code-block:: restructuredtext 55 56 .. |rst| replace:: `RestructuredText`_ 57 .. _`RestructuredText`: https://en.wikipedia.org/wiki/ReStructuredText 58 59Hope this was useful! 60 61Tanim 62 63.. note:: 64 65 This is based off an older demonstration email I sent out to PyRVA_ on 2022-03-09 and to SacPy_ on 2022-04-07. 66 67 I have also attached this |rst| file, ``sacpy_demo_email_20221121.rst``, to this email. 68 69.. |rst| replace:: `RestructuredText`_ 70.. _`RestructuredText`: https://en.wikipedia.org/wiki/ReStructuredText 71 72.. |inline_images| replace:: ``inline_images`` 73 74.. _autoCropImage: https://tanimislam.github.io/iv_tanim/core_functionality.html#autocropimage 75.. _here: https://tanimislam.github.io/nprstuff/driving.html#my-philosopy-on-driving 76 77.. |iwanttobelieve_uncropped_cropped| image:: https://tanimislam.github.io/iv_tanim/_images/cumulative_plot_emission_uncropped_cropped.png 78 :width: 50% 79 :align: middle 80 81.. |turn_cartoon| image:: https://tanimislam.gitlab.io/blog/2020/09/driving/turn_cartoon.png 82 :width: 100% 83 :align: middle 84 85.. |iwanttobelieve_uncropped_cropped_local| image:: iwanttobelieve_uncropped_cropped.png 86 :width: 100% 87 :align: middle 88 89.. |turn_cartoon_local| image:: turn_cartoon.png 90 :width: 100% 91 :align: middle 92 93.. |covid19_7day_conus_LATEST_CLIPPED| image:: covid19_7day_conus_LATEST_CLIPPED.gif 94 :width: 100% 95 :align: middle 96 97.. _MP4: https://en.wikipedia.org/wiki/MPEG-4_Part_14 98 99.. _`this blog page`: https://tanimislam.gitlab.io/blog/2020-year-in-review.html 100 101.. _PyRVA: http://www.pyrva.org 102 103.. _SacPy: http://sacpy.org 104 105.. |quaker_mp4| raw:: html 106 107 <video controls width="100%"> 108 <source src="https://tanimislam.sfo3.digitaloceanspaces.com/blog/2020/12/Quaker_2020_WTF.mp4"> 109 </video> 110 111.. _CONUS: https://en.wikipedia.org/wiki/Contiguous_United_States 112.. _GIF: https://en.wikipedia.org/wiki/GIF
The three images files:
covid19_7day_conus_LATEST_CLIPPED.gif,iwanttobelieve_uncropped_cropped.png, andturn_cartoon.png.
Example of simple_email functionality is mocked up below. I assume your SMTP server is localhost and it operates off port 25.
simple_email -f demo_email.rst -F <email_sender> -T <email_recip_1> <email_recip_2> \
  -C <cc_recip_1> <email_recip_2> -B <bcc_recip_1> <bcc_recip_2> \
  -A demo_email.rst
If everything email-wise and SMTP wise goes right, then your TO and CC and BCC recipients should receive the email with attachment.